Airfix 1/72 F-104G Starfighter

Military or civil, triplanes, biplanes or monoplanes, props, jets or helicopters...models in here.
User avatar
BWP
Got in under the wire
Posts: 778
Joined: April 28th, 2011, 2:23 am
Location: Melbourne, Australia
Contact:

Airfix 1/72 F-104G Starfighter

Post by BWP »

My next project, determined by a complicated selection process (I more or less picked it randomly from the stash) is this 1960's piece of old cheese.

Image

Image

Image

Image

Image

Image

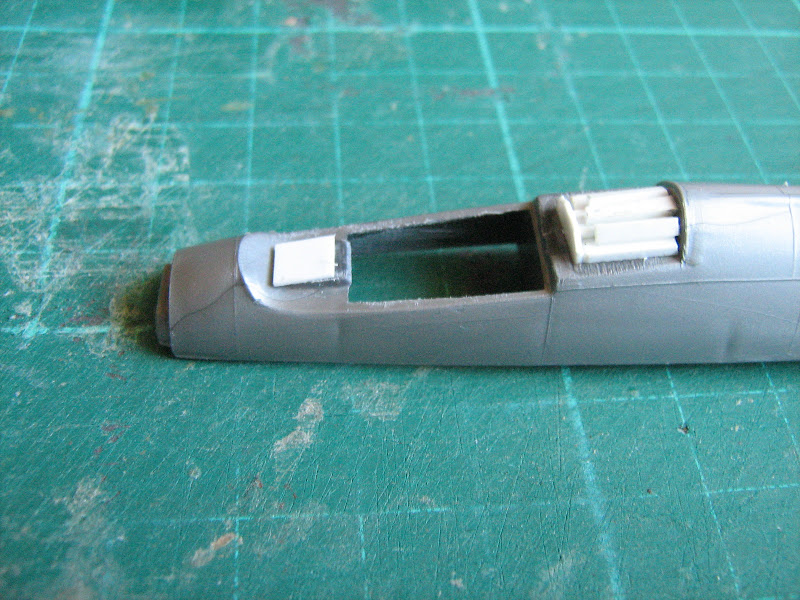
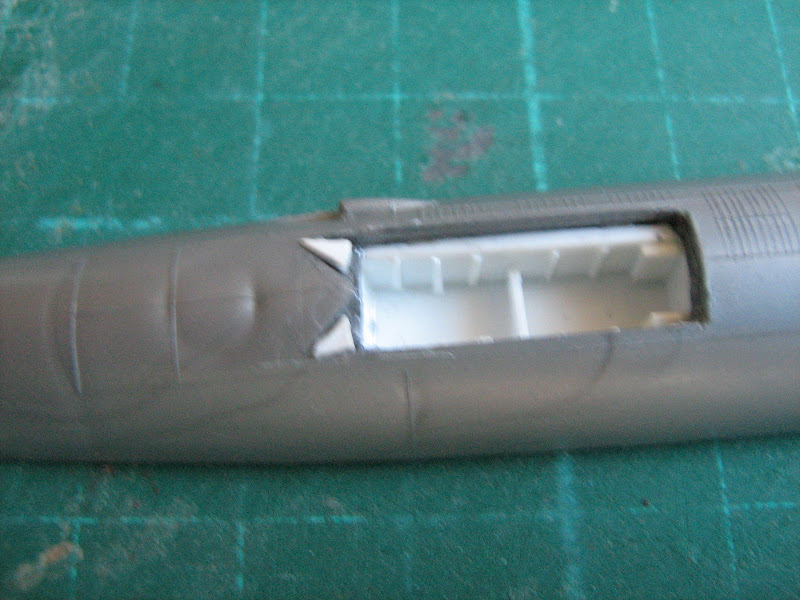
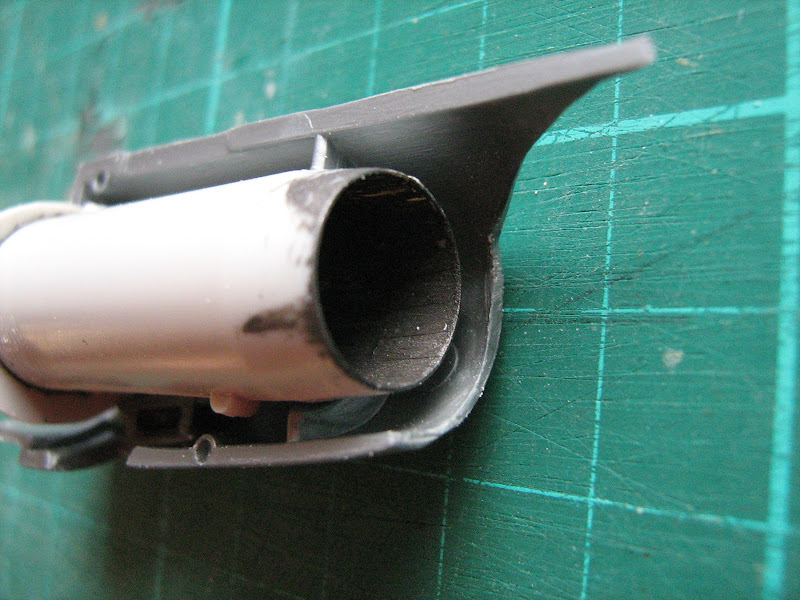
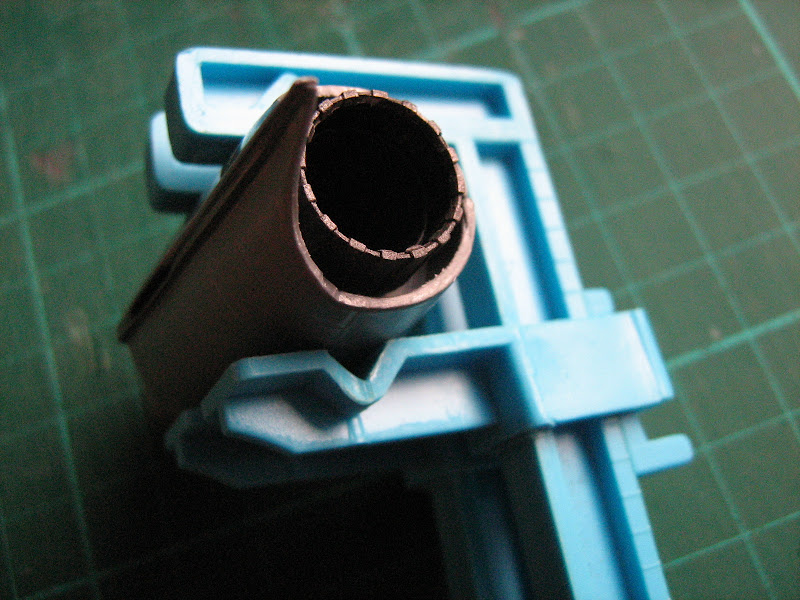
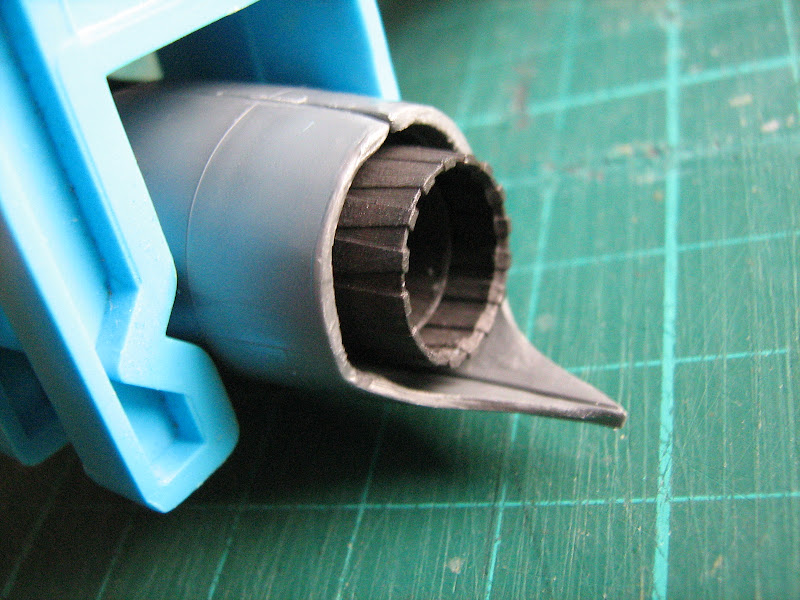
This will not be an out-of-the-box build. I have a small collection of F-104 kits and accessories and I want to make the most of them. First order of business is to replace the far-too-shallow exhaust pipe, using the parts from the (simply excellent '90s tool) Hasegawa F-104G/S kit. These parts are available because when I build that kit it will be built as an F-104S, and I have a Quickboost resin replacement exhaust for that.

Image

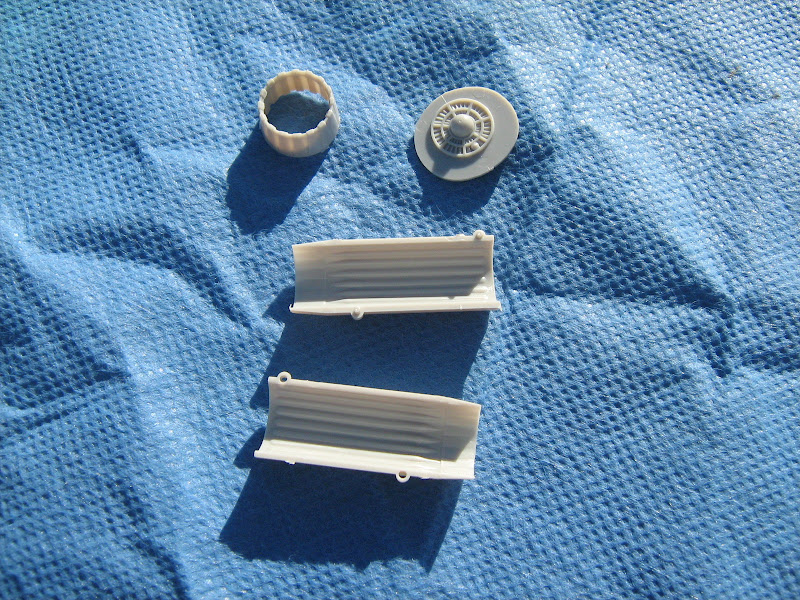
Interestingly, based on some dry-fitting tests, these parts will fit into the Airfix kit with only a minimal amount of adjustment. Bonus! I think the Hasegawa kits are the only F-104 kits that provide a full-length exhaust pipe; all the others do much as Airfix did.

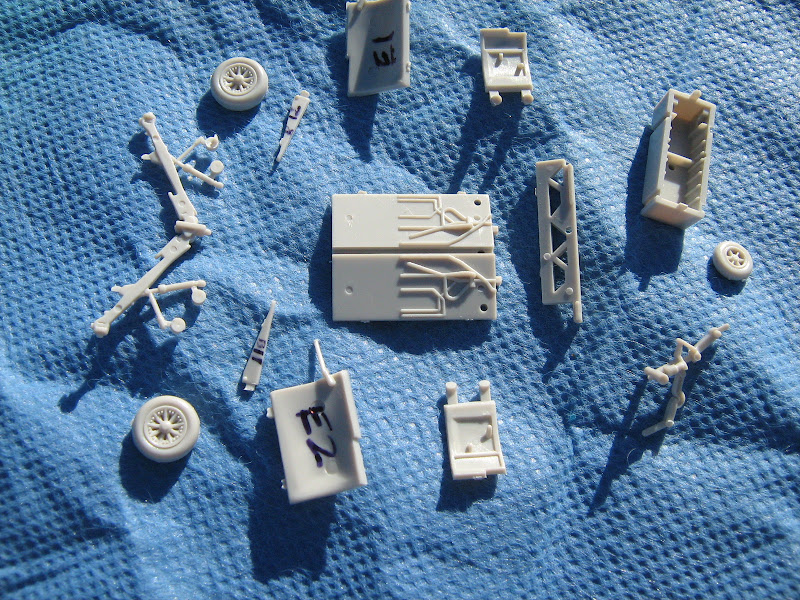
I am going to have to scratch-build the cockpit, which I don't think will be too hard (there's plenty of reference material, not to mention other kits to use as a guide). The rather lame Airfix seat will of course be replaced by the nice Aires resin example. The plastic pitot tube will be replaced by the very nice Master brass part. I don't know about the canopy PE set ... it's rather fiddly; I haven't decided whether I'll try and dress up the Airfix canopy with it or not. The Airfix part is not very well-shaped compared to the real thing anyway, I'm leaning towards just using it as it comes.

Image

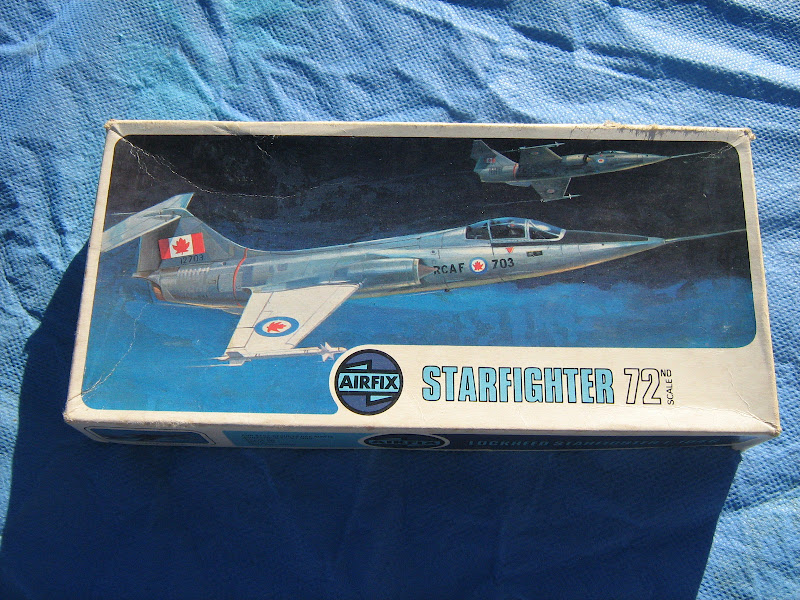
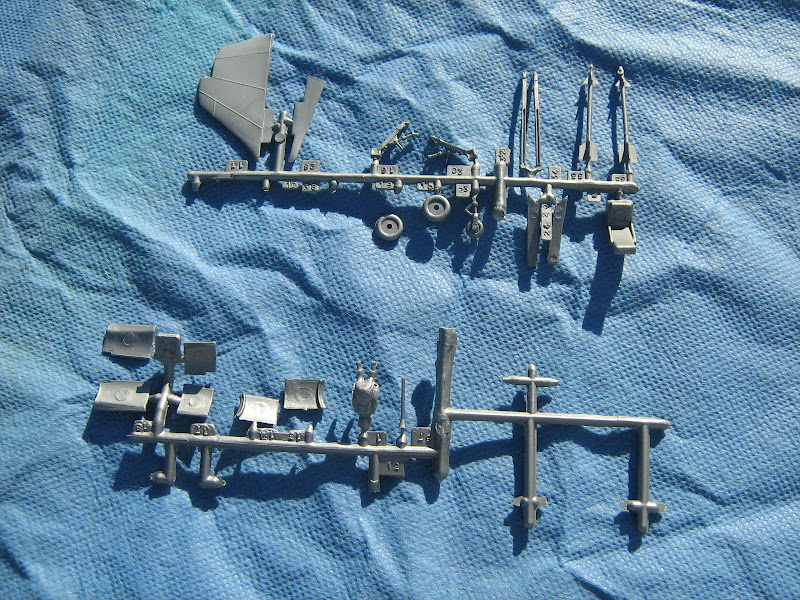
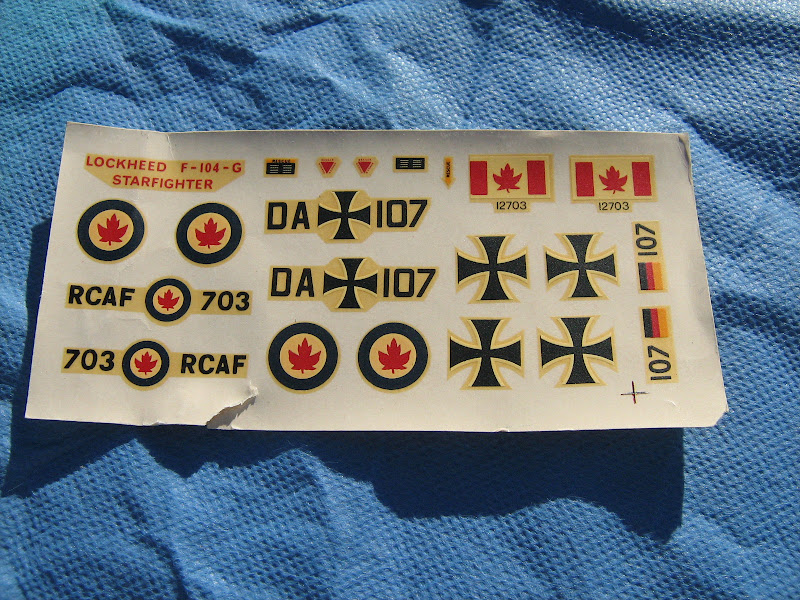
I'll be building the kit as a Luftwaffe 'G' from the late-'60s/early-'70s, using the rather-excellent-looking decals that are spare from the Hasegawa kit.

Image

Lastly the Airfix undercarriage representation is pretty terrible in just about every respect; but unfortunately nobody makes full replacement set for any kit (CMK do make resin bays, which look nice, but they don't provide any replacements for the undercarriage and wheels). I don't want to steal parts from other, better kits that I can't replace; so my plan is to use the parts from the Hasegawa kit as masters for some home-brew resin parts, along with some scratch-building. This will be new territory for me, I hope it turns out OK. (If all the Hasegawa parts came from a single sprue in the kit I'd be tempted to see if I could just source a replacement sprue, but that would be too easy. It would be easier if I was making a F-104A/F-104C/F-104J, since the Hasegawa kits provide the wheels for those aircraft along with the F-104G/S wheels; and of course I don't currently have one of those kits in the stash ....)

Image

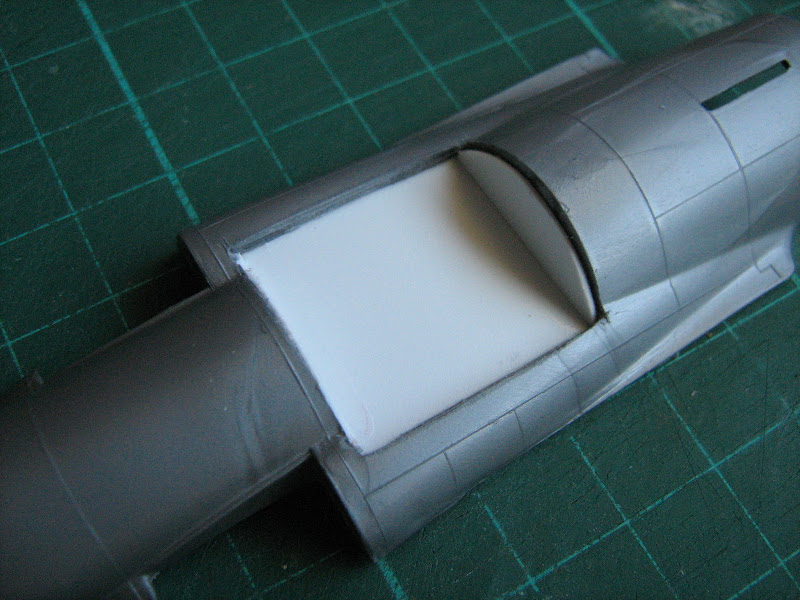
Aside from the issues discussed above, the Airfix kit has a number of shape issues that I am not going to try and fix; the overall dimensions are not too bad though, I will confirm once I get my hands on some decent 1/72 plans (which are en route as I type, I hope). The fins on the wingtip tanks need some work (the inboard fins should be longer than the outboard fins) but that should be an easy adjustment with some plastic card. The tanks themselves may have some shape issues (they look a little slender) but if so that ought not be too hard to fix with some Milliput or similar (he says hopefully). From what I have read of other builds of this kit, and confirmed by some dry-fitting tests, I can expect to use a fair amount of filler at the various joins, particularly around the intakes.

Any way, it should keep me busy for a little while.
Bruce Probst
Melbourne, Australia
"I want to decide who lives and who dies."
My Model Profile
User avatar
Stamford
Modelling Gent and Scholar
Posts: 2240
Joined: May 1st, 2011, 7:42 am
Location: Klågerup Sweden

Re: Airfix 1/72 F-104G Starfighter

Post by Stamford »

How many original parts will you be using? Only joking I shall follow this. I have to say I want a Starfighter but this is not an oldie that I remember fondly. It will take some real modelling to knock it into shape, I look forward to you solving the undercarriage problem!
running at the edge of their world
User avatar
BlohmWolf
Modelling Gent and Scholar
Posts: 2355
Joined: May 15th, 2013, 11:21 pm
Location: Down under, TAS.

Re: Airfix 1/72 F-104G Starfighter

Post by BlohmWolf »

Looks a decent kit from the box. I'm a bit sad it's not OOB.
"Can not finish a model at all"

"You can get more of what you want, with a kind word and a wallet, than just a kind word".

Currently Building: FROG Wildcat, Fokker DR1 Red baron and some other things...
User avatar
splash
Senior Service Rotorhead
Posts: 13828
Joined: May 1st, 2011, 11:02 am
Location: Somerset England

Re: Airfix 1/72 F-104G Starfighter

Post by splash »

This will be a fun build to watch.

Regards Splash
My work bench is starting to look like Portsmouth Naval Dockyard.
User avatar
Ian
Blitzbau hero
Posts: 5137
Joined: May 4th, 2011, 10:01 am

Re: Airfix 1/72 F-104G Starfighter

Post by Ian »

Certainly a kit of its day! And I have a feeling this is the only kit that Airfix produced where the wings are not seperate parts from the fuselage.
I'm a mostly full-time modeller put a part-time poster....
User avatar
Dirkpitt289
NUMA's Auto Mechanic
Posts: 8724
Joined: May 2nd, 2011, 1:55 am
Location: New jersey USA
Contact:

Re: Airfix 1/72 F-104G Starfighter

Post by Dirkpitt289 »

This apparently is a very old kit but I look forward to seeing you apply your skills to this kit. I also love the subject. The Starfighter is one of the truly great looking aircraft of all time (IMHO)
.... Dirk

Beware of the DOG's of WAR

My Youtube Channel
https://www.youtube.com/user/ModelingGu ... rid&view=0
User avatar
BWP
Got in under the wire
Posts: 778
Joined: April 28th, 2011, 2:23 am
Location: Melbourne, Australia
Contact:

Re: Airfix 1/72 F-104G Starfighter

Post by BWP »

Well I see the crowd gathering to watch the train wreck. :)

Got the office largely completed today, along with the nose-wheel bay.

Here you can see I have cut off the lumps Airfix included in the cockpit, and glued down some plastic to act as the framework for some putty.

Image

Nose-wheel bay completed. The front angular extensions on the nose-wheel doors in real-life were very thin, and consequently the depressions in the fuselage to fit them were very shallow. The Airfix depiction is far too deep (because the doors are far too thick). I plan to fill in the depressions with putty (hence the little plastic inserts) and reshape them to something more to scale. The nosewheel doors themselves I shall probably replace with thin plastic card.

Image

With a surprising amount of effort I managed to cut out the kit's rear-wheel "bay" and filled in the hole with plastic card, pending filling it with the replicated Hasegawa pieces.

Image

The front office (seat not yet fitted), made from plastic card and scrap to replicate the appearance of Hasegawa's example. Once everything is in place a lot of this will be hard to see of course, so I didn't go overboard with the detailing. Assembling the bits of plastic was easy, but it needed a lot of dry-fitting, cutting and adjusting to get it to sit right in the cockpit area. The IP is also done, it's not visible here in the photos because it's now attached to the cockpit area of the top half of the fuselage.

Image

Image

Now I'm waiting for the Milliput to set so I can proceed with final shaping and painting of the interior. (I discovered to my horror that my tube of Tamiya putty has dried out since I last used it even though it was properly sealed. :( Fortunately I had the Milliput available.) I also used the left-over putty to fill the nose-cone, and embedded a lead fishing weight into the front portion of the nose area. It doesn't really matter if it's not enough to stop it from tail-sitting since I will be fixing the finished kit to a base any way, but it will make it more convenient in the final decal and paint stages if it sits on its wheels properly.

Aside from shaping the putty when it dries, I still need to "build" the bang seat (the Aires set has some fine PE webbing etc. to apply) and paint it, and paint the interior of the cockpit area and apply the IP decals, so I can seal the two halves of the fuselage.
Bruce Probst
Melbourne, Australia
"I want to decide who lives and who dies."
My Model Profile
User avatar
Dirkpitt289
NUMA's Auto Mechanic
Posts: 8724
Joined: May 2nd, 2011, 1:55 am
Location: New jersey USA
Contact:

Re: Airfix 1/72 F-104G Starfighter

Post by Dirkpitt289 »

BWP wrote:Well I see the crowd gathering to watch the train wreck. :)
I like train wrecks.... :ha: :ha:
.... Dirk

Beware of the DOG's of WAR

My Youtube Channel
https://www.youtube.com/user/ModelingGu ... rid&view=0
User avatar
splash
Senior Service Rotorhead
Posts: 13828
Joined: May 1st, 2011, 11:02 am
Location: Somerset England

Re: Airfix 1/72 F-104G Starfighter

Post by splash »

Nice work Bruce.

I like train wrecks tooooooooo that's what toy train set were for wasn't it?

Regards Splash
My work bench is starting to look like Portsmouth Naval Dockyard.
User avatar
Dirkpitt289
NUMA's Auto Mechanic
Posts: 8724
Joined: May 2nd, 2011, 1:55 am
Location: New jersey USA
Contact:

Re: Airfix 1/72 F-104G Starfighter

Post by Dirkpitt289 »

splash wrote:Nice work Bruce.

I like train wrecks tooooooooo that's what toy train set were for wasn't it?

Regards Splash
Should we start calling you Gomez now Splash? :ha: :ha:

.... Dirk

Beware of the DOG's of WAR

My Youtube Channel
https://www.youtube.com/user/ModelingGu ... rid&view=0
User avatar
splash
Senior Service Rotorhead
Posts: 13828
Joined: May 1st, 2011, 11:02 am
Location: Somerset England

Re: Airfix 1/72 F-104G Starfighter

Post by splash »

Dirkpitt289 wrote:
splash wrote:Nice work Bruce.

I like train wrecks tooooooooo that's what toy train set were for wasn't it?

Regards Splash
Should we start calling you Gomez now Splash? :ha: :ha:

:ha: :ha: :ha:
My work bench is starting to look like Portsmouth Naval Dockyard.
User avatar
BWP
Got in under the wire
Posts: 778
Joined: April 28th, 2011, 2:23 am
Location: Melbourne, Australia
Contact:

Re: Airfix 1/72 F-104G Starfighter

Post by BWP »

Well, not much to add, other than I got the PE onto the bang seat.

Image

Frankly this is overkill in this scale. The ejection hoops I'll grant are probably just about impossible to do otherwise, and if that was all the PE involved I wouldn't comment. However the ten (!) separate PE belts -- plus an 11th piece for the quick-release buckle -- could just as well have been represented by some moulded-on straps IMO. The resin is lovely, but in future I think I would go for something like a Pavla set -- not as fancy, but not nearly as much grief. Although, to be honest, last night when I built this I was unusually patient and didn't have any problems actually putting the PE parts in place (they're well-engineered, as such things go) ... I'd just rather not have had to do it at all.

I went and bought a new tube of Tamiya putty today -- believe me, this kit will need a good supply!
Bruce Probst
Melbourne, Australia
"I want to decide who lives and who dies."
My Model Profile
User avatar
jssel
Still crazy after all these years
Posts: 11998
Joined: April 5th, 2011, 3:42 pm

Re: Airfix 1/72 F-104G Starfighter

Post by jssel »

Like a bug to a light. Just try to keep me away.
Besting 60 years of mediocre building of average kits in the stand off scale
User avatar
BWP
Got in under the wire
Posts: 778
Joined: April 28th, 2011, 2:23 am
Location: Melbourne, Australia
Contact:

Re: Airfix 1/72 F-104G Starfighter

Post by BWP »

While I'm finishing up the assembly and painting of the cockpit, I thought I'd start work on the tail section. First order of business was to get the Hasegawa exhaust into the Airfix parts.

Image

Image

And it was just about as difficult as it looks. All I needed to do was slightly sand down the backplate width, only by a mm or so, just enough to allow the two halves of the tail section to join. The Hasegawa parts fit the kit better than the Airfix parts do!

Image

Image

And that last photo gives you an appreciation of just how much seam-filling will be needed. Every join on the kit is like that.
Bruce Probst
Melbourne, Australia
"I want to decide who lives and who dies."
My Model Profile
User avatar
Chris
Modelling Gent and Scholar
Posts: 2917
Joined: March 15th, 2013, 7:18 pm
Location: In your head
Contact:

Re: Airfix 1/72 F-104G Starfighter

Post by Chris »

Off to a great start bruce, the seat looks grand.
Honcho of ASMMF
Post Reply

Return to “Aviation Modelling”