Rob's Lancaster BIII Dambuster *Finished*

Any aircraft flown by 617 Squadron.
Runs April 27th to June 2nd.
GB Leader is lancfan.
rob_van_riel
Modelling Gent and Scholar
Posts: 3325
Joined: November 4th, 2012, 11:28 am
Location: The Netherlands
Contact:

Rob's Lancaster BIII Dambuster *Finished*

Post by rob_van_riel »

Predictable, I know, but it just wouldn't be proper to do a Dambuster build without it.
Image
Image
I don't nearly know enough about Lancasters to start AMSing here, so except for the Xtradecal markings for the plane that actually busted the Moehne dam, this is going to be out of the box work. If they'll fit the cockpit, I may also add some Revell crew figures.
User avatar
Narayan
If anyone needs me, I'll be in my office
Posts: 2602
Joined: April 10th, 2011, 7:01 pm
Location: The Middle of Nowhere in Ireland

Re: Rob's Lancaster BIII Dambuster

Post by Narayan »

rob_van_riel wrote:it just wouldn't be proper to do a Dambuster build without it.
Image

I completely agree! I wish I had the time to do one.

_________________
Narayan

The force is with you, young Skywalker, but you are not a Jedi yet.

A:B 2013 11:04 2012 20:05 2011 11:10 2010 44:12 2009 19:16 2008 16:03 Overall 204:55
rob_van_riel
Modelling Gent and Scholar
Posts: 3325
Joined: November 4th, 2012, 11:28 am
Location: The Netherlands
Contact:

Re: Rob's Lancaster BIII Dambuster

Post by rob_van_riel »

Got some actual work done before a late and lazy breakfast (public holiday..). There are now blobs of filler in the ejector marks on the cockpit floor, and the wing halves have been joined, as have the tailplanes. Certainly cuts down on the bulk of the sprues and the clutter in the box.

I then took a long look at the inboard engines. Does anyone know if there's any point to putting a lot of effort into the engines? I get the impression they'll be completely hidden from view when mounted inside the nacelles.
rob_van_riel
Modelling Gent and Scholar
Posts: 3325
Joined: November 4th, 2012, 11:28 am
Location: The Netherlands
Contact:

Re: Rob's Lancaster BIII Dambuster

Post by rob_van_riel »

Started fiddling with the cockpit. Can't say I'm really impressed by the work Revell did here. There's some technically very "interesting" choices in the parts breakdown, and sinkholes all over the place. Also, I would expect Revell pilots to fit a Revell aircraft, especially since several of the figures are depicted in the artwork as sitting at the very stations I intended to put them in, only to find feet would have to come off and legs reduced to less than half thickness. Not being able to man the turrets without resorting to amputations would have been OK, but this sucks.
Not sure whether this is because I'm too demanding or too clumsy, but modifying figures at this scale has never been a satisfying experience for me, so this one is going to be unmanned.
As stated, completely redecorating the interior was never my intention, so my corrections will be limited to moving the pilot's chair forward.

Some pictures to show where I was when I called it a day for the Lancaster:
Image
Image
User avatar
AndrewR
In the basement lab
Posts: 24072
Joined: April 5th, 2011, 4:13 pm
Location: Ottawa, Ontario, The Great White North
Contact:

Re: Rob's Lancaster BIII Dambuster

Post by AndrewR »

I have the same set of figures Rob, and some of them are far too large to be true 1/72 scale. It's a pity because they are very well sculpted. Revell reboxed an ICM original for that set.

Cheers

Andrew
Up in the Great White North
rob_van_riel
Modelling Gent and Scholar
Posts: 3325
Joined: November 4th, 2012, 11:28 am
Location: The Netherlands
Contact:

Re: Rob's Lancaster BIII Dambuster

Post by rob_van_riel »

AndrewR wrote:I have the same set of figures Rob, and some of them are far too large to be true 1/72 scale. It's a pity because they are very well sculpted. Revell reboxed an ICM original for that set.
ICM? That explains a lot. I have their 1/72 scale Soviet weapons set, and some of the missiles would look better on a 1/48 airplane. And you're right, except for the scale problem they are very nice figures.
rob_van_riel
Modelling Gent and Scholar
Posts: 3325
Joined: November 4th, 2012, 11:28 am
Location: The Netherlands
Contact:

Re: Rob's Lancaster BIII Dambuster

Post by rob_van_riel »

Got quite a bit of work done today, despite some resistance by the plastic.
I finished construction of the cockpit module. I found it quite tricky to get the front an rear bulkheads on properly; I can't help but think Revell could have made this rather easier without sacrificing any accuracy. As it was, it involved juggling three parts that don't particularly like each other, plus a glue brush, for each bulkhead. It just so happens I am not an octupus, so this involved some unpublishable comments.. This juggling seems to be a recurring theme with this kit.
Once the cockpit module was built up, I dry-fitted the fuselage halves. Good thing too, as this revealed another recurring theme: oversized bulkheads. I'm seeing better fit from my ageing Airfix Tornado.
Image
Some filing and more comments later I had persuaded the fuselage to fit, and primed the cockpit as a preparation for painting, and to be able to see the details better. Black plastic is rapidly rising on the "avoid if at all possible" list.
Image
I then turned my attention to the engine pods. Some juggling with more parts than last time later, I had one of the engines mounted. As I suspected, this engine will be completely hidden once the engine pod is closed, so take a good peek, this is the last you'll ever see of it:
Image
Further construction proved that it was also completely unnessessary to build the engine in the first place, unless planning to open up the cowling. They might have pointed that out..
The inner engine pods also hold the impressively large undercarriage. Parts 94, the lattice work that makes up the sides of the wheel wells (wheel caverns would be more accurate) are too large, and protrude from the surface of the wing, and need cutting down. The same holds for bulkheads 85, these are too large and will prevent the engine pods from lining up to the wings.
I do not believe the build sequence as indicated in the instructions is workable. The inner engine pods curve around the forward wing edge, preventing them from being attached from directly below the wing, and even when cut down to a nice fit, bulkheads 85 prevent hooking them over the front edge and then rotating them into place. I cought this while chopping the 85s down to size, and took a different approach.
Bulkhead 81 was glued to engine pod half 74, with or without the Merlin and braces 84 installed. Once the glue had set, 74 was positioned over the wing edge and against bulkhead 85 (you can get a good grip on 74 and the wing, they're big enough), but not yet glued. The other engine pod half was then positioned, again without glue, against 74. Between the locator pin at the rear edge of the engine pod, bulkhead 85, and the front wing edge, the engine pod was now fairly stable against the wing. Keeping the rear of the pod halves lined up with the wing and 85, I then ran some very thin solvent glue into the seams between the rear portion of the pod halves, 85 and the pod halves, and the rear of the pod halves and the wing. No glue anywhere forward of 85 at this point. Once the (fortunately very fast glue) had set, the propellor hub was then wiggles between the pod halves at the front, and the front of the pods glued together and to the wing. Part 75 was then inserted from the front, and finally 87 attached, completing most of the pod. They're now in this state, waiting for the plastic to fully recover from the glue. Once completely set, I'll start stuffing filler into the gaps that remain between the wings and the pods.

Am I rambling :-D ?

The outer engine pods have now had their filler sanded smooth, and are waiting to be installed on the wings.
rob_van_riel
Modelling Gent and Scholar
Posts: 3325
Joined: November 4th, 2012, 11:28 am
Location: The Netherlands
Contact:

Re: Rob's Lancaster BIII Dambuster

Post by rob_van_riel »

It was hairy stick day over here. The cockpit interior of the Lancaster is as complete as it's going to get.
Image
Image

With the interior assembled and painted, it was then time to close the fuselage. Couldn't resist dry fitting the wings afterwards, just to get a feel for the shape and size of the model. This is a really big bird, and once completed, will easily be the biggest model in my collection.
Image
rob_van_riel
Modelling Gent and Scholar
Posts: 3325
Joined: November 4th, 2012, 11:28 am
Location: The Netherlands
Contact:

Re: Rob's Lancaster BIII Dambuster

Post by rob_van_riel »

Installed the bomb bay insert today (took some cursing, fit is again very dubious), and covered the seam between the fuselage halves in filler. This is not so much because the seam is somehow terrible, but I find that filler makes an excellent indicator to judge when the seam is sanded smooth; once all the filler is sanded off, the two halves join prefectly. Paint could do the same, except that filler also corrects any minor damage from sprue gates and such.
I've finished the engine nacelles, and all four are now on the wings. The area around the nacelles has been primed, to help me see where filler is going to be needed (did I mention I'm not fond of black plastic?)
User avatar
Jagewa
Modelling Gent and Scholar
Posts: 2752
Joined: April 6th, 2011, 2:18 am
Location: Christchurch, New Zealand
Contact:

Re: Rob's Lancaster BIII Dambuster

Post by Jagewa »

Looking great Rob, zooming through her.

I hear you about the black plastic, not my favourite either.

Cheers
Jim
User avatar
AndrewR
In the basement lab
Posts: 24072
Joined: April 5th, 2011, 4:13 pm
Location: Ottawa, Ontario, The Great White North
Contact:

Re: Rob's Lancaster BIII Dambuster

Post by AndrewR »

Jagewa wrote: I hear you about the black plastic, not my favourite either.

Cheers
Jim
But better than red plastic, any day. :grin:

That's looking very nice Rob, black plastic or not.

cheers

Andrew
Up in the Great White North
rob_van_riel
Modelling Gent and Scholar
Posts: 3325
Joined: November 4th, 2012, 11:28 am
Location: The Netherlands
Contact:

Re: Rob's Lancaster BIII Dambuster

Post by rob_van_riel »

I'm too tired to fiddle with photos or write a long report, so just a quick rundown. More verbose update with pictures tomorrow...

The plane is now mostly built. All coarse construction is complete, and I've started to add all the finer bits that will go on before painting. That includes the undercarriage, except for the actual wheels, and ye gods, that's one fragile looking undercarriage. The main struts may well have the thinnest pieces of plastic in them I've ever dealt with, and this is the largest, heaviest plane I ever built. Really, really scary combination. Also, I somehow managed to get one of the sets of main struts on out of whack. Don't know which, can't for the life of me find where it went wrong, but one is at (roughly) straight angles to the wing, while the other slants noticably backwards (it doesn't help they're so long). No idea if it will be readily visible once finished, but right now, it's glaring at me.
rob_van_riel
Modelling Gent and Scholar
Posts: 3325
Joined: November 4th, 2012, 11:28 am
Location: The Netherlands
Contact:

Re: Rob's Lancaster BIII Dambuster

Post by rob_van_riel »

rob_van_riel wrote:More verbose update with pictures tomorrow...
Progress (and sleep) over since Monday have been less than stellar, on account of one of the cats going AWOL on Tuesday and Wednesday, seriously rattling the nerves of your's truly and her more faithful sister. Apparently the extended expedition didn't agree with her much, because when she did return, she felt really needed loads of attention and kept me awake begging for hugs and cuddles.

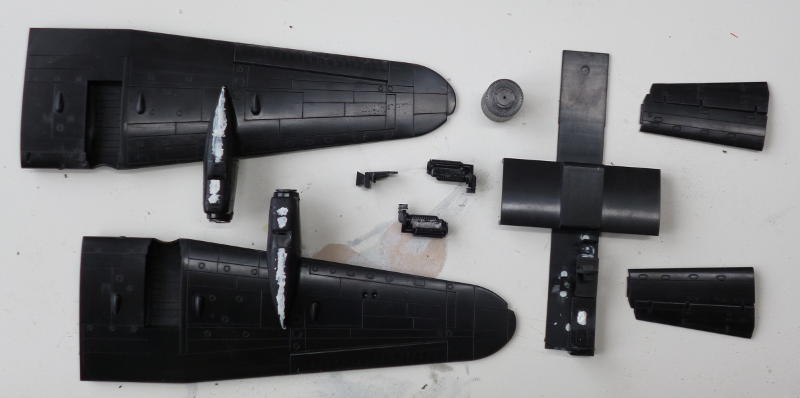
Furry distractions aside, I committed some brutalities against the bombbay insert to chop down that horrible step at the rear (could this error have been caused by someone looking at a Grand Slam modification, I seem to recall those having a step at the rear?), then sanded the whole fuselage seam smooth with a rather more delicate grade of sandpaper. The gaps between the inboard nacelles and the wing were treated to some Milliput, and finally, I gathered up the courage to attach the wings. I fully expected a serious fight, since this is the primary trouble spot on most aircraft, and this kit had shown some fit issues already, but to my surprise, the wings joined up with the fuselage very smoothly, and with a very clear postition fix. That particular part of the engineering on this kit is very much appreciated. That, roughly, was the end of Tuesday.

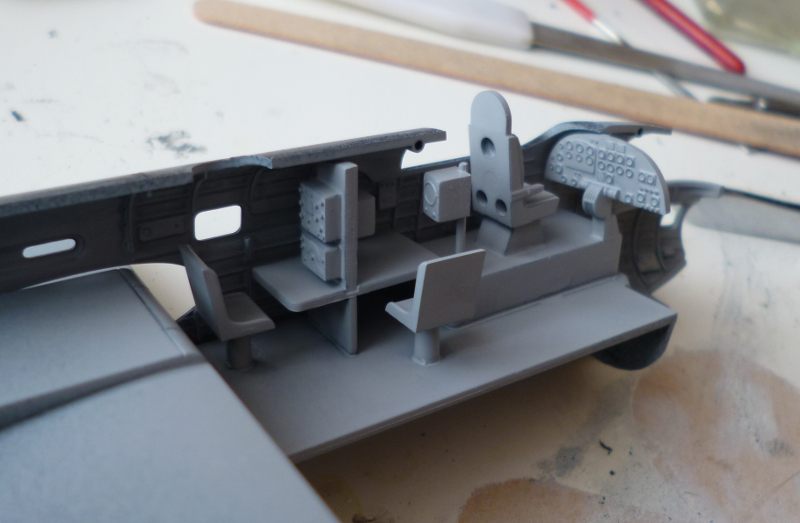
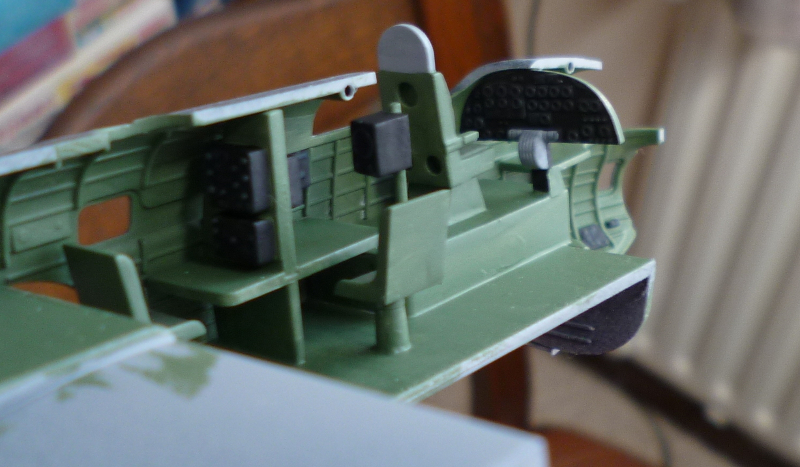
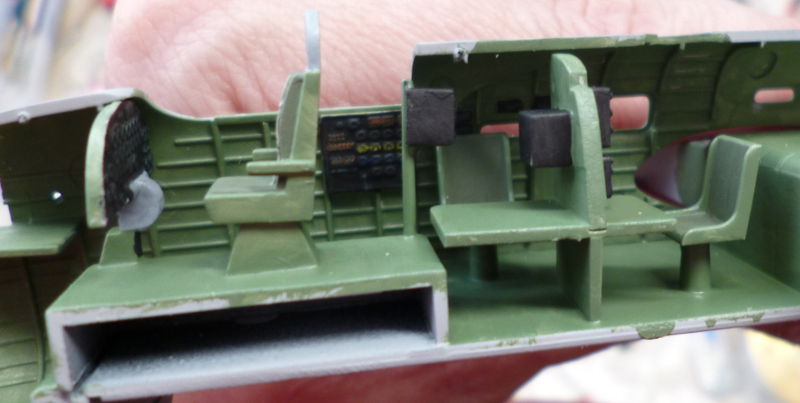
Wednesday was mostly spent assembling and painting the gun turrets. I always find working with transparencies in general, and painting the frames on them in particular, a rather nerve wrecking job, and my nerves weren't too good to start with at this time, so this took some time. The tail was also assembled during this day.

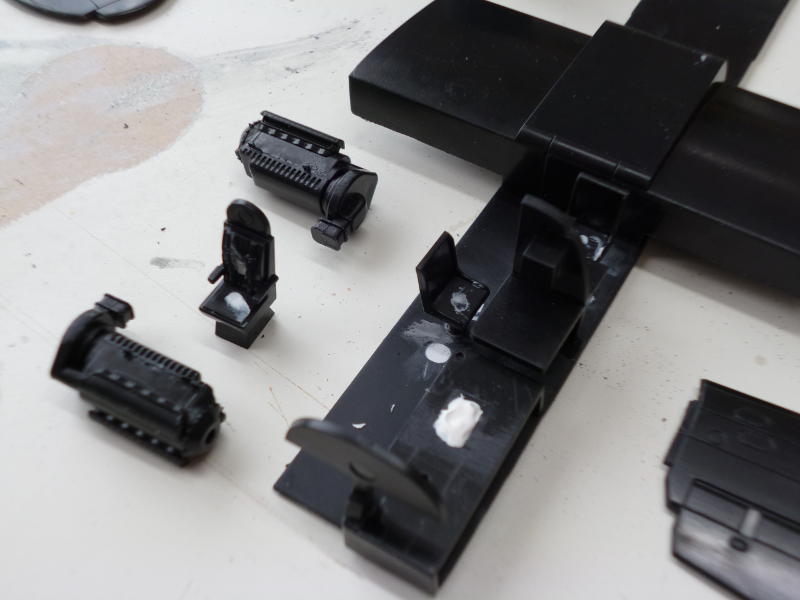
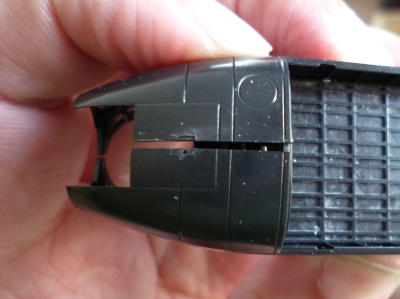
Yesterday, I mounted the front gunturret and fixed it in place with the "collar" (for lack of a more accurate word). The collar didn't fit worth a damn, lining up reasonably at the bottom, but leaving a gap of almost 1mm between the fairing on top and the fuselage (does anyone know what lives under that fairing?). Fixable, but sloppy, although to its credit, the turret remains turnable nicely.
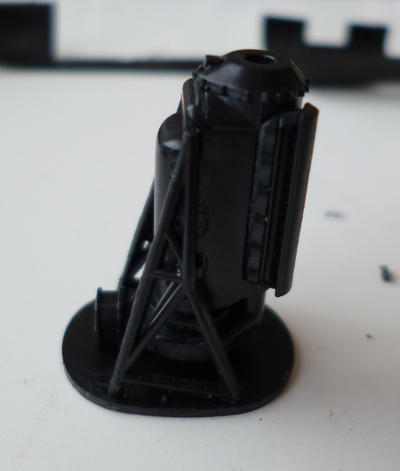
I expected the rear turret to also be locked in by the pair of plastic bits at the very rear of the fuselage, but it turns out it remains completely free. I consider this a good thing, as it allows me to keep the turret safely out of harm way while I finish and paint the aircraft. What I can't figure out though, is why there were two sets of these plastic bits at the rear. I can't seem to find any difference between them, and the instructions only indicate a choice between the pairs, but no criteria for making that choice. In the end, I took the lazy option, and picked the pair with the least flash on them :grin:
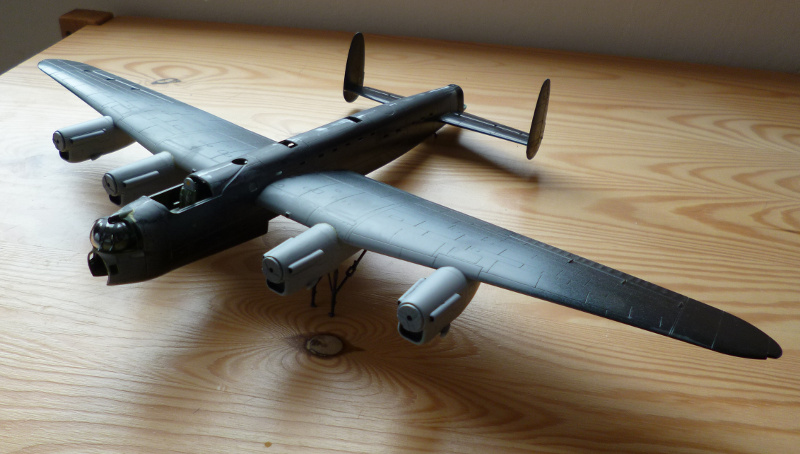
Then it was time for the really, really scary bit, the undercarriage legs. From the instructions and casual inspection of the parts, this looked like a fidgety, but mostly fool proof construction. I was right about the fidgety part, but apparently, I'm a better fool than they'd reconed with. Some parts of the legs and especially the bits that extend to the rear of the bays are so thin, I had serious doubts as to whether they could take the weight of the complete airplane. Never mind that they look great and are probably to scale, lumping this heavy a kit on top of a few tenths of millimeters of plastic is creepy.
In spite of the theory that says a triangle with sides of a given length can only have one shape, tolerances in either the production of the kit, or my inept handling of it, were enough to mis-align the left and right legs.
Image

In the picture, it looks like I'm going to be in a world of trouble with this, but I'm beginning to suspect I might get away with it. Few people will be checking for alignment, the Upkeep is going to get in the way of any such checks, and most importantly, the airplane still appears level. I measured the distance between the bench and the wingtips, and the left wing is about half a millimeter lower than the right. At this size, it won't be noticed. A single sheet of paper under the left leg, and everything ends up level. I could fix this by very lightly sanding down the right wheel.
Despite this, just sitting there it is beginning to look like a Lancaster.

Image

I hope to finish adding all the smaller exterior bits today, and maybe even masking and priming.
User avatar
aeroplanegripper
Active Participant
Posts: 563
Joined: October 20th, 2012, 5:05 pm
Location: Malvern, Worcestershire.

Re: Rob's Lancaster BIII Dambuster

Post by aeroplanegripper »

Great progress there Rob, I have just affixed the outer engines on mine, and came to grief at the same point on the front fuselage fit. Great review and progress report though mate.
Best Regards

Mark

"bis vivit qui bene vivit"
IPMS UK No 9960

On the go (ish), and under the bench or about to be:

Academy P-51C Mustang -1/72nd
Academy Grumman Hellcat II - 1/72nd
Hasegawa Brewster Buffalo I - 1/72nd
rob_van_riel
Modelling Gent and Scholar
Posts: 3325
Joined: November 4th, 2012, 11:28 am
Location: The Netherlands
Contact:

Re: Rob's Lancaster BIII Dambuster

Post by rob_van_riel »

rob_van_riel wrote:I hope to finish adding all the smaller exterior bits today, and maybe even masking and priming.
That went better than hoped for. Turns out there weren't any exterior bits left to stick on at this stage; antennas and such go on last, sometimes even after the decals. That left masking, with also went quicker than I thought it would, and rattlecan primer (Motip grey primer, in case anyone cares). A few hours later, and the primer was sufficently dry to re-coat, so there's now a primer-grey bottom, dark earth top Lancaster waiting for more work over the weekend.
Locked

Return to “Dambusters! 617 Sqn GB”