Tamiya 1/35th Universal Carrier
-
Stuart

- Raider of the Lost Ark Royal
- Posts: 19451
- Joined: February 25th, 2013, 4:55 pm
- Location: North Wales
- Contact:
Re: Tamiya 1/35th Universal Carrier
Looks excellent Shaun!
Stuart Templeton I may not be good but I'm slow...
My Blog: https://stuartsscalemodels.blogspot.com/
My Blog: https://stuartsscalemodels.blogspot.com/
-
X12A

- Modelling Gent and Scholar
- Posts: 1327
- Joined: October 5th, 2020, 6:30 pm
- Location: The New Forest, UK
Re: Tamiya 1/35th Universal Carrier
Coming along nicely Shaun.
-
ShaunW
- NOT the sheep
- Posts: 26190
- Joined: November 26th, 2011, 6:11 pm
- Location: Pontefract West Yorkshire
Re: Tamiya 1/35th Universal Carrier
Many thanks for your continued interest, guys, as always it is much appreciated.
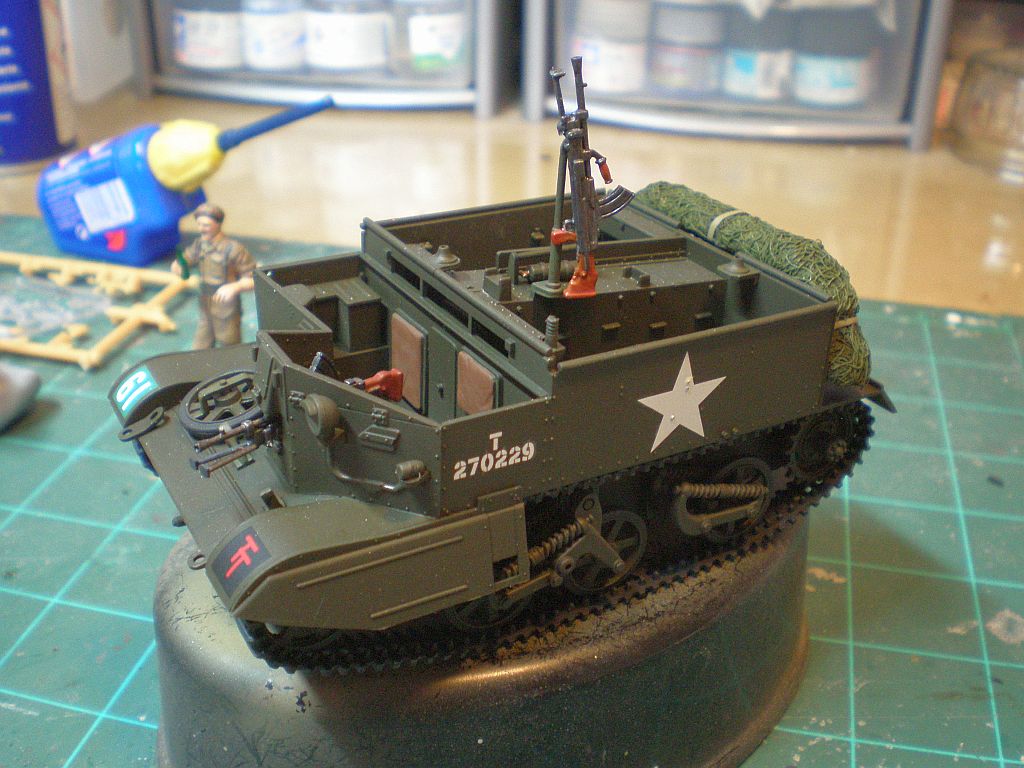
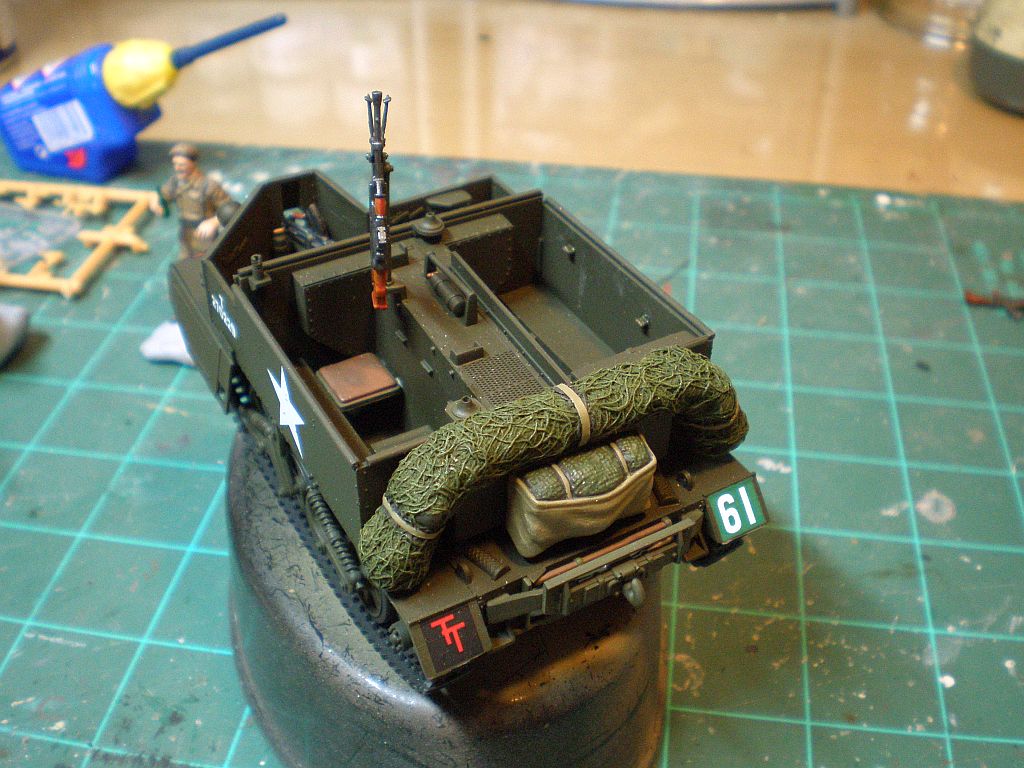
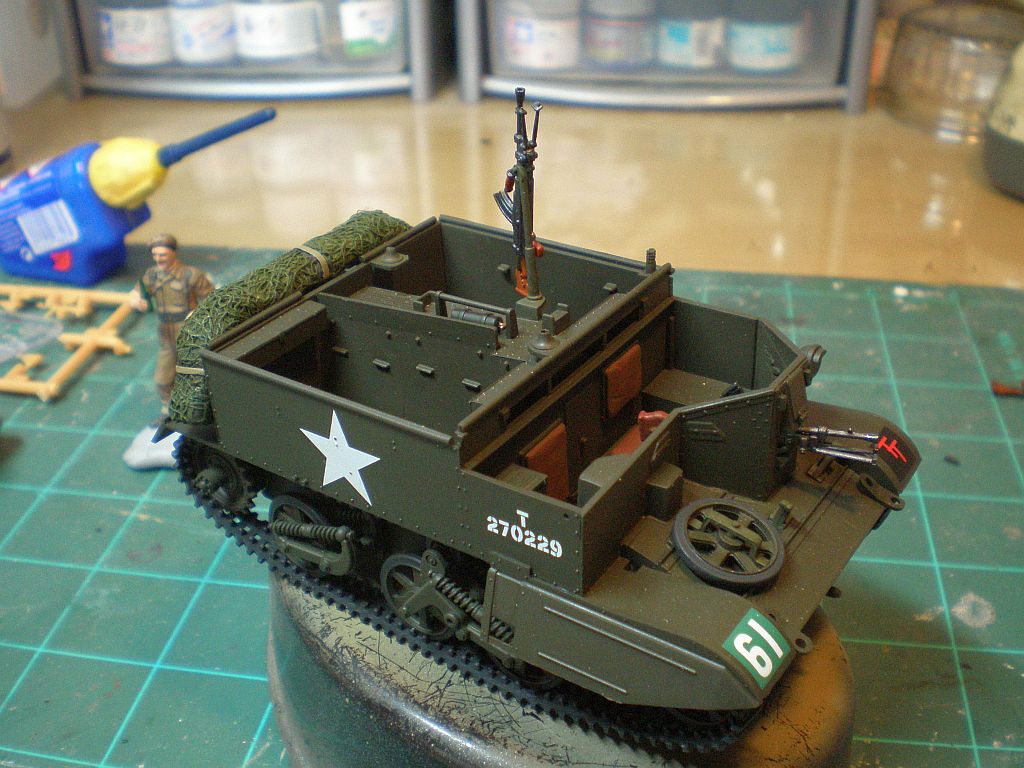
She's now all stickered up in markings of the 50th (Northumbrian) Infantry Division, which fought with considerable distinction in the Second World War, with its members winning more Victoria Crosses than any other division in the British Army during the conflict. The decals behaved very well using Microscale sol/set and there is no silvering that I can see. Post decals the model received a finish of Humbrol Matt Cote, which is my preferred matt finish - I'm not so keen on Humbrol's modern enamel paints but have kept the faith with their clear coats which, thus far, have not let me down. The matt coat was thinned with el cheapo DIY store white spirit and applied by airbrush but was not entirely dry when I took the photos although it has now dried fully with just a hint of sheen, which is the way I prefer it.
Next up will be adding accessory parts, detail painting and a bit of light weathering, although not necessarily in that order. Those pesky front track side guards/plates, whatever they are called, still don't fully match the rest of the model thanks to not having received a gloss coat prior to the matt finish - weathering will hopefully go some way to sorting them out, otherwise I'll call them replacement parts from another vehicle

Thanks for looking.
She's now all stickered up in markings of the 50th (Northumbrian) Infantry Division, which fought with considerable distinction in the Second World War, with its members winning more Victoria Crosses than any other division in the British Army during the conflict. The decals behaved very well using Microscale sol/set and there is no silvering that I can see. Post decals the model received a finish of Humbrol Matt Cote, which is my preferred matt finish - I'm not so keen on Humbrol's modern enamel paints but have kept the faith with their clear coats which, thus far, have not let me down. The matt coat was thinned with el cheapo DIY store white spirit and applied by airbrush but was not entirely dry when I took the photos although it has now dried fully with just a hint of sheen, which is the way I prefer it.
Next up will be adding accessory parts, detail painting and a bit of light weathering, although not necessarily in that order. Those pesky front track side guards/plates, whatever they are called, still don't fully match the rest of the model thanks to not having received a gloss coat prior to the matt finish - weathering will hopefully go some way to sorting them out, otherwise I'll call them replacement parts from another vehicle
Thanks for looking.
Doing - Tamiya 1/35th Universal Carrier.
Work is the curse of the modelling classes!
IPMS#12300
Work is the curse of the modelling classes!
IPMS#12300
-
Clashcityrocker

- Modelling Gent and Scholar
- Posts: 10827
- Joined: May 1st, 2011, 12:31 am
- Location: Adelaide. South Australia
Re: Tamiya 1/35th Universal Carrier
Looks good Shaun, but it's strange how a clear coat can alter the look of the underlying colour 
Nigel
Nigel
-
JamesPerrin

- Looks like his avatar
- Posts: 13696
- Joined: April 5th, 2011, 8:09 pm
- Location: W. Yorkshire
- Contact:
Re: Tamiya 1/35th Universal Carrier
Nice progress Shaun
Classic British Kits SIG Leader Better to fettle than to fill
(2024 A:B 5:2) (2023 13:8:7) (2022 21:11) (2021 15:8) (2020 8:4:4)
(2024 A:B 5:2) (2023 13:8:7) (2022 21:11) (2021 15:8) (2020 8:4:4)
-
PaulBradley

- Staring out the window
- Posts: 21220
- Joined: April 6th, 2011, 3:08 pm
- Location: Flagstaff, AZ
Re: Tamiya 1/35th Universal Carrier
Does look very good, Shaun!
Paul
За демократію і незалежний Україну
"For Democracy and a Free Ukraine"
За демократію і незалежний Україну
"For Democracy and a Free Ukraine"
-
skypirate

- Modelling Gent and Scholar
- Posts: 7303
- Joined: May 1st, 2011, 6:13 am
- Location: Port Macquarie, Australia
Re: Tamiya 1/35th Universal Carrier
That's very smart, Shaun. Those start and serial numbers look painted on!
Cheers,
David
Cheers,
David
-
B4en

- Modelling Gent and Scholar
- Posts: 1147
- Joined: February 8th, 2014, 9:58 am
- Location: South Yorkshire
Re: Tamiya 1/35th Universal Carrier
All beautifully done Shaun!
The past, present, and future walked into a bar. It was tense.
-
David Silver

- Active Participant
- Posts: 658
- Joined: March 28th, 2022, 11:33 pm
Re: Tamiya 1/35th Universal Carrier
Looking good Shaun!
-
iggie

- Modelling Gent and Scholar
- Posts: 23438
- Joined: July 31st, 2013, 11:04 am
- Location: North Somercotes, Lincolnshire
- Contact:
Re: Tamiya 1/35th Universal Carrier
That's looking very neat indeed Shaun; good work!
Best wishes
Jim
If you can walk away from a landing, it's a good landing. If you use the airplane the next day, it's an outstanding landing
"Never put off till tomorrow, what you can do the day after tomorrow"
Jim
If you can walk away from a landing, it's a good landing. If you use the airplane the next day, it's an outstanding landing
"Never put off till tomorrow, what you can do the day after tomorrow"
-
flakmonkey

- Modelling Gent and Scholar
- Posts: 3489
- Joined: April 6th, 2011, 9:58 am
- Location: Down in the tube station at midnight
- Contact:
Re: Tamiya 1/35th Universal Carrier
Looks good to me. I wouldn't worry too much about the side guards being a slightly different shade. I quite deliberately use four shades of OD on my own builds. If anybody asks, tell them it's colour modulation.
Would ya like to learn to fly? Would ya? Would you like to see me try?
-
ShaunW
- NOT the sheep
- Posts: 26190
- Joined: November 26th, 2011, 6:11 pm
- Location: Pontefract West Yorkshire
Re: Tamiya 1/35th Universal Carrier
Many thanks for the kind comments. It's been a while as I've been busy with non-modelling things, but I haven't been totally idle with this project and the build has moved on a bit.
The vehicle has now received its weapons and accessories at the rear, together with painting of the seats. I got around the rather plain looking stowed rear tarp by tarting it up with some Verlinden netting. The Bren guns received some additional attention by way of drilling out their barrels using fine drills held in a pin vice and the weapon on the AA mount has been fitted with a folded bipod purloined from the Tamiya British Infantry on Patrol set. Tamiya provide only an open bipod for the AA mounted gun but all of the contemporary photos I have seen don't support that. Other than that, the build is still OOB.
And here are my little chaps making up the crew. Don't laugh too much as I'm not an experienced figure painter but I think I have managed to make them vaguely human. The flesh tone is a home mix of Winsor and Newton oils using Flesh Tint, Flake White and Naples Yellow with shadow being Raw Umber and the oils were applied over a base coat of Tamiya Flesh. I think I have managed a reasonable flesh colour but I am colour blind so if it looks off then please let me know! The uniforms are all Tamiya acrylics, with a base coat of Earth Brown, which was then highlighted with Buff and Deck Tan with shadows of Smoke. Webbing is late war dark green.
Out of the first two figures, the driver figure on the right is as OOB, whilst the guy who is seated in the rear of the vehicle has had his left arm replaced from one of the 8th Army figures that came with the kit to replace the OOB arm, which had him holding a water bottle, as I wanted a different yet still relaxed pose.
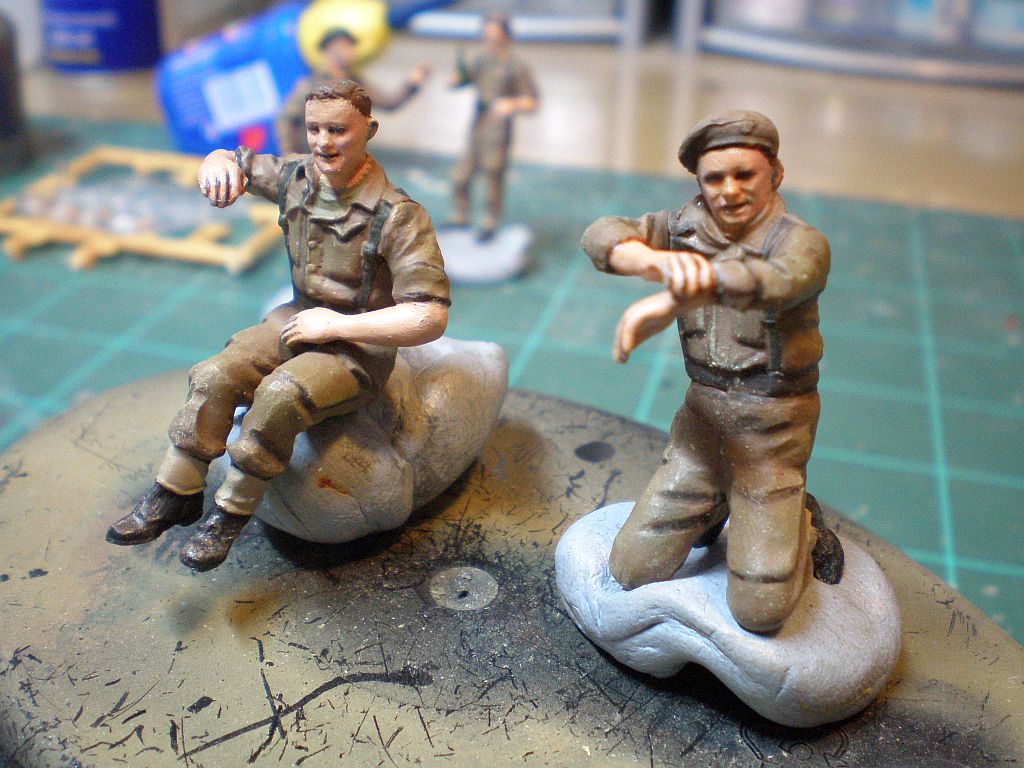
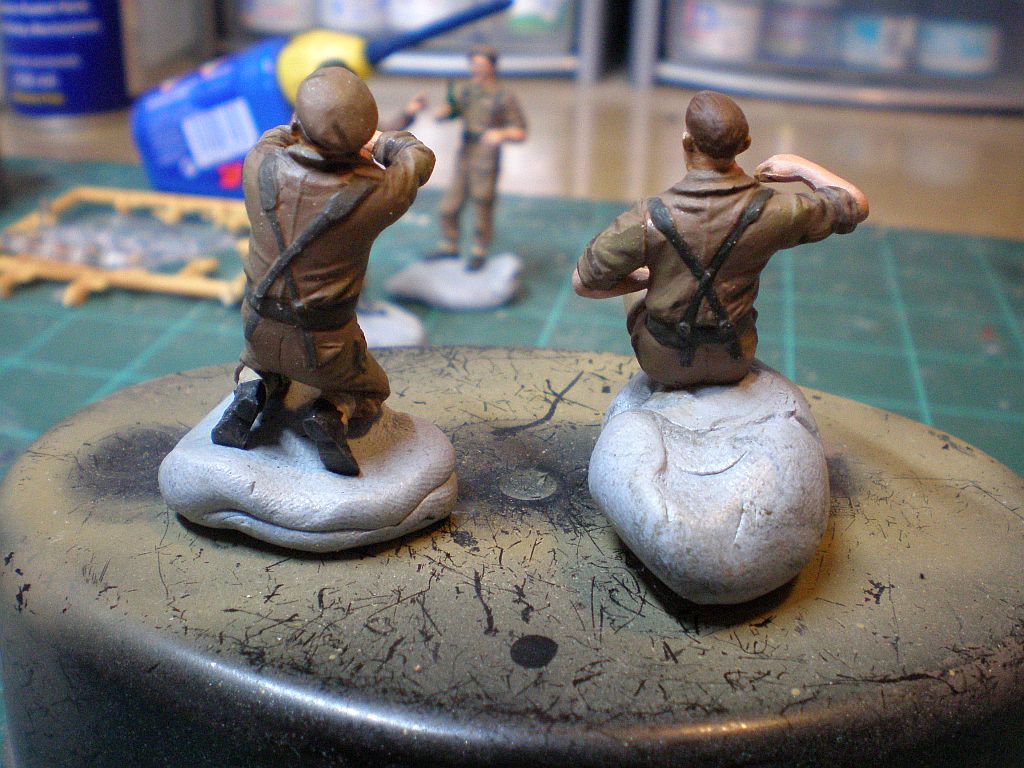
The next two figures consist of the vehicle commander NCO on the right and a standing infantry figure on the left, which came from the late 70's Churchill Crocodile kit. Mr Crocodile was in a pointing pose but his original arm was straight out, which I felt was a little stiff looking and I replaced the arm from a Tamiya German figure from, I think, the PAK 40 crew to give a more natural bent look. The pointing hand is the original and fitting the new arm required a bit of filler to get the pose right. Other than that, I used one of the rifles that came with the Bren Carrier kit as it seemed to be better that the original and added a sling made out of wine bottle foil. All of the other accessories on the figure are as it came save for the bayonet scabbard, which I nicked from the Carrier kit. The NCO has received new arms courtesy once again of the 8th Army figures that came with the kit. The left hand was cut off and repositioned to hold the front armour of the vehicle and into the other hand was placed a bottle, which came from the Tamiya Pibber patrol boat kit that I built a while ago.

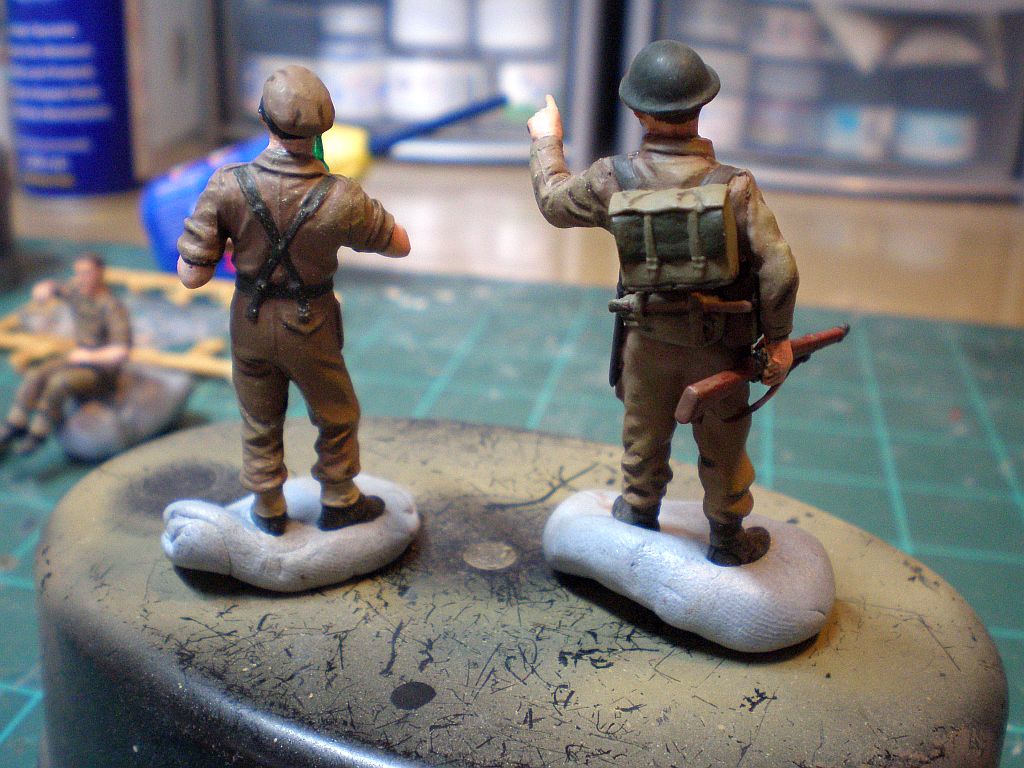
I like to change the pose of OOB figures whenever I can but really need to do more figure painting as I'm certainly not anywhere there yet, but it's fun to give it a go.
Next up is to finish the vehicle, including weathering and I'm mulling over making a little base to display it on.
Thanks for looking.
The vehicle has now received its weapons and accessories at the rear, together with painting of the seats. I got around the rather plain looking stowed rear tarp by tarting it up with some Verlinden netting. The Bren guns received some additional attention by way of drilling out their barrels using fine drills held in a pin vice and the weapon on the AA mount has been fitted with a folded bipod purloined from the Tamiya British Infantry on Patrol set. Tamiya provide only an open bipod for the AA mounted gun but all of the contemporary photos I have seen don't support that. Other than that, the build is still OOB.
And here are my little chaps making up the crew. Don't laugh too much as I'm not an experienced figure painter but I think I have managed to make them vaguely human. The flesh tone is a home mix of Winsor and Newton oils using Flesh Tint, Flake White and Naples Yellow with shadow being Raw Umber and the oils were applied over a base coat of Tamiya Flesh. I think I have managed a reasonable flesh colour but I am colour blind so if it looks off then please let me know! The uniforms are all Tamiya acrylics, with a base coat of Earth Brown, which was then highlighted with Buff and Deck Tan with shadows of Smoke. Webbing is late war dark green.
Out of the first two figures, the driver figure on the right is as OOB, whilst the guy who is seated in the rear of the vehicle has had his left arm replaced from one of the 8th Army figures that came with the kit to replace the OOB arm, which had him holding a water bottle, as I wanted a different yet still relaxed pose.
The next two figures consist of the vehicle commander NCO on the right and a standing infantry figure on the left, which came from the late 70's Churchill Crocodile kit. Mr Crocodile was in a pointing pose but his original arm was straight out, which I felt was a little stiff looking and I replaced the arm from a Tamiya German figure from, I think, the PAK 40 crew to give a more natural bent look. The pointing hand is the original and fitting the new arm required a bit of filler to get the pose right. Other than that, I used one of the rifles that came with the Bren Carrier kit as it seemed to be better that the original and added a sling made out of wine bottle foil. All of the other accessories on the figure are as it came save for the bayonet scabbard, which I nicked from the Carrier kit. The NCO has received new arms courtesy once again of the 8th Army figures that came with the kit. The left hand was cut off and repositioned to hold the front armour of the vehicle and into the other hand was placed a bottle, which came from the Tamiya Pibber patrol boat kit that I built a while ago.
I like to change the pose of OOB figures whenever I can but really need to do more figure painting as I'm certainly not anywhere there yet, but it's fun to give it a go.
Next up is to finish the vehicle, including weathering and I'm mulling over making a little base to display it on.
Thanks for looking.
Doing - Tamiya 1/35th Universal Carrier.
Work is the curse of the modelling classes!
IPMS#12300
Work is the curse of the modelling classes!
IPMS#12300