Shaun's builds

Kitmaster, Airfix and Dapol railway model kits

Moderator: JamesPerrin

ShaunW
NOT the sheep
Posts: 26194
Joined: November 26th, 2011, 6:11 pm
Location: Pontefract West Yorkshire

Re: Shaun's builds

Post by ShaunW »

Over the course of this weekend I've finished up the tender. All of the moulded on detail that I removed has now been replaced.

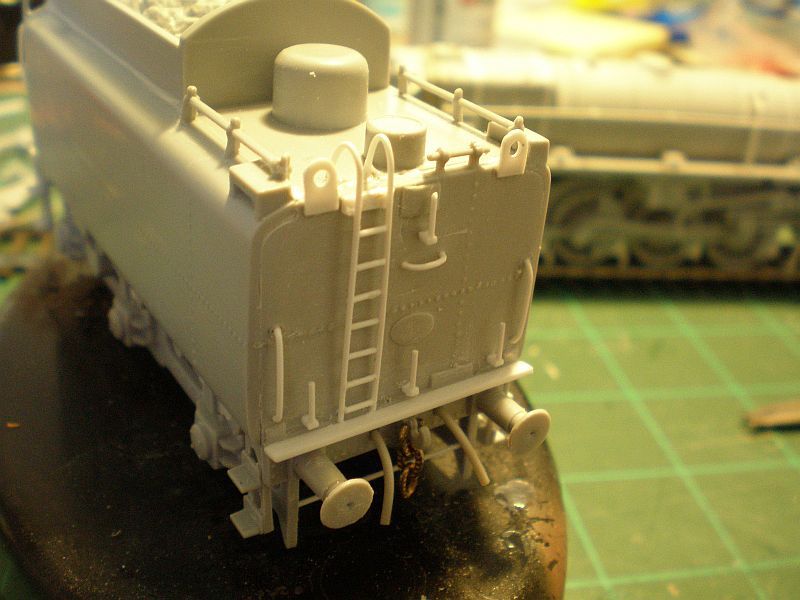
Starting at the rear, I added new brackets to the roof using drilled out plastic card, grab handles and a ladder made out of 0.5mm Plastruct rod (I don't know what I would have done without it during this build!), together with lamp hangers made out of the same rod mounted on to blocks of Plastruct strip. At the base of the tender I added a new shelf from Plastruct strip as the OOB was far too narrow and underneath that I scratched up some vacuum pipes from plastic rod carefully bent to shape around a pencil - the kit only provides for one such pipe, but photos show two and in addition the kit pipe is moulded as being nicely stowed in a loop, whilst most photos of working locos show the pipes dangling. The hook is from the kit but with the solid-moulded chain removed and replaced with a bit of cosmetic metal chain from my spares (I knew that would come in handy one day!). The chain is a little over scale and in a rather fetching gold colour but it will paint up and looks a lot better than the OOB chain IMHO. To finish up, I added yet another length of 0.5mm Plastruct rod between the chassis rear members to simulate the visible part of what I believe to be the brake hanger assembly. Alas, the kit buffers have pin holes in their centres which will have to be dealt with prior to painting.
Image

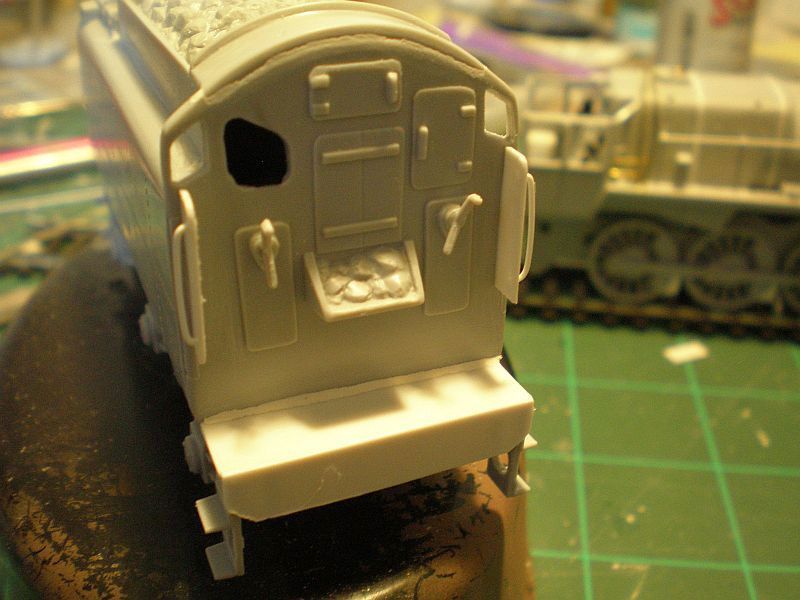
Less work was required at the front of the tender and, as alluded to in my last update, I replaced the moulded on side parts with plastic card which was drilled to accept yet more Plastruct rod for the handles. I also built up a new front chassis shelf arrangement from plastic card as the OOB was far too thick.
Image

And finally, here is the tender posed with the loco to give an idea how it will finally look. The loco body and chassis are not glued together and neither is the roof fixed to the cab.
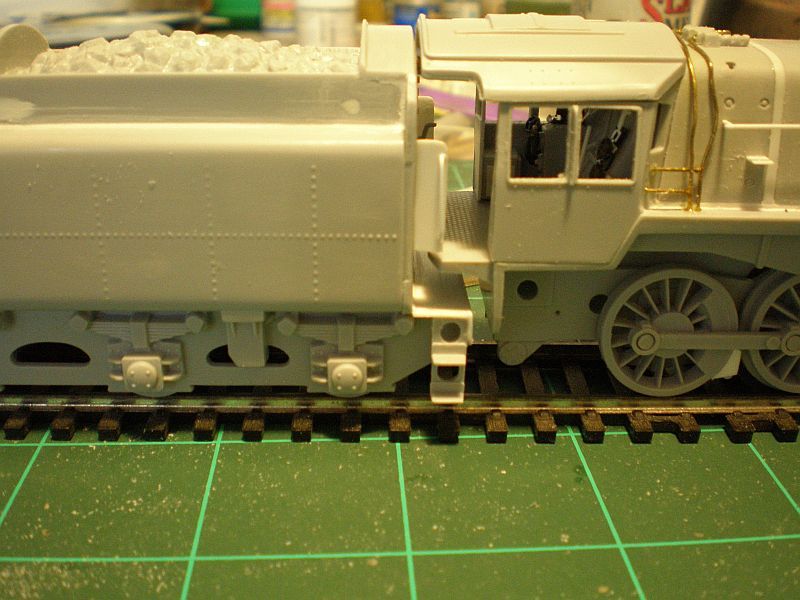
Image

I intend to apply one or two parts to the underside of the loco and then, finally, I will start to apply some paint.

Thanks for looking.
Doing - Tamiya 1/35th Universal Carrier.

Work is the curse of the modelling classes!
IPMS#12300
User avatar
splash
Senior Service Rotorhead
Posts: 13828
Joined: May 1st, 2011, 11:02 am
Location: Somerset England

Re: Shaun's builds

Post by splash »

That is starting to look incredible, are you going for bright and shiny green Everning Star or mucky black working machine?

Regards Splash
My work bench is starting to look like Portsmouth Naval Dockyard.
User avatar
Ratch
Modelling Gent and Scholar
Posts: 9946
Joined: May 1st, 2011, 9:16 am
Location: Northampton

Re: Shaun's builds

Post by Ratch »

Shaun, I've put some info on train brakes and couplings in your WIP thread ;-)
All models are equal. Some models are more equal than others.
Airfix Tribute Forum
ShaunW
NOT the sheep
Posts: 26194
Joined: November 26th, 2011, 6:11 pm
Location: Pontefract West Yorkshire

Re: Shaun's builds

Post by ShaunW »

splash wrote:That is starting to look incredible, are you going for bright and shiny green Everning Star or mucky black working machine?

Regards Splash
Many thanks Splash. I am going to paint it as a black workaday example, which I think is more representative of the Class.
Doing - Tamiya 1/35th Universal Carrier.

Work is the curse of the modelling classes!
IPMS#12300
ShaunW
NOT the sheep
Posts: 26194
Joined: November 26th, 2011, 6:11 pm
Location: Pontefract West Yorkshire

Re: Shaun's builds

Post by ShaunW »

Ratch wrote:Shaun, I've put some info on train brakes and couplings in your WIP thread ;-)
Many thanks for taking the time Ratch. I may revisit photos as obviously I've missed something or otherwise hope no one else notices and press on to the painting as I could do with pushing on to finish her. I'd like to try and build more than one model for the display, but I am one of the slower builders on here - four builds in a year would be classed as a good year for me!
Doing - Tamiya 1/35th Universal Carrier.

Work is the curse of the modelling classes!
IPMS#12300
User avatar
Ratch
Modelling Gent and Scholar
Posts: 9946
Joined: May 1st, 2011, 9:16 am
Location: Northampton

Re: Shaun's builds

Post by Ratch »

Image
This is 'Tornado', but the pipe arrangement should be similar,
L to R - the red air pipe, the yellow main res pipe, the screw coupling and the vacuum bag ;-)
All models are equal. Some models are more equal than others.
Airfix Tribute Forum
User avatar
Ratch
Modelling Gent and Scholar
Posts: 9946
Joined: May 1st, 2011, 9:16 am
Location: Northampton

Re: Shaun's builds

Post by Ratch »

Incidentally, some locos have a second bag which supplies steam heating for the train, but as the 9F was designed for freight work, it doesn't have this facility (despite working passenger trains on the S&DJR) :twisted:
All models are equal. Some models are more equal than others.
Airfix Tribute Forum
ShaunW
NOT the sheep
Posts: 26194
Joined: November 26th, 2011, 6:11 pm
Location: Pontefract West Yorkshire

Re: Shaun's builds

Post by ShaunW »

Cheers Ratch, I'll revisit this at the weekend hopefully - I still might go "la, la, la, I haven't heard you" though :ha:
Doing - Tamiya 1/35th Universal Carrier.

Work is the curse of the modelling classes!
IPMS#12300
ShaunW
NOT the sheep
Posts: 26194
Joined: November 26th, 2011, 6:11 pm
Location: Pontefract West Yorkshire

Re: Shaun's builds

Post by ShaunW »

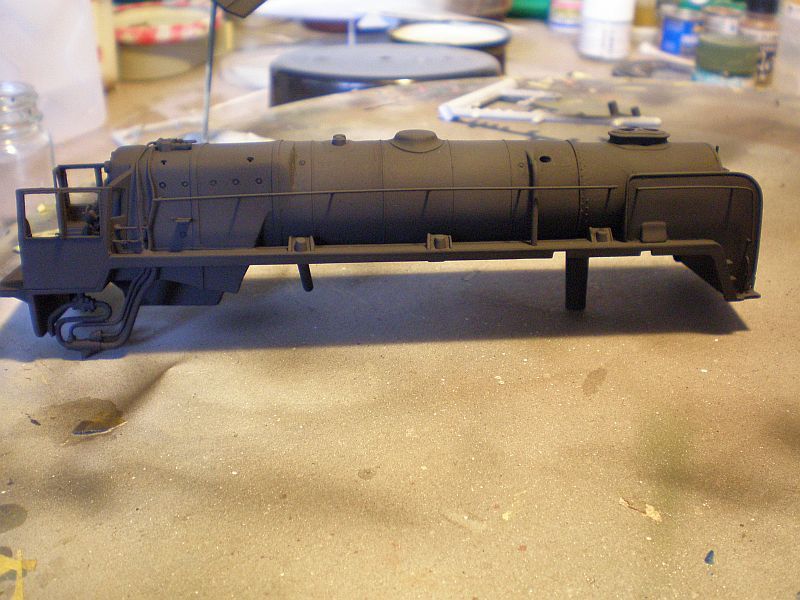
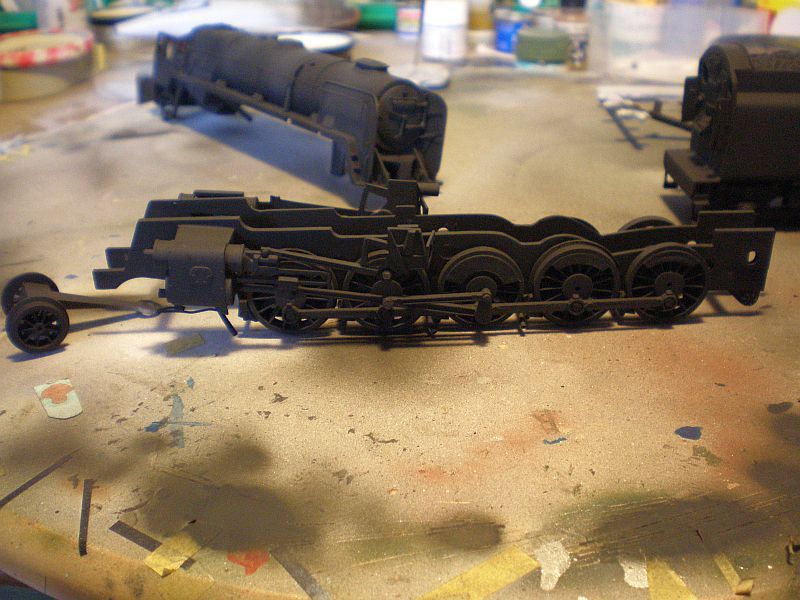
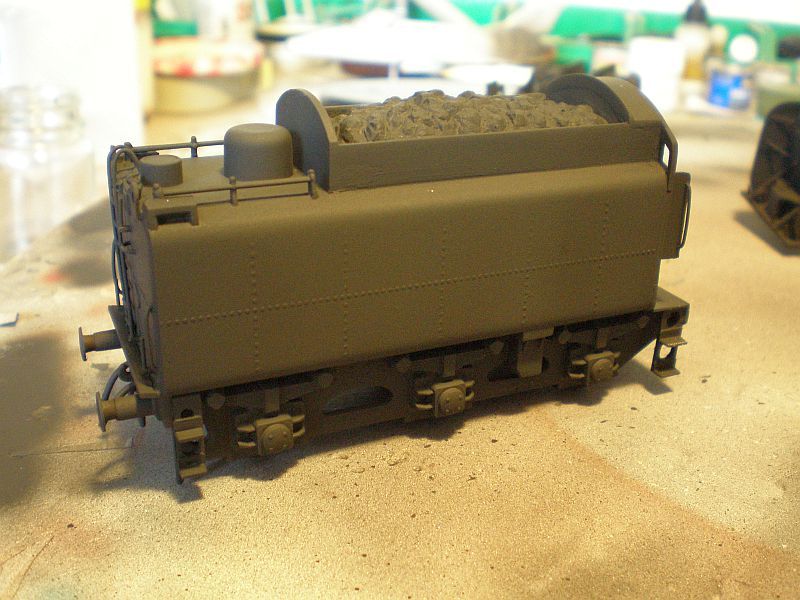
Right, I'll worry about the couplings later. For Gawd's sake let's get some paint on.

And here we have the initial base colours, all applied by airbrush, firstly Tamiya Flat Black followed by an overspray of Vallejo NATO Black to give some tonal variation.

Image

Image

Image

Once the paint has fully hardened off I will continue the weathering process using washes and dry brushing in rather the same way that I would weather a military vehicle.

Thanks for looking.
Doing - Tamiya 1/35th Universal Carrier.

Work is the curse of the modelling classes!
IPMS#12300
User avatar
splash
Senior Service Rotorhead
Posts: 13828
Joined: May 1st, 2011, 11:02 am
Location: Somerset England

Re: Shaun's builds

Post by splash »

that's brilliant, its hard to believe its the old Kitmaster/Airfix/Dapol kit.

Regards Splash
My work bench is starting to look like Portsmouth Naval Dockyard.
User avatar
Ratch
Modelling Gent and Scholar
Posts: 9946
Joined: May 1st, 2011, 9:16 am
Location: Northampton

Re: Shaun's builds

Post by Ratch »

Looking good Shaun :razz:
All models are equal. Some models are more equal than others.
Airfix Tribute Forum
ShaunW
NOT the sheep
Posts: 26194
Joined: November 26th, 2011, 6:11 pm
Location: Pontefract West Yorkshire

Re: Shaun's builds

Post by ShaunW »

Cheers boys. I've had a busy week but I've started to do the detail painting ahead of the weathering.
Doing - Tamiya 1/35th Universal Carrier.

Work is the curse of the modelling classes!
IPMS#12300
ShaunW
NOT the sheep
Posts: 26194
Joined: November 26th, 2011, 6:11 pm
Location: Pontefract West Yorkshire

Re: Shaun's builds

Post by ShaunW »

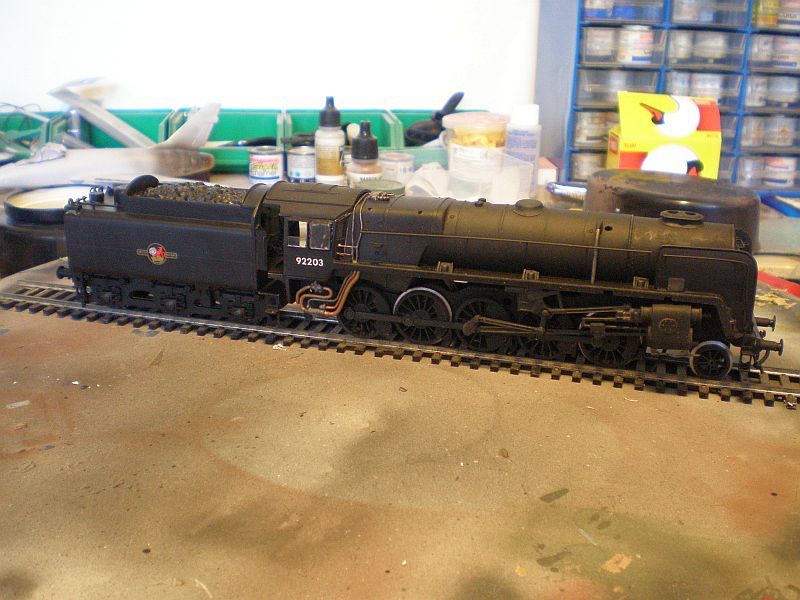
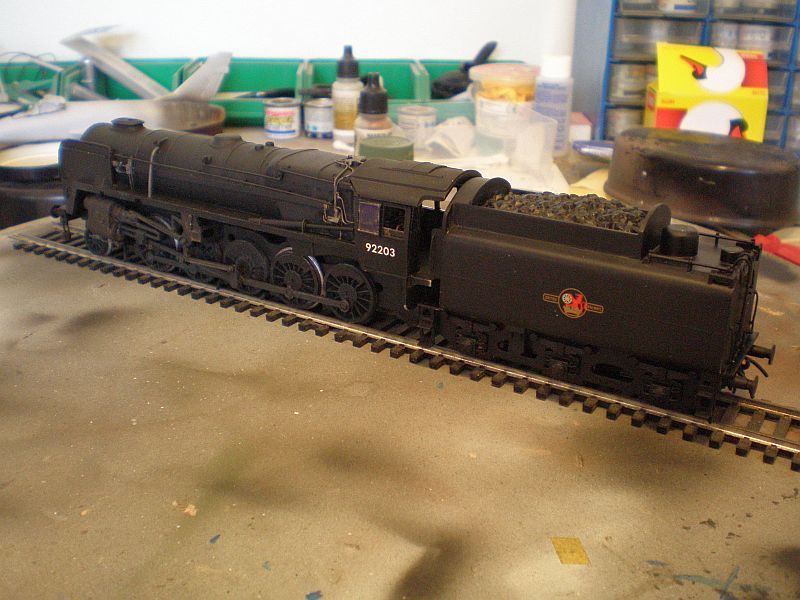
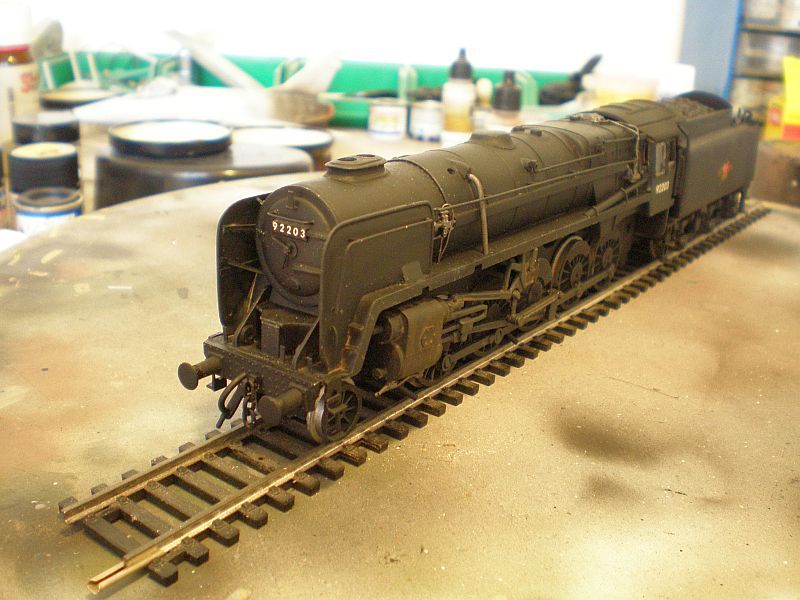
After what seems an eternity, here's some pics to show that I haven't totally fallen asleep on this project. The model is now almost complete. The decals didn't look spectacular on the sheet but they went on very well indeed over a coat of Humbrol gloss varnish and after a coat of Hu matt varnish there was no silvering and the decals also responded well to a bit of Microscale red bottle solution, which pulled them down nice and tight. The cab roof was a pain to fit and required shims of thin plastic card to eliminate the gaps and achieve a reasonable fit. The cab windows were glazed using packaging material fixed into place with Glue n Glaze. Body to chassis fit was also quite poor and required the use of plastic card shims to get the body to sit level. The front chassis member was a decent fit and I made up a vacuum pipe and used more of the gold chain that I used on the tender. Not 100% accurate but 100% better than OOB IMHO. The weathering has ended up being quite restrained but I will do a little bit more dry brushing to bring out some of the detail. I still have to make up grab rails for the cab and there are some additional connecting rods to be added that don't come with the kit but are apparent from photos. The pipes were painted with Mr Hobby stainless and Tamiya Dark Copper for the shinier tubes. The wheel rims received a coat of Mr Hobby silver, which was dulled down with matt varnish.

Image


Image

Image

So, I'm nearly there. After this I will get hold of a couple of Dapol signal boxes and have a go at a bit of building modelling, which again is something I haven't done before.

Thanks for looking.
Doing - Tamiya 1/35th Universal Carrier.

Work is the curse of the modelling classes!
IPMS#12300
User avatar
splash
Senior Service Rotorhead
Posts: 13828
Joined: May 1st, 2011, 11:02 am
Location: Somerset England

Re: Shaun's builds

Post by splash »

Image
My work bench is starting to look like Portsmouth Naval Dockyard.
ShaunW
NOT the sheep
Posts: 26194
Joined: November 26th, 2011, 6:11 pm
Location: Pontefract West Yorkshire

Re: Shaun's builds

Post by ShaunW »

Cheers Splash, I'm glad you like her.
Doing - Tamiya 1/35th Universal Carrier.

Work is the curse of the modelling classes!
IPMS#12300
Locked

Return to “SMW 2015 - Going loco”