It will be good to see another one of those cranes built!
Shaun's builds
Moderator: JamesPerrin
-
ShaunW
- NOT the sheep
- Posts: 26194
- Joined: November 26th, 2011, 6:11 pm
- Location: Pontefract West Yorkshire
Re: Shaun's builds
Yes, I was pleasantly surprised myself Chris as the Class 9F kit had a lot more flash than this one does. This in fact looks to be a much more modern kit than it actually is. So far though, the fit is up to 1960's standards 
It will be good to see another one of those cranes built!
It will be good to see another one of those cranes built!
Doing - Tamiya 1/35th Universal Carrier.
Work is the curse of the modelling classes!
IPMS#12300
Work is the curse of the modelling classes!
IPMS#12300
-
ShaunW
- NOT the sheep
- Posts: 26194
- Joined: November 26th, 2011, 6:11 pm
- Location: Pontefract West Yorkshire
Re: Shaun's builds
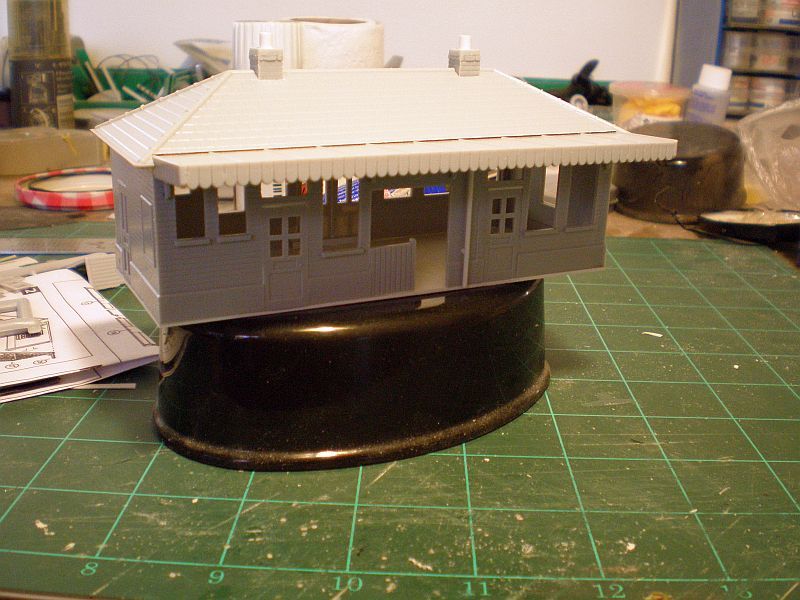
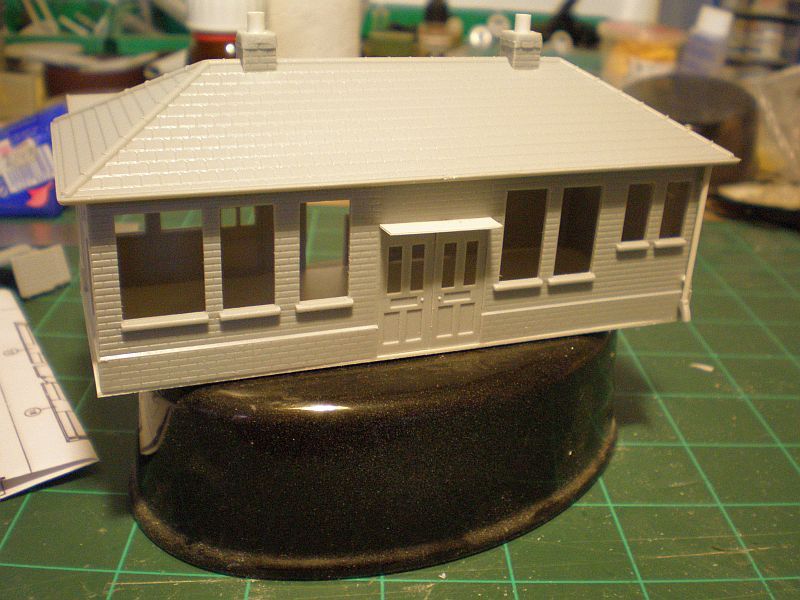
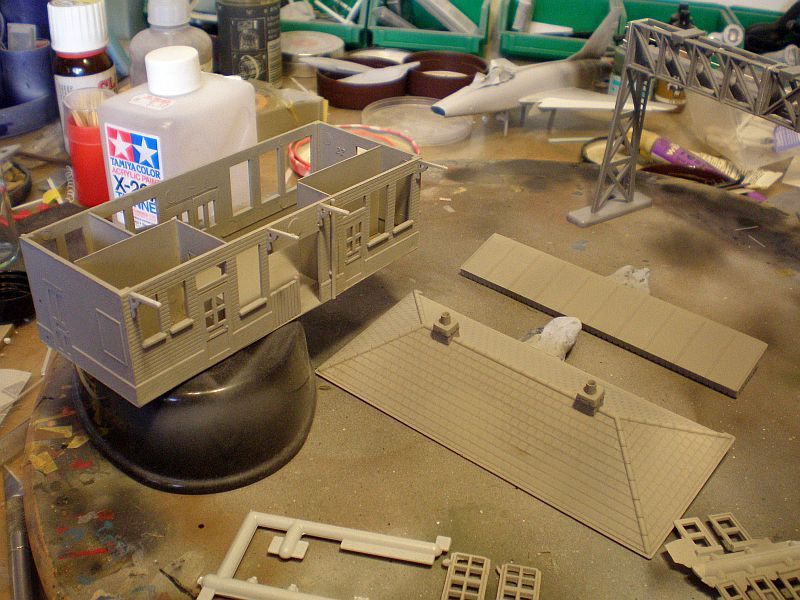
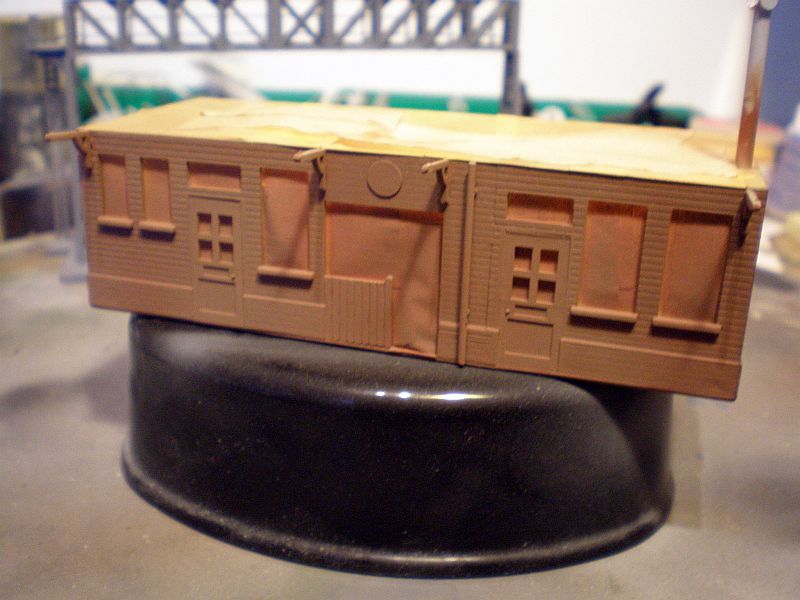
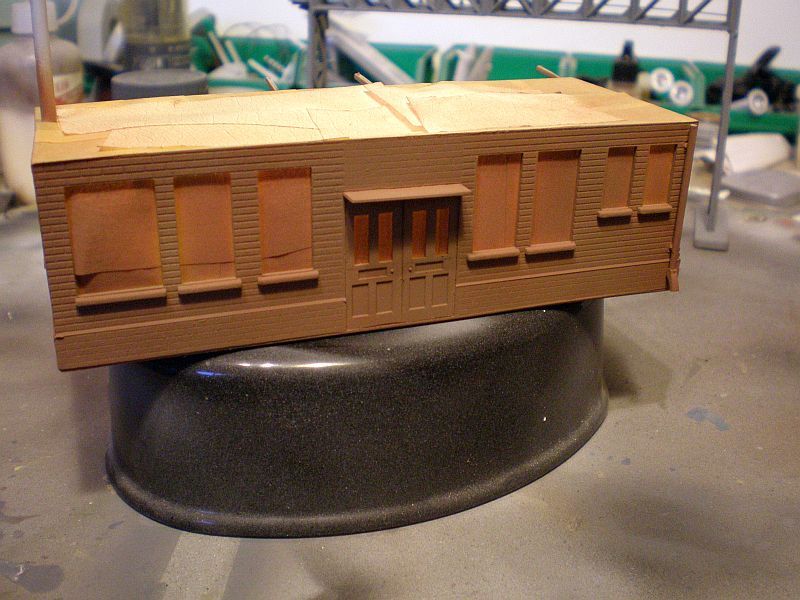
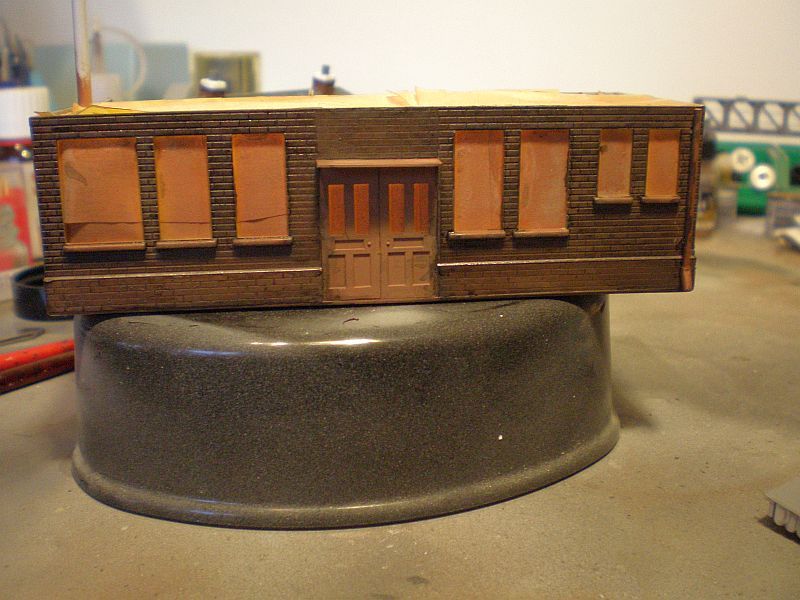
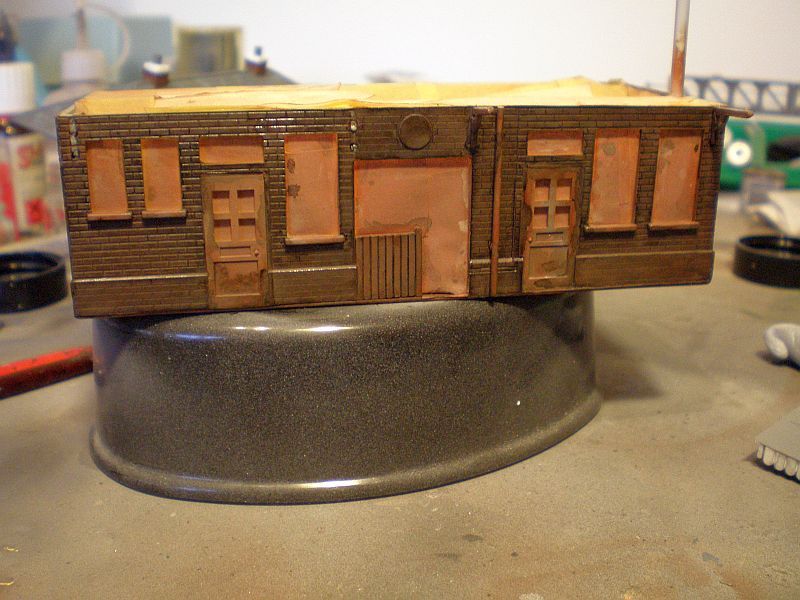
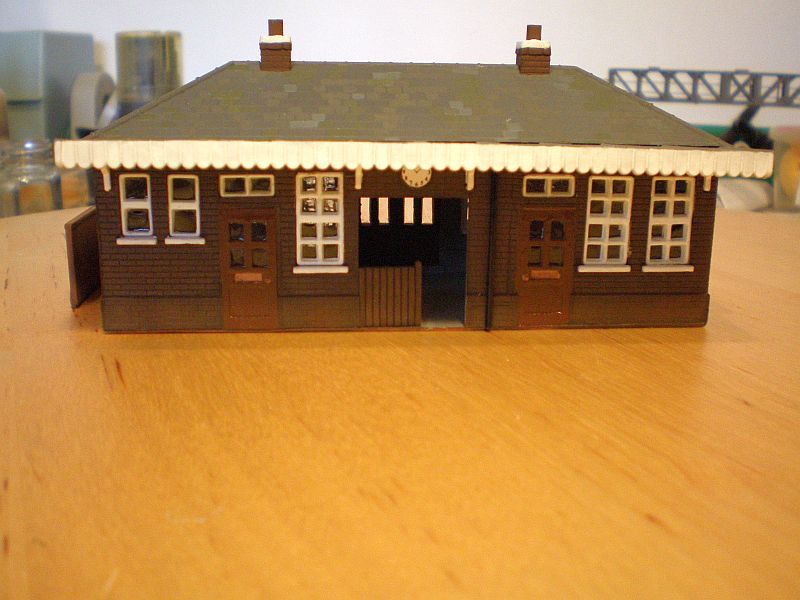
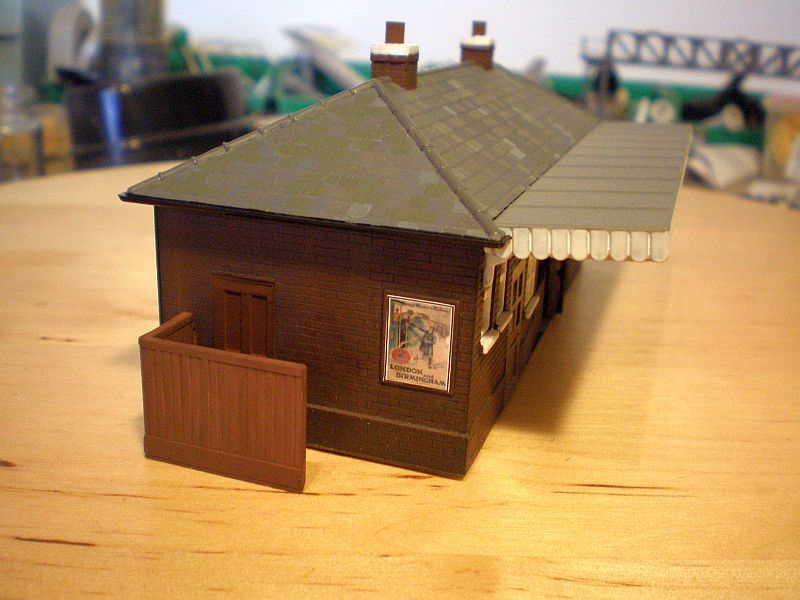
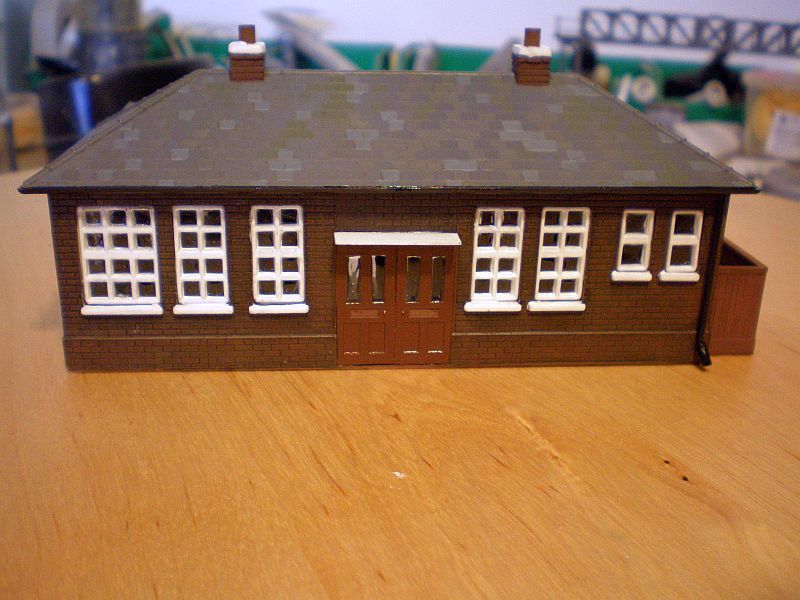
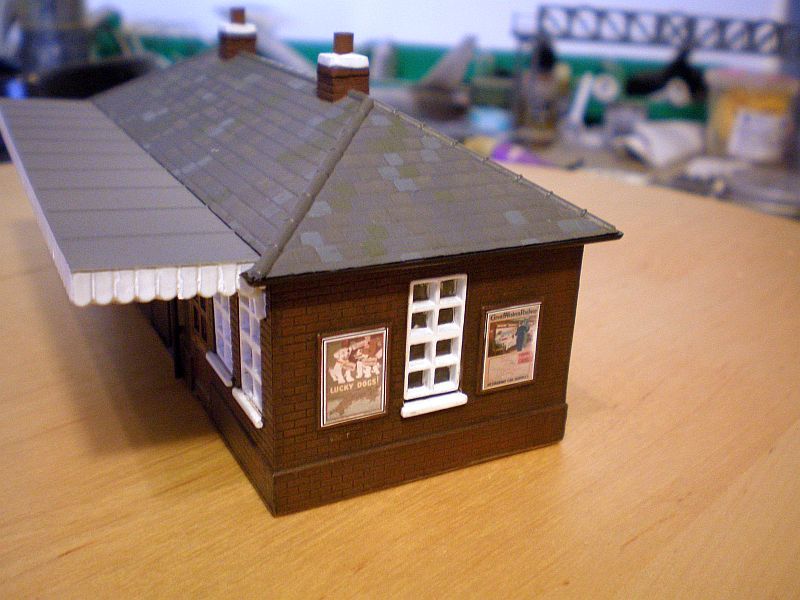
I've now managed to build the booking hall to the level where it is ready for paint. I have mocked up the building for the purposes of the photos and the roof and canopy are not permanently attached. I have made some alterations from stock, the drainpipes have been replaced with tube as I wasn't keen on the square section pipes that were provided with the kit. At the rear, I have used what was formerly the curved top section of the drainpipe to produce a curved bottom section, rather like that seen on domestic drainpipes, which serve to keep the water away from the brickwork. OOB, the curved top section didn't really come close to meeting up with the roof guttering and I thought this was a better solution. I'm not too keen on the fit of the canopy as it seems to want to lean back towards the roof (I have fitted the canopy supports but they are not really visible in the photos) and so that will require attention on final assembly. I have mounted the building on a base of plastic card as the whole structure was somewhat wobbly and a little warped. The base has had the effect of strengthening the structure and counteracting the warp, as well as providing a floor. The base does, however, require a little trimming around the edges.
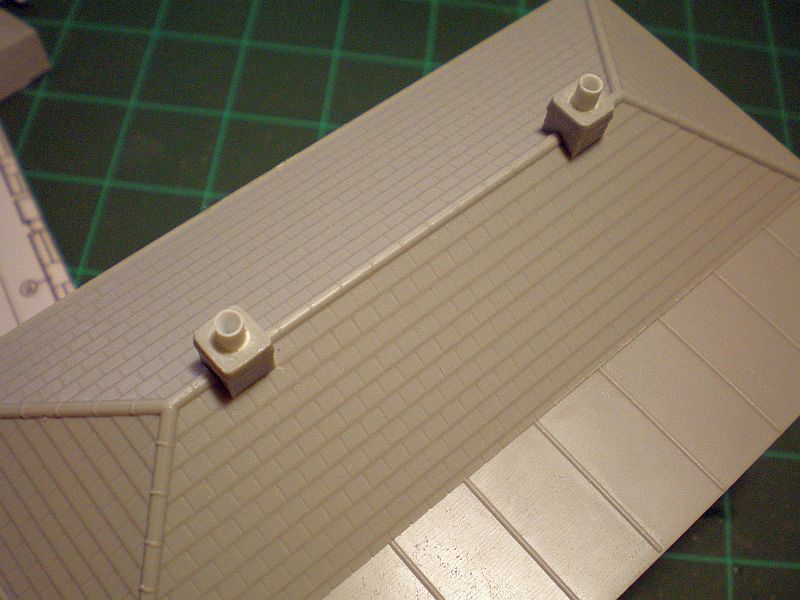
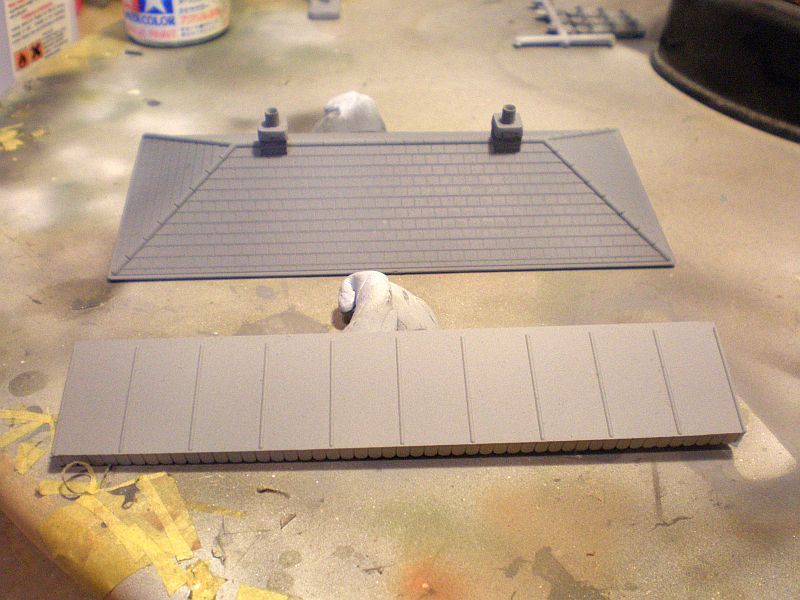
On the roof, the chimney pots were moulded solid and I attacked them with a drill but unfortunately made a mess of one, using a drill bit that was too large and stupidly rushing the job etc etc and therefore ended up replacing both with hollow plastic tube:
I'll now start work on the signal gantry and hopefully I will be able to paint both at the weekend.
Thanks for looking.


On the roof, the chimney pots were moulded solid and I attacked them with a drill but unfortunately made a mess of one, using a drill bit that was too large and stupidly rushing the job etc etc

I'll now start work on the signal gantry and hopefully I will be able to paint both at the weekend.
Thanks for looking.
Doing - Tamiya 1/35th Universal Carrier.
Work is the curse of the modelling classes!
IPMS#12300
Work is the curse of the modelling classes!
IPMS#12300
Re: Shaun's builds
That looks sweet already. A coat of paint and it will be well spot on.
Trying to Build kits and not Buy kits
-
ShaunW
- NOT the sheep
- Posts: 26194
- Joined: November 26th, 2011, 6:11 pm
- Location: Pontefract West Yorkshire
Re: Shaun's builds
Cheers Chris, all being well it will be receiving paint at the weekend.
Doing - Tamiya 1/35th Universal Carrier.
Work is the curse of the modelling classes!
IPMS#12300
Work is the curse of the modelling classes!
IPMS#12300
-
ShaunW
- NOT the sheep
- Posts: 26194
- Joined: November 26th, 2011, 6:11 pm
- Location: Pontefract West Yorkshire
Re: Shaun's builds
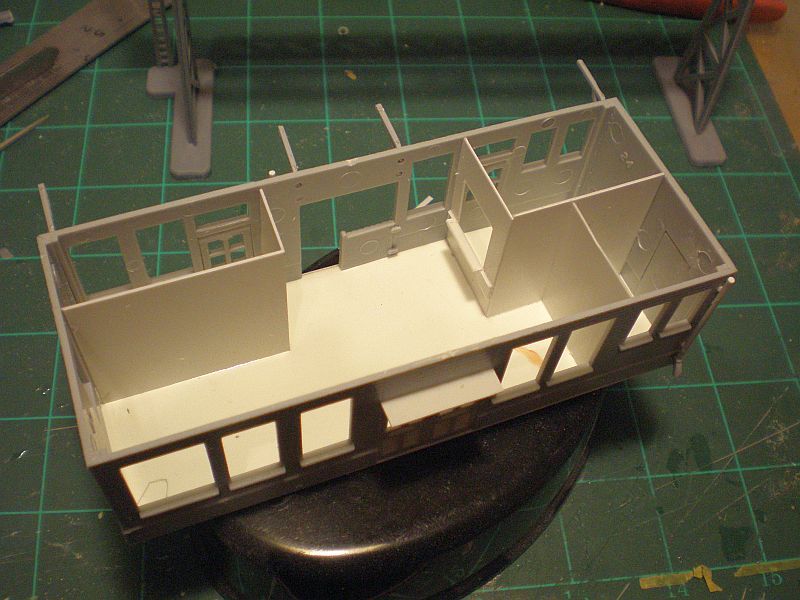
After some mulling and chewing, I decided to add a rudimentary interior to the booking hall, both to cut down on any potential see-through effect and to give the impression that it is more than simply an empty box. I used some off-cuts of plastic card and also incorporated a ticket office window and serving counter behind the front swing door.
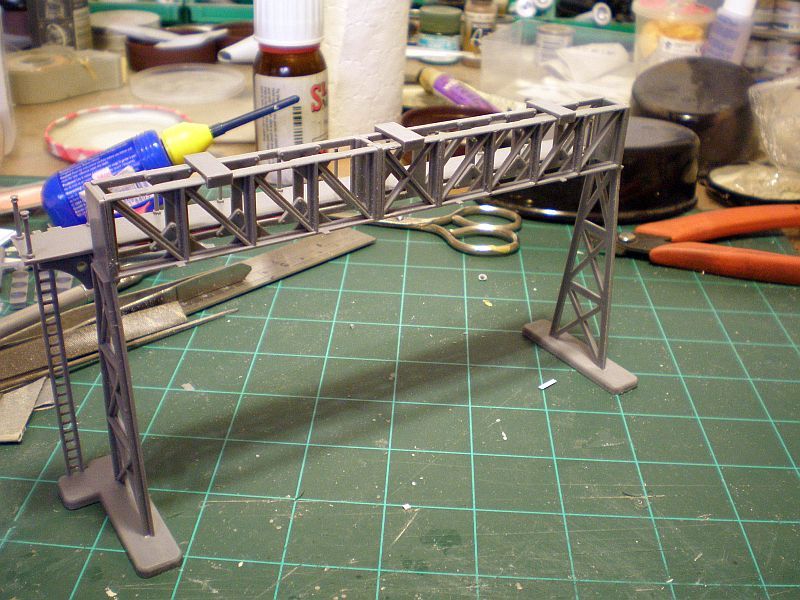
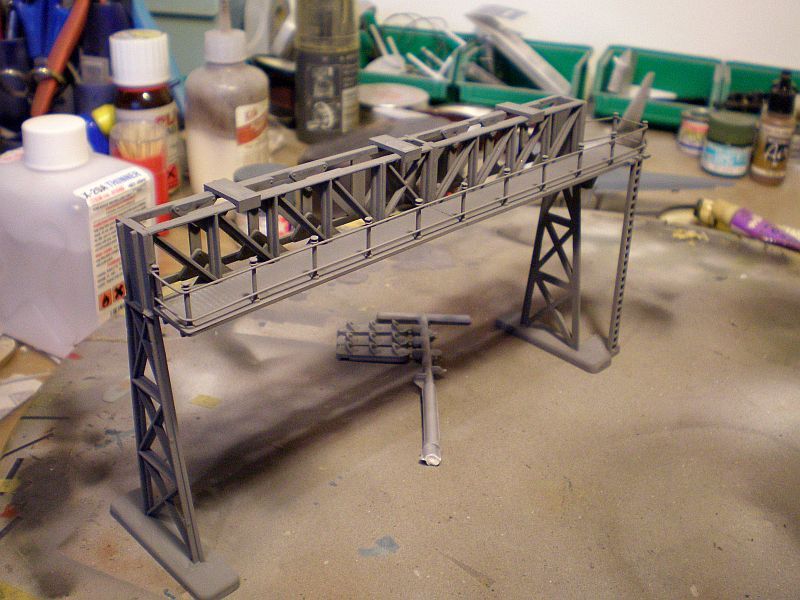
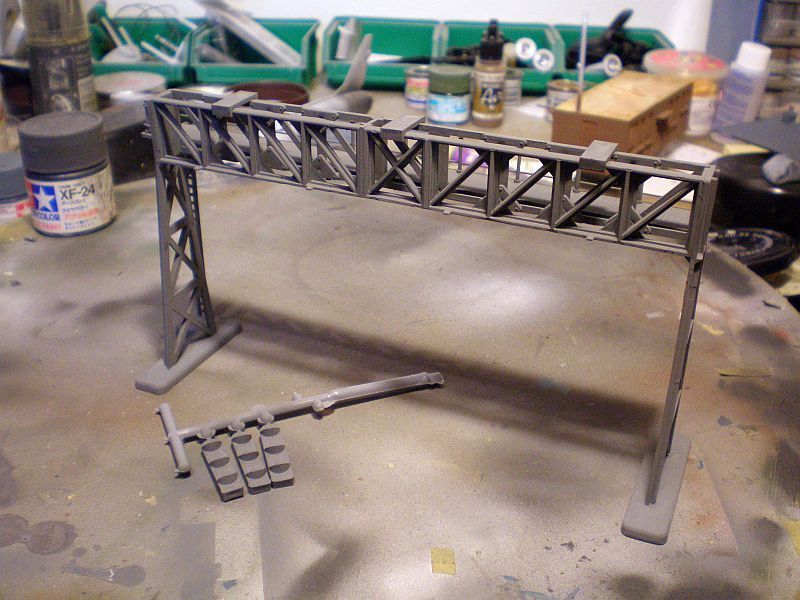
I then turned my attention to the signal gantry. My edition of this kit did, however, leave a little to be desired as a couple of the girder sections, one of the uprights and a section of the rear walkway were all warped to one degree or another. I used very hot water to iron out the warps and was largely successful, however the gantry still looks ever so slightly bent Ho hum, onwards and upwards. The final job on this will be to make some horizontal bars to fit between the uprights on the walkways, thereby creating safety rails. Dapol suggest using thread but I'm none to keen on that idea and will likely use 0.5mm Plastruct rod or stretched sprue if the former looks too out of scale.
I aim to give the booking hall its first coat of paint tomorrow and will do likewise with the gantry if I have the time.
Thanks for looking.

I then turned my attention to the signal gantry. My edition of this kit did, however, leave a little to be desired as a couple of the girder sections, one of the uprights and a section of the rear walkway were all warped to one degree or another. I used very hot water to iron out the warps and was largely successful, however the gantry still looks ever so slightly bent


I aim to give the booking hall its first coat of paint tomorrow and will do likewise with the gantry if I have the time.
Thanks for looking.
Doing - Tamiya 1/35th Universal Carrier.
Work is the curse of the modelling classes!
IPMS#12300
Work is the curse of the modelling classes!
IPMS#12300
Re: Shaun's builds
Cotton thread worked well for me for the guardrail on crane. I have posted final photos in my build log now. I used some stuff that came out of an airfix sailing ship kit and just tied it in a simple loop knot between each plastic upright, gave it a coat of pva to stiffen it and then painted it (grey in my case to fit in with crane base colour). Could save you hours of faffing at this stage.
Trying to Build kits and not Buy kits
-
PaulBradley

- Staring out the window
- Posts: 21223
- Joined: April 6th, 2011, 3:08 pm
- Location: Flagstaff, AZ
Re: Shaun's builds
Looking good, Shaun.
Paul
За демократію і незалежний Україну
"For Democracy and a Free Ukraine"
За демократію і незалежний Україну
"For Democracy and a Free Ukraine"
-
ShaunW
- NOT the sheep
- Posts: 26194
- Joined: November 26th, 2011, 6:11 pm
- Location: Pontefract West Yorkshire
Re: Shaun's builds
Cheers Paul.
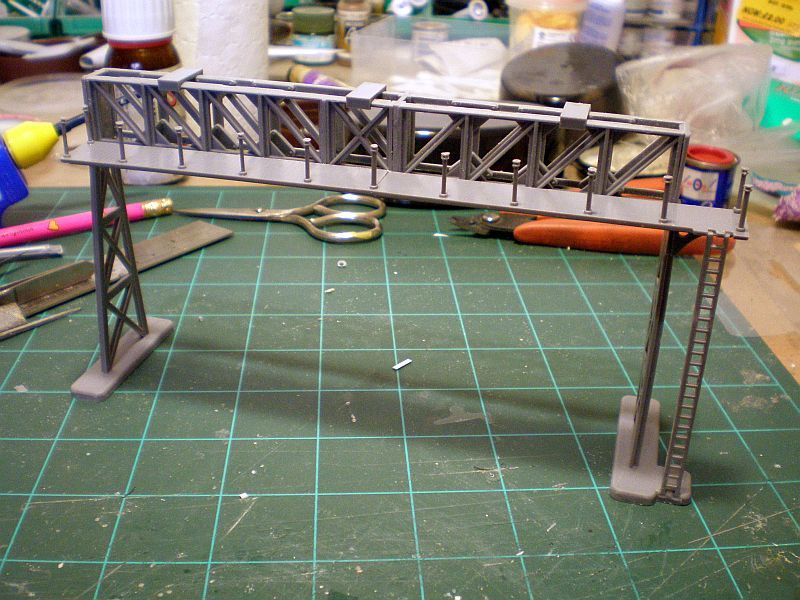
Well, I've done the gantry guardrails and have cheated a little. In the end I decided against raiding Mrs W's sewing provisions and elected to use 0.5mm Plastruct rod mounted to the outside of the uprights rather than between them. I used one continuous piece of rod for each of the two rails, which was measured and then given a 90 degree bend at each end using the edge of my steel rule. The guardrails were attached with tube glue carefully applied to the uprights using a cocktail stick. I also decided to put in an additional section on the right hand side between the front of the walkway and the side of the gantry as an extra safety feature, which I'm sure will be appreciated any 00 scale workmen who might find themselves up there This proved to be a relatively easy method and handrails only took about 20 mins to complete.
In other news, the components of the booking hall have now all received an undercoat of Tamiya medium grey (XF-20), applied by airbrush (thinking about it now, I should have mixed up a bit more to to give the F-100 in the background a further undercoat whilst I was at it as I have recently fitted new L/E slats, but I digress ). Painting of the booking hall will commence in earnest on my day off tomorrow.
Thanks for looking.
Well, I've done the gantry guardrails and have cheated a little. In the end I decided against raiding Mrs W's sewing provisions and elected to use 0.5mm Plastruct rod mounted to the outside of the uprights rather than between them. I used one continuous piece of rod for each of the two rails, which was measured and then given a 90 degree bend at each end using the edge of my steel rule. The guardrails were attached with tube glue carefully applied to the uprights using a cocktail stick. I also decided to put in an additional section on the right hand side between the front of the walkway and the side of the gantry as an extra safety feature, which I'm sure will be appreciated any 00 scale workmen who might find themselves up there

In other news, the components of the booking hall have now all received an undercoat of Tamiya medium grey (XF-20), applied by airbrush (thinking about it now, I should have mixed up a bit more to to give the F-100 in the background a further undercoat whilst I was at it as I have recently fitted new L/E slats, but I digress

Thanks for looking.
Doing - Tamiya 1/35th Universal Carrier.
Work is the curse of the modelling classes!
IPMS#12300
Work is the curse of the modelling classes!
IPMS#12300
-
beany

- Fat git, glasses, goatie - Avoid!
- Posts: 4336
- Joined: April 6th, 2011, 11:05 am
- Location: Chellaston, Derby
Re: Shaun's builds
You ain't whistling Dixie brother. There was a gantry just like this one at Guildford I remember as a signal engineering student. I used to be scared stiff up there as the wooden floor boards were covered in green, mossy slime in the autumn and winter and were extremely slippery, and those 750v dc live rails seemed to beckon from down below!ShaunW wrote:I also decided to put in an additional section on the right hand side between the front of the walkway and the side of the gantry as an extra safety feature, which I'm sure will be appreciated any 00 scale workmen who might find themselves up there
The gantry looks real good mate.
Al.
2024 Acquired: 9 Built: 1
-
ShaunW
- NOT the sheep
- Posts: 26194
- Joined: November 26th, 2011, 6:11 pm
- Location: Pontefract West Yorkshire
Re: Shaun's builds
Sooner you that me climbing up one of those things Al. I don't even like domestic ladders! Interesting tale though and I like that sort of thing as it puts builds into perspective.
Right, I've made my airbrush have it today with a flurry of painting. First up the booking hall. I gave this an initial coat of Tamiya XF-64 Red Brown as I don't have any brick or hull red in stock. This was followed by coats of XF-68 NATO Brown and XF-52 Flat Earth sprayed in "cloud" patterns to give some contrast. I will then apply a wash or two and I also might paint some individual bricks in different shades - in this scale, however, those bricks are darned small!
The roof and canopy also received paint. The roof was initially painted XF-64 Dark Sea Grey, whilst allowing some of the undercoat of XF-20 Medium Grey to show through. Thereafter, additional contrast coats of XF-82 RAF Ocean Grey and XF-82 with a few drops of XF-24 Dark Grey were "clouded" on. I decided to make the canopy a lighter contrast to the roof and largely kept the XF-20 with a gentle overspray of XF-82.
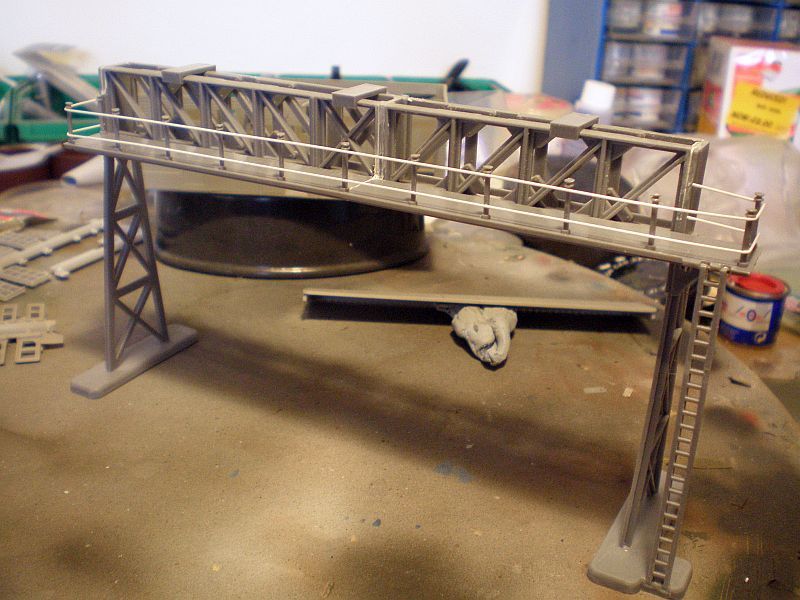
Whilst I was at it, I decided to give the gantry an initial coat of XF-54 - this was a bit of a pig to paint with the airbrush as it proved difficult to get paint into all of the nooks and crannies. A further coat will be required and I will probably use a contrast coat as with the other pieces.
And that's where I am at the moment. I don't know what I'll manage to get done further during the week as it is now time to start organising for the show, including establishing where you are all at with your various builds.
Thanks for looking.
Right, I've made my airbrush have it today with a flurry of painting. First up the booking hall. I gave this an initial coat of Tamiya XF-64 Red Brown as I don't have any brick or hull red in stock. This was followed by coats of XF-68 NATO Brown and XF-52 Flat Earth sprayed in "cloud" patterns to give some contrast. I will then apply a wash or two and I also might paint some individual bricks in different shades - in this scale, however, those bricks are darned small!


The roof and canopy also received paint. The roof was initially painted XF-64 Dark Sea Grey, whilst allowing some of the undercoat of XF-20 Medium Grey to show through. Thereafter, additional contrast coats of XF-82 RAF Ocean Grey and XF-82 with a few drops of XF-24 Dark Grey were "clouded" on. I decided to make the canopy a lighter contrast to the roof and largely kept the XF-20 with a gentle overspray of XF-82.

Whilst I was at it, I decided to give the gantry an initial coat of XF-54 - this was a bit of a pig to paint with the airbrush as it proved difficult to get paint into all of the nooks and crannies. A further coat will be required and I will probably use a contrast coat as with the other pieces.


And that's where I am at the moment. I don't know what I'll manage to get done further during the week as it is now time to start organising for the show, including establishing where you are all at with your various builds.
Thanks for looking.
Doing - Tamiya 1/35th Universal Carrier.
Work is the curse of the modelling classes!
IPMS#12300
Work is the curse of the modelling classes!
IPMS#12300
-
ShaunW
- NOT the sheep
- Posts: 26194
- Joined: November 26th, 2011, 6:11 pm
- Location: Pontefract West Yorkshire
Re: Shaun's builds
So far this weekend I've spent time attempting to breathe a bit of life into the booking hall. First up, I've staredt by applying a couple of dark washes, to put some shadow and general grime into the brickwork. First up was a wash of Burnt Sienna oil paint heavily diluted in white spirit and that was followed by a black wash made using Humbrol matt black enamel once again heavily diluted in white spirit. The black wash was was still drying when I took the photos. It looks a little messy at the moment, as washes sometimes do when viewed in isolation, but I will follow up tomorrow with some dry brushing of lighter tones before the detail painting of the window sills, doors etc.
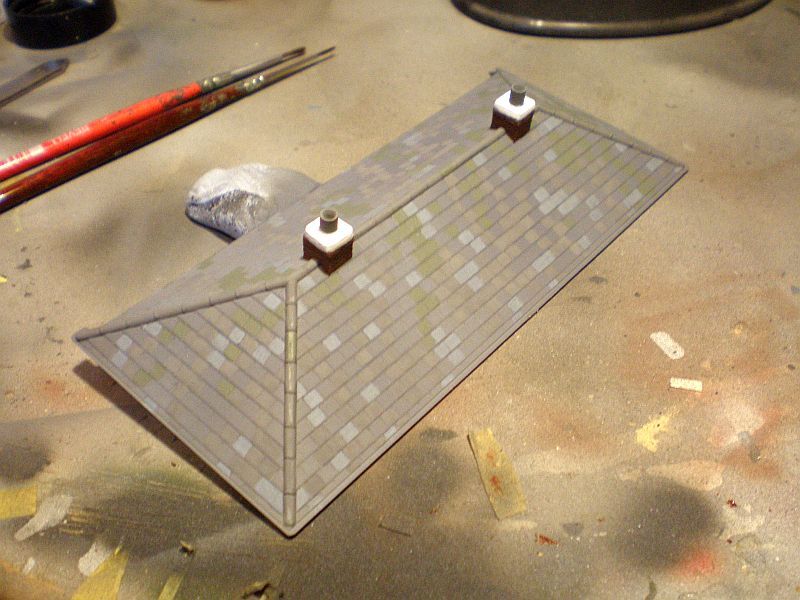
I've also made an attempt at creating a multi-tonal effect on the roof by painting individual tiles using Tamiya XF-82 RAF Ocean Grey, XF-54 Dark Sea Grey and XF-22 RLM Grey. The roof will also receive a dark wash and dry brush.
As I'm outside of my modelling comfort zone, I'm experimenting a little here but hopefully it will be alright on the night


I've also made an attempt at creating a multi-tonal effect on the roof by painting individual tiles using Tamiya XF-82 RAF Ocean Grey, XF-54 Dark Sea Grey and XF-22 RLM Grey. The roof will also receive a dark wash and dry brush.

As I'm outside of my modelling comfort zone, I'm experimenting a little here but hopefully it will be alright on the night
Doing - Tamiya 1/35th Universal Carrier.
Work is the curse of the modelling classes!
IPMS#12300
Work is the curse of the modelling classes!
IPMS#12300
Re: Shaun's builds
The brickwork on that wall and roofing tiles are looking fine to me from those photos. Good work.
Trying to Build kits and not Buy kits
-
ShaunW
- NOT the sheep
- Posts: 26194
- Joined: November 26th, 2011, 6:11 pm
- Location: Pontefract West Yorkshire
Re: Shaun's builds
Many thanks Chris.
After a surge of activity during the week and over the weekend (by my standards anyway!) I'm now calling the booking hall finished. The final fitting out was a bit of a pig TBH, with some of the rear windows refusing to play ball and the roof also throwing the toys out of the pram. I persevered however and here is the result, it won't win any prizes but I'm reasonably pleased with it. The windows are glazed with Glue n Glaze and I went for Tamiya X-9 brown for the doors, with the door furniture being finished in Tamiya Dark Copper to represent slightly weathered brass fittings. The posters and clock, which are not decals, were fixed using PVA.
Next up will be the signal gantry and I have a question - what colours are the signal lights? traffic light style red, amber and green or some other combination?
Thanks for looking.
After a surge of activity during the week and over the weekend (by my standards anyway!) I'm now calling the booking hall finished. The final fitting out was a bit of a pig TBH, with some of the rear windows refusing to play ball and the roof also throwing the toys out of the pram. I persevered however and here is the result, it won't win any prizes but I'm reasonably pleased with it. The windows are glazed with Glue n Glaze and I went for Tamiya X-9 brown for the doors, with the door furniture being finished in Tamiya Dark Copper to represent slightly weathered brass fittings. The posters and clock, which are not decals, were fixed using PVA.


Next up will be the signal gantry and I have a question - what colours are the signal lights? traffic light style red, amber and green or some other combination?
Thanks for looking.
Doing - Tamiya 1/35th Universal Carrier.
Work is the curse of the modelling classes!
IPMS#12300
Work is the curse of the modelling classes!
IPMS#12300
-
splash

- Senior Service Rotorhead
- Posts: 13828
- Joined: May 1st, 2011, 11:02 am
- Location: Somerset England
Re: Shaun's builds
Great work it looks brilliant
My work bench is starting to look like Portsmouth Naval Dockyard.
-
beany
- Fat git, glasses, goatie - Avoid!
- Posts: 4336
- Joined: April 6th, 2011, 11:05 am
- Location: Chellaston, Derby
Re: Shaun's builds
The signal heads themselves will be Matt Black. There are three bulges suggesting these are three aspect signals, so they would show either a red at the bottom (most restrictive aspect is always nearest to the drivers eye level), yellow in the middle (caution, next signal is currently showing red), or green at the top (line ahead is clear - unrestricted). So choose one of the three colours for each signal head Shaun, but not more than one at the same time in any head. Google colour light signal gantry (Images) for a better idea mate!ShaunW wrote:Next up will be the signal gantry and I have a question - what colours are the signal lights? traffic light style red, amber and green or some other combination?
I'd use Humbrol Emerald Green, Trainer Yellow and/or Scarlet/Red or whatever equivalents you have. For the period we are modelling these would be low voltage but highly focused beams from filament lamps - none of you're fancy LEDs thank you very much.
Cheers
Al.
2024 Acquired: 9 Built: 1