Yellow Wings P-26 *** Finished ***
-
JohnRatzenberger

- Why is he so confused ?
- Posts: 15736
- Joined: April 5th, 2011, 3:42 pm
- Location: Living on a sandbar - Nags Head, NC.
Re: Yellow Wings
Pictures and decaling got OBE and much of tomorrow is shot already. 
John Ratzenberger 
It's my model and I'll do what I want with it.
It's my model and I'll do what I want with it.
-
DavidWomby

- Modelling Gent and Scholar
- Posts: 11767
- Joined: May 1st, 2011, 8:09 pm
- Location: Florida, USA
Re: Yellow Wings
I have to agree with you there.jRatz wrote: It's really a crime that Polly Scale ... well never mind.
Great looking P-26.
David
-
JohnRatzenberger
- Why is he so confused ?
- Posts: 15736
- Joined: April 5th, 2011, 3:42 pm
- Location: Living on a sandbar - Nags Head, NC.
Re: Yellow Wings
Finally, decaling has started ....
The underside; it's still glistening with Micro-Sol - my big hope is that the tail decorations meld into the stab/elev line.
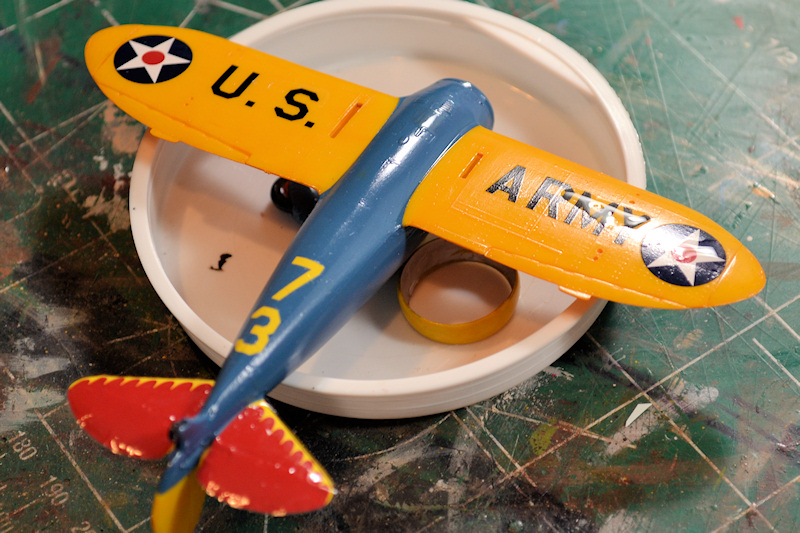
Tomorrow, I hope, will be the topsides -- at least wing and tail -- and the wheel spats. I'll save the fuselage stripes and cowl for another day. I do have to get back to work on the engine and get it mounted.
The underside; it's still glistening with Micro-Sol - my big hope is that the tail decorations meld into the stab/elev line.
Tomorrow, I hope, will be the topsides -- at least wing and tail -- and the wheel spats. I'll save the fuselage stripes and cowl for another day. I do have to get back to work on the engine and get it mounted.
John Ratzenberger
It's my model and I'll do what I want with it.
It's my model and I'll do what I want with it.
-
JamesPerrin

- Looks like his avatar
- Posts: 13695
- Joined: April 5th, 2011, 8:09 pm
- Location: W. Yorkshire
- Contact:
Re: Yellow Wings
It's going to be eye-popping when all done.
Classic British Kits SIG Leader Better to fettle than to fill
(2024 A:B 5:2) (2023 13:8:7) (2022 21:11) (2021 15:8) (2020 8:4:4)
(2024 A:B 5:2) (2023 13:8:7) (2022 21:11) (2021 15:8) (2020 8:4:4)
-
iggie

- Modelling Gent and Scholar
- Posts: 23438
- Joined: July 31st, 2013, 11:04 am
- Location: North Somercotes, Lincolnshire
- Contact:
Re: Yellow Wings
It's certainly a bright little thing!
Best wishes
Jim
If you can walk away from a landing, it's a good landing. If you use the airplane the next day, it's an outstanding landing
"Never put off till tomorrow, what you can do the day after tomorrow"
Jim
If you can walk away from a landing, it's a good landing. If you use the airplane the next day, it's an outstanding landing
"Never put off till tomorrow, what you can do the day after tomorrow"
-
fearless frankie
- Active Participant
- Posts: 810
- Joined: January 18th, 2012, 1:10 am
Re: Yellow Wings
Loving it
-
JohnRatzenberger
- Why is he so confused ?
- Posts: 15736
- Joined: April 5th, 2011, 3:42 pm
- Location: Living on a sandbar - Nags Head, NC.
Re: Yellow Wings
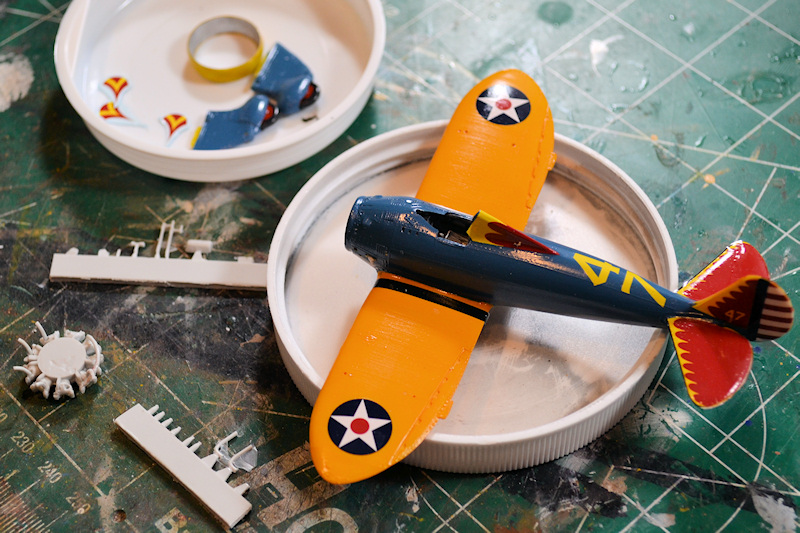
Did topside today ... have the fuselage sides, cowl, and wheel pants yet ...
John Ratzenberger
It's my model and I'll do what I want with it.
It's my model and I'll do what I want with it.
-
JohnRatzenberger
- Why is he so confused ?
- Posts: 15736
- Joined: April 5th, 2011, 3:42 pm
- Location: Living on a sandbar - Nags Head, NC.
Re: Yellow Wings
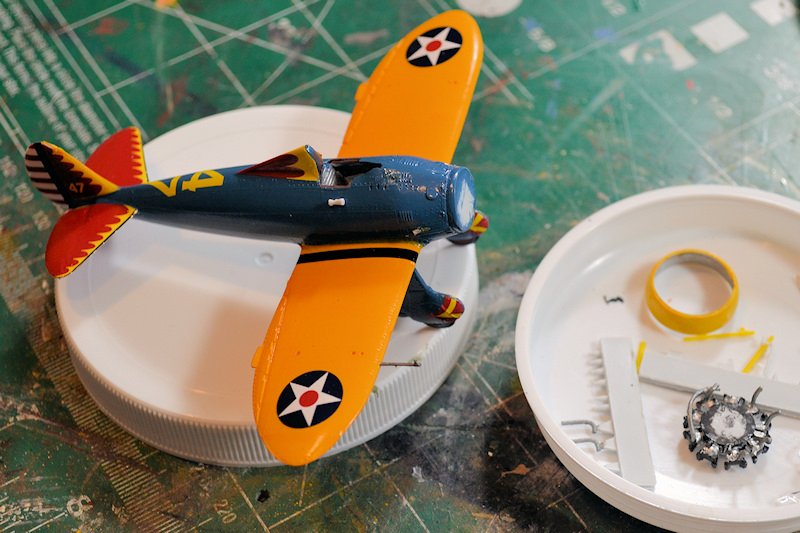
Here's yesterday and today .... decals on upper side of wings, upper fuselage, headrest, fin/rudder, and tailplanes.
And I'm working on getting the engine built, it has added detail, so I can mount it/cowl before I finish decaling. That should ensure the stripes run straight and are aligned with the cowl.
So, test-fit the engine, paint it, get it in the cowl properly and mounted, do the remaining decaling, and add the few remaining bits. It will still take a few days at my pace. I also need to trim around the fin/rudder and the tailplanes then touchup with paint.
John Ratzenberger
It's my model and I'll do what I want with it.
It's my model and I'll do what I want with it.

Re: Yellow Wings
Looking good but can I ask a silly question?, it says 47 on the tail and spine but (I assume) 37 underneath. Is that right and something I've missed?.
Hoping to return to modelling sometime this year!! 
Owner of Marky's Model Emporium since 2013!.
Owner of Marky's Model Emporium since 2013!.
-
JohnRatzenberger
- Why is he so confused ?
- Posts: 15736
- Joined: April 5th, 2011, 3:42 pm
- Location: Living on a sandbar - Nags Head, NC.
Re: Yellow Wings
Good question, and it is very odd looking.MarkyM607 wrote:Looking good but can I ask a silly question?, it says 47 on the tail and spine but (I assume) 37 underneath. Is that right and something I've missed?.
That's 73 underneath for the squadron and 47 on top for the aircraft number. In the low purchase rate of those days, it's not the 47th in the squadron, but the 47th in the contract. The longer form contains the 2-digit year number in front, thus 33-47.
John Ratzenberger
It's my model and I'll do what I want with it.
It's my model and I'll do what I want with it.
Re: Yellow Wings
Thanks, that an interesting snippet of info. Knew I'd be wrong somehow!!jRatz wrote:Good question, and it is very odd looking.MarkyM607 wrote:Looking good but can I ask a silly question?, it says 47 on the tail and spine but (I assume) 37 underneath. Is that right and something I've missed?.
That's 73 underneath for the squadron and 47 on top for the aircraft number. In the low purchase rate of those days, it's not the 47th in the squadron, but the 47th in the contract. The longer form contains the 2-digit year number in front, thus 33-47.
Hoping to return to modelling sometime this year!!
Owner of Marky's Model Emporium since 2013!.
Owner of Marky's Model Emporium since 2013!.
-
JohnRatzenberger
- Why is he so confused ?
- Posts: 15736
- Joined: April 5th, 2011, 3:42 pm
- Location: Living on a sandbar - Nags Head, NC.
Re: Yellow Wings
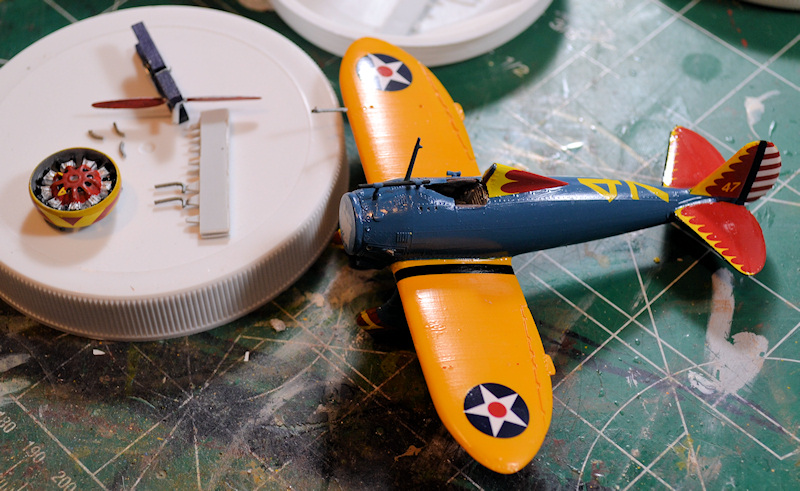
Gear and a couple details are now on; engine almost painted.
The wheel pant decals didn't work out well, but look better today than they did yesterday so maybe someone visited the workbench overnight Anyway, I'll have to do some touch-up there as elsewhere.
My big effort is to get the engine and cowl on so I can do the final decaling. After that it is put on the antenna and gun sight and then paint touch up, spray a gloss coat, and then finally, the photoetch rigging. Or something like that ....
The wheel pant decals didn't work out well, but look better today than they did yesterday so maybe someone visited the workbench overnight
My big effort is to get the engine and cowl on so I can do the final decaling. After that it is put on the antenna and gun sight and then paint touch up, spray a gloss coat, and then finally, the photoetch rigging. Or something like that ....
John Ratzenberger
It's my model and I'll do what I want with it.
It's my model and I'll do what I want with it.
-
DavidWomby
- Modelling Gent and Scholar
- Posts: 11767
- Joined: May 1st, 2011, 8:09 pm
- Location: Florida, USA
Re: Yellow Wings
Perky looking little thing. Nice work,John.
David
David
-
TimJ

- Modelling Gent and Scholar
- Posts: 4292
- Joined: May 1st, 2011, 12:54 am
- Location: Oldbury, West Midlands
Re: Yellow Wings
Nice and colourful.
2020 A:35 B:18. 2021 A: 51 B:25 C:21 2022 A:63 B:23 C:11 2024 A:9 B:4 C:15
-
JohnRatzenberger
- Why is he so confused ?
- Posts: 15736
- Joined: April 5th, 2011, 3:42 pm
- Location: Living on a sandbar - Nags Head, NC.
Re: Yellow Wings
There goes Plan A ....
I put all the remaining bits on and touched up paint - so far so good.
I then decided to decal the cowl, so I could mate it to the engine, and the engine to the fuselage, and then do the fuselage stripes.
Three problems came immediately to light.
1. The decals would not conform to the cowl shape ... that's when I figured out I had them on backwards, so I reversed them, which did nothing to fix the problem that they weren't cowl width anyway.
2. That meant I was looking at the cowl backwards and my engine, with intakes and exhausts, wasn't going to slide peacefully in from the back of the cowl but would have to be levered in from the smaller opening.
3. With #1 settled, I put some MicroSol on to set the decals and turned my back - meaning one decal slid partially out of position.
I have fixed the engine, repaired/replaced the stacks, still need to touch up the paint. But now I essentially am reduced to overpainting the cowl markings -- not just for the out-of-position decal but for the narrow width.
I have started the yellow over-paint -- probably need a couple more coats, but that has to wait until tomorrow.
This has put me a whole day behind.
Plan B - I may be able to get some of that back by tacking the engine/cowl onto the fuselage long enough to lay down the fuselage stripes. Then the engine/cowl can come off to be painted while I work on the fuselage -- let decals dry under MicroSol (watching them carefully), gloss coating it, then adding the PE. Then once cowl is done I can gloss coat it before putting it on and it'll be done. Still I have to watch drying time.
I have a meeting Wednesday, take half a day or more and I'm usually in foul mood after, so unsure if I'll make the Wednesday night finish line.
John Ratzenberger
It's my model and I'll do what I want with it.
It's my model and I'll do what I want with it.