TeeELLs Meteor NF 11 ** FINISHED **
-
TeeELL

- Modelling Gent and Scholar
- Posts: 11632
- Joined: December 28th, 2015, 4:38 pm
- Location: North Wiltshire
Re: TeeELLs Meteor NF 11
I received the CMK engine set for the Meteor now is it me? The Meteor has 2 engines, so why does the CMK resin set have only one? At the very least I think a second 'compressor' face (or all the gubbins that sits ahead of the centrifical compressor) should have been supplied! I now have to make a copy, so my plan to complete the build before heading off to Cuba is looking increasingly unlikely :-(
Tony
The older I get the better I was!
Current build:
Airfix 1:72 Javelin FAW9
Particular modelling interests:
Cuban Airforce aircraft, 29(F) Sqn aircraft, Aircraft I’ve flown
The older I get the better I was!
Current build:
Airfix 1:72 Javelin FAW9
Particular modelling interests:
Cuban Airforce aircraft, 29(F) Sqn aircraft, Aircraft I’ve flown
Re: TeeELLs Meteor NF 11
CMK seems to do that alot. Some CMK engine sets only have 1/2 the engine. I think the idea is that you model a vignette of the aircraft with panels removed. Still, they should be advertising clearly that you only get 1/2 of what you need.TeeELL wrote: why does the CMK resin set have only one?
-
TeeELL
- Modelling Gent and Scholar
- Posts: 11632
- Joined: December 28th, 2015, 4:38 pm
- Location: North Wiltshire
Re: TeeELLs Meteor NF 11
59North,
I've no problem with one engine in detail, but to not supply a basic intake/exhast for the second is seriously poor marketing.
I've no problem with one engine in detail, but to not supply a basic intake/exhast for the second is seriously poor marketing.
Tony
The older I get the better I was!
Current build:
Airfix 1:72 Javelin FAW9
Particular modelling interests:
Cuban Airforce aircraft, 29(F) Sqn aircraft, Aircraft I’ve flown
The older I get the better I was!
Current build:
Airfix 1:72 Javelin FAW9
Particular modelling interests:
Cuban Airforce aircraft, 29(F) Sqn aircraft, Aircraft I’ve flown
-
TeeELL
- Modelling Gent and Scholar
- Posts: 11632
- Joined: December 28th, 2015, 4:38 pm
- Location: North Wiltshire
Re: TeeELLs Meteor NF 11
The front end of the CMK engine details is presently encased on molding rubber which I hope will be set tomorrow. I shall mix either the resin or some araldite in order to cast a copy, I will at least have 2 detailed engine compressor faces. Modelling opportunities are vanishing at a frightening rate, in just 7 days I will be off to 'winter sun'. Will I be finished in time?
Tony
The older I get the better I was!
Current build:
Airfix 1:72 Javelin FAW9
Particular modelling interests:
Cuban Airforce aircraft, 29(F) Sqn aircraft, Aircraft I’ve flown
The older I get the better I was!
Current build:
Airfix 1:72 Javelin FAW9
Particular modelling interests:
Cuban Airforce aircraft, 29(F) Sqn aircraft, Aircraft I’ve flown
-
shangos70
- Modelling Gent and Scholar
- Posts: 4422
- Joined: May 1st, 2011, 11:14 am
- Location: Doncaster, Socialist Republic of South Yorkshire.
Re: TeeELLs Meteor NF 11
Great work on this one, it's reported ( proven) tricky fit issues has always stopped me moving it up the pile. I have seen some nice builds made from it and I'm sure yours will be one of them.
-
TeeELL
- Modelling Gent and Scholar
- Posts: 11632
- Joined: December 28th, 2015, 4:38 pm
- Location: North Wiltshire
Re: TeeELLs Meteor NF 11
This morning I caste the second engine 'front' using the mold I made yesterday. Rather than mix up the proper resin for such a small item I used epoxy glue (in this case the Wilkinsons' rapid). It has worked sufficiently well to 'do', especially as the depth in the engine nacelles is quite significant and detail will be hard to make out. Hand on heart, I don't think it was worth going to a. the expense of the CMK upgrade and b. the trouble of casting a second front - so, if you are thinking about it, I really would stick to the very simple Matchbox/XtraKit parts.
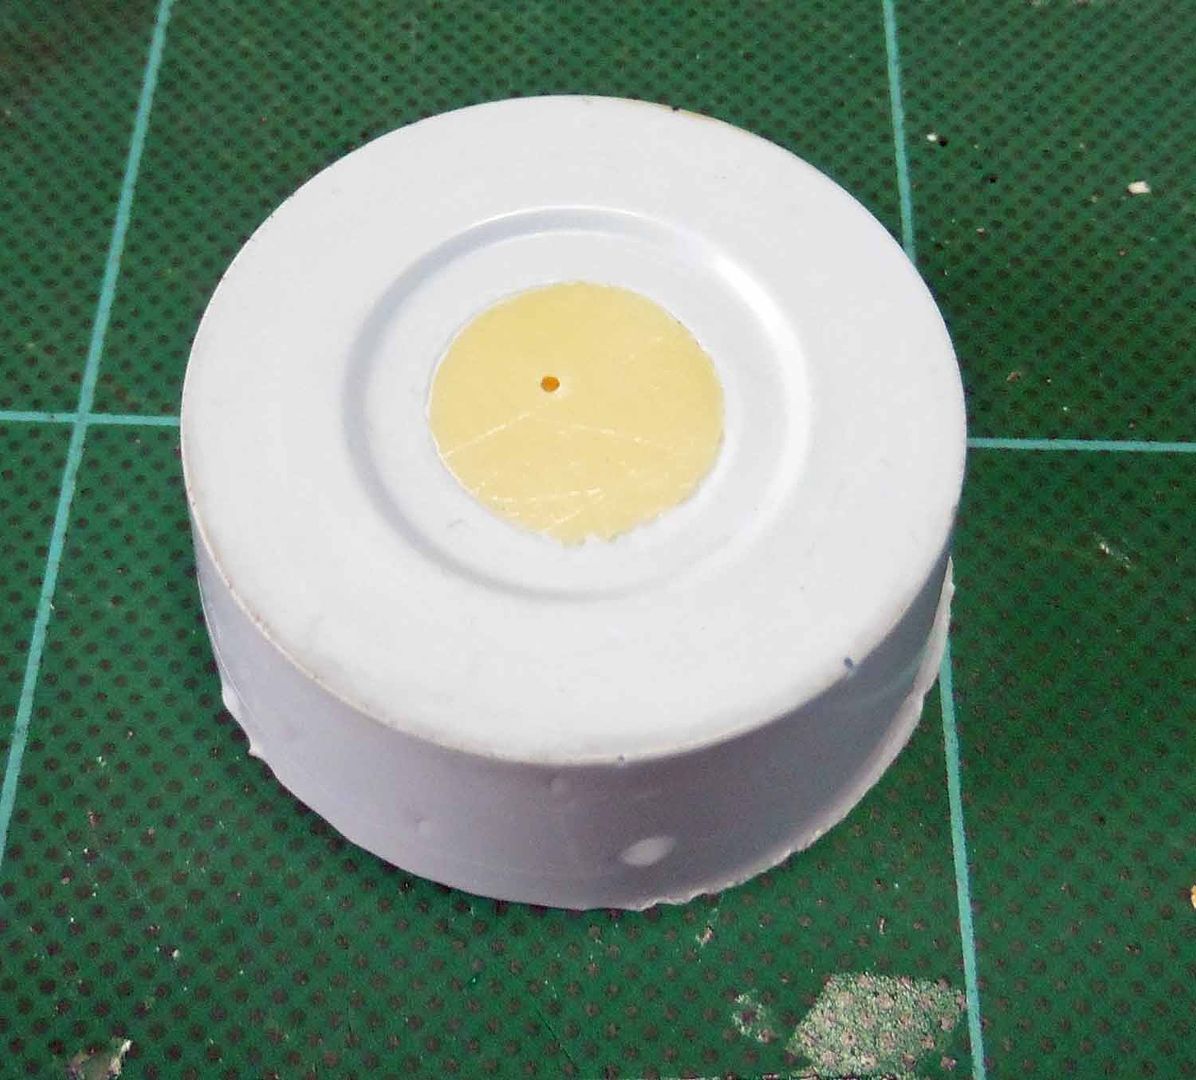
This is the resin original in the rubber casting block:
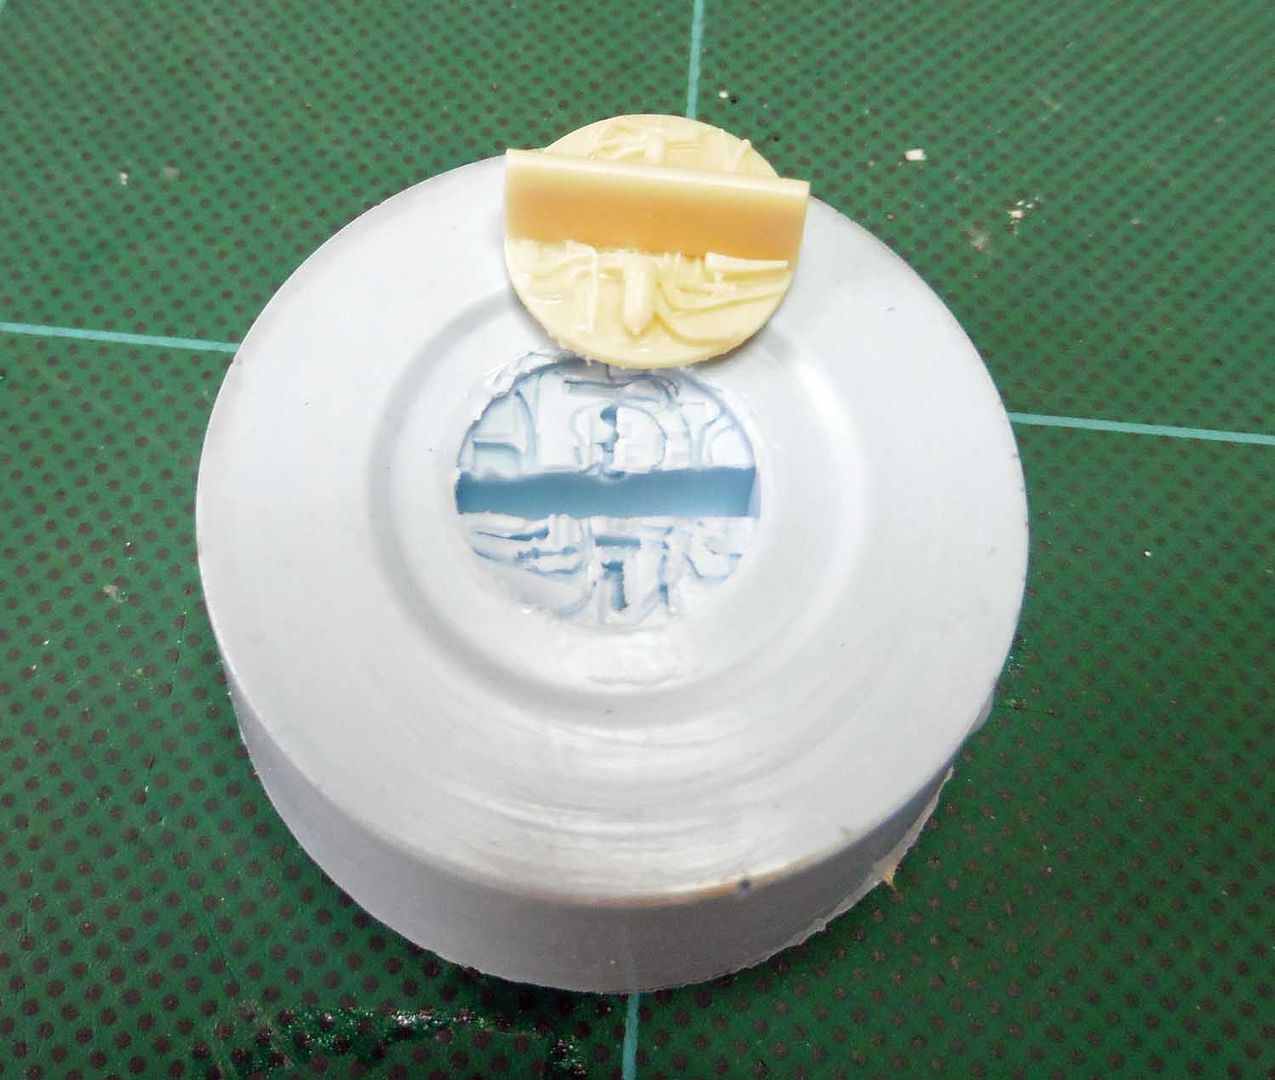
The original part removed:
Finally the original and 'new' part primed:
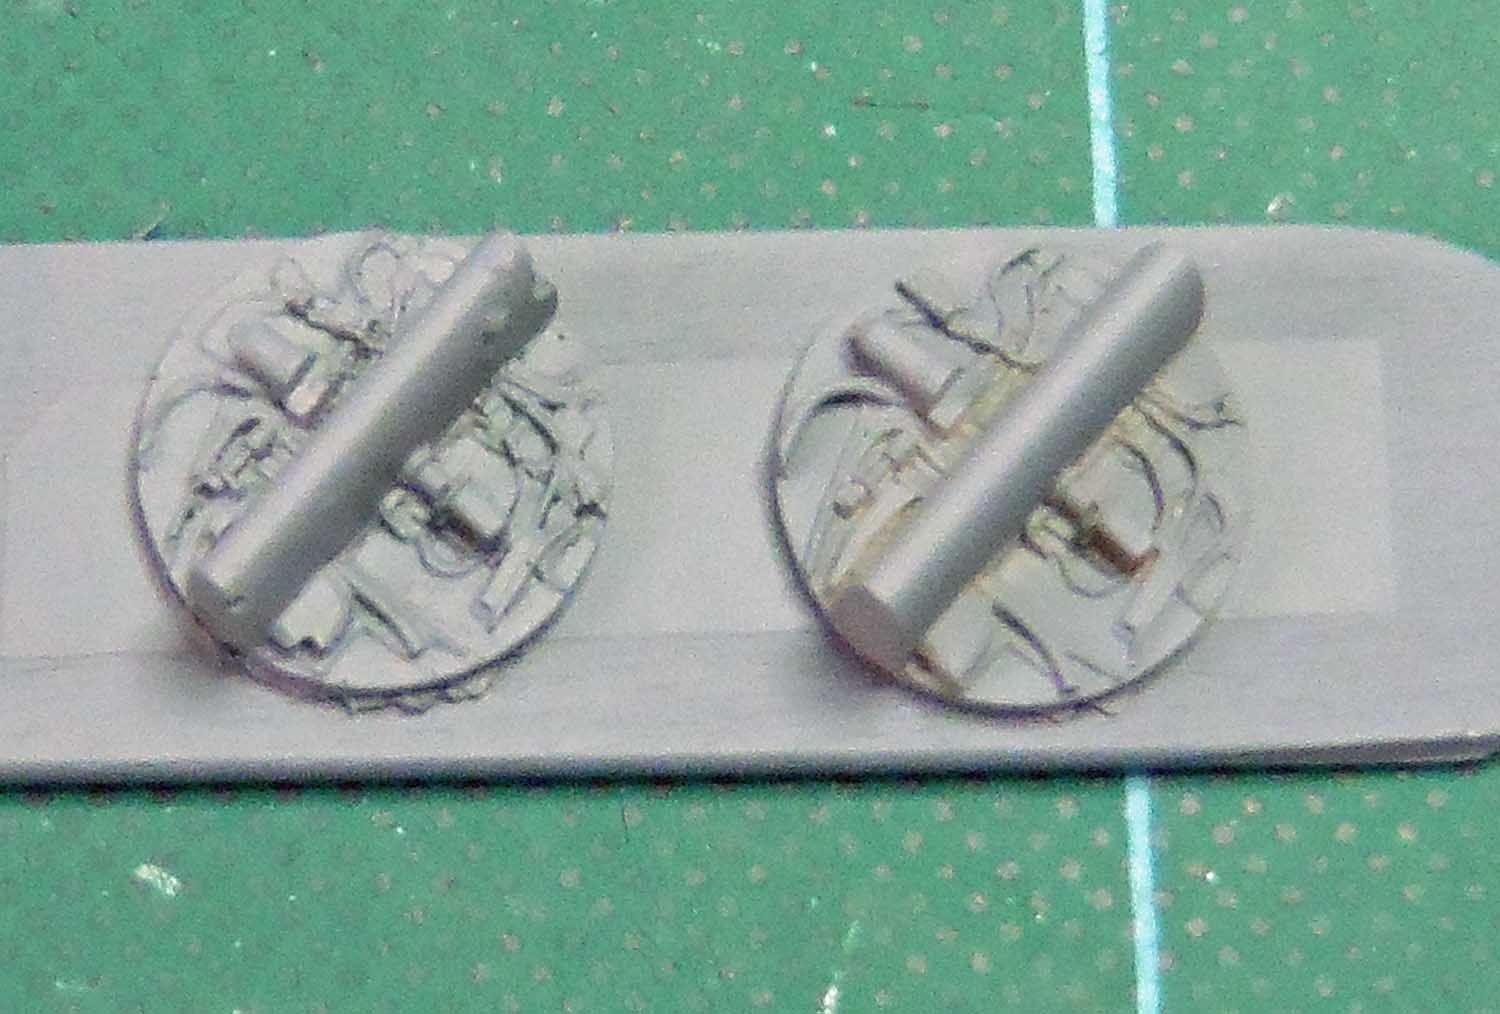
You can see that the epoxy part (on the left) has not taken the moldings particularly well but there is nothing sufficiently wrong to justify a second attempt, the problem was that the epoxy I used is rapid and mixes quite thick. If I had used proper Araldite, mixed well and warmed, it would have flowed into the mold better and with fewer air bubbles - but it would be setting still!!
This is the resin original in the rubber casting block:
The original part removed:
Finally the original and 'new' part primed:
You can see that the epoxy part (on the left) has not taken the moldings particularly well but there is nothing sufficiently wrong to justify a second attempt, the problem was that the epoxy I used is rapid and mixes quite thick. If I had used proper Araldite, mixed well and warmed, it would have flowed into the mold better and with fewer air bubbles - but it would be setting still!!
Tony
The older I get the better I was!
Current build:
Airfix 1:72 Javelin FAW9
Particular modelling interests:
Cuban Airforce aircraft, 29(F) Sqn aircraft, Aircraft I’ve flown
The older I get the better I was!
Current build:
Airfix 1:72 Javelin FAW9
Particular modelling interests:
Cuban Airforce aircraft, 29(F) Sqn aircraft, Aircraft I’ve flown
-
Old_Tonto

- Modelling Gent and Scholar
- Posts: 8063
- Joined: May 1st, 2011, 7:41 pm
- Location: Middlesbrough, Peoples Republic of Teesside.
Re: TeeELLs Meteor NF 11
Wilkinson's Rapid! Who Knew?
I think you are being overly critical TeeELL, it looks the biz to me and I bet once painted it will do the job.
I think you are being overly critical TeeELL, it looks the biz to me and I bet once painted it will do the job.
2023 - A:0 B:0 C:0
Current Projects:
East German Air Force (1956-90)
South African Air Force (1958-93)
Current Projects:
East German Air Force (1956-90)
South African Air Force (1958-93)
-
Stuart

- Raider of the Lost Ark Royal
- Posts: 19451
- Joined: February 25th, 2013, 4:55 pm
- Location: North Wales
- Contact:
Re: TeeELLs Meteor NF 11
wow - that's an interesting technique. I do think new part will look good under paint.
Stuart Templeton I may not be good but I'm slow...
My Blog: https://stuartsscalemodels.blogspot.com/
My Blog: https://stuartsscalemodels.blogspot.com/
-
TeeELL
- Modelling Gent and Scholar
- Posts: 11632
- Joined: December 28th, 2015, 4:38 pm
- Location: North Wiltshire
Re: TeeELLs Meteor NF 11
Well now, I do appreciate your comments OT and SirT but the proof of the pudding .......
Here are the engine faces dry brushed 'a bit' (having done a trial fit I knew that the details were not all that important - as you will see). Note that I have removed the 'leading edge' part of the castings so that they would sit behind the kit parts. My 'Blue Light' glue fixed these in place.

There should be some copper coloured pipes in there as well!
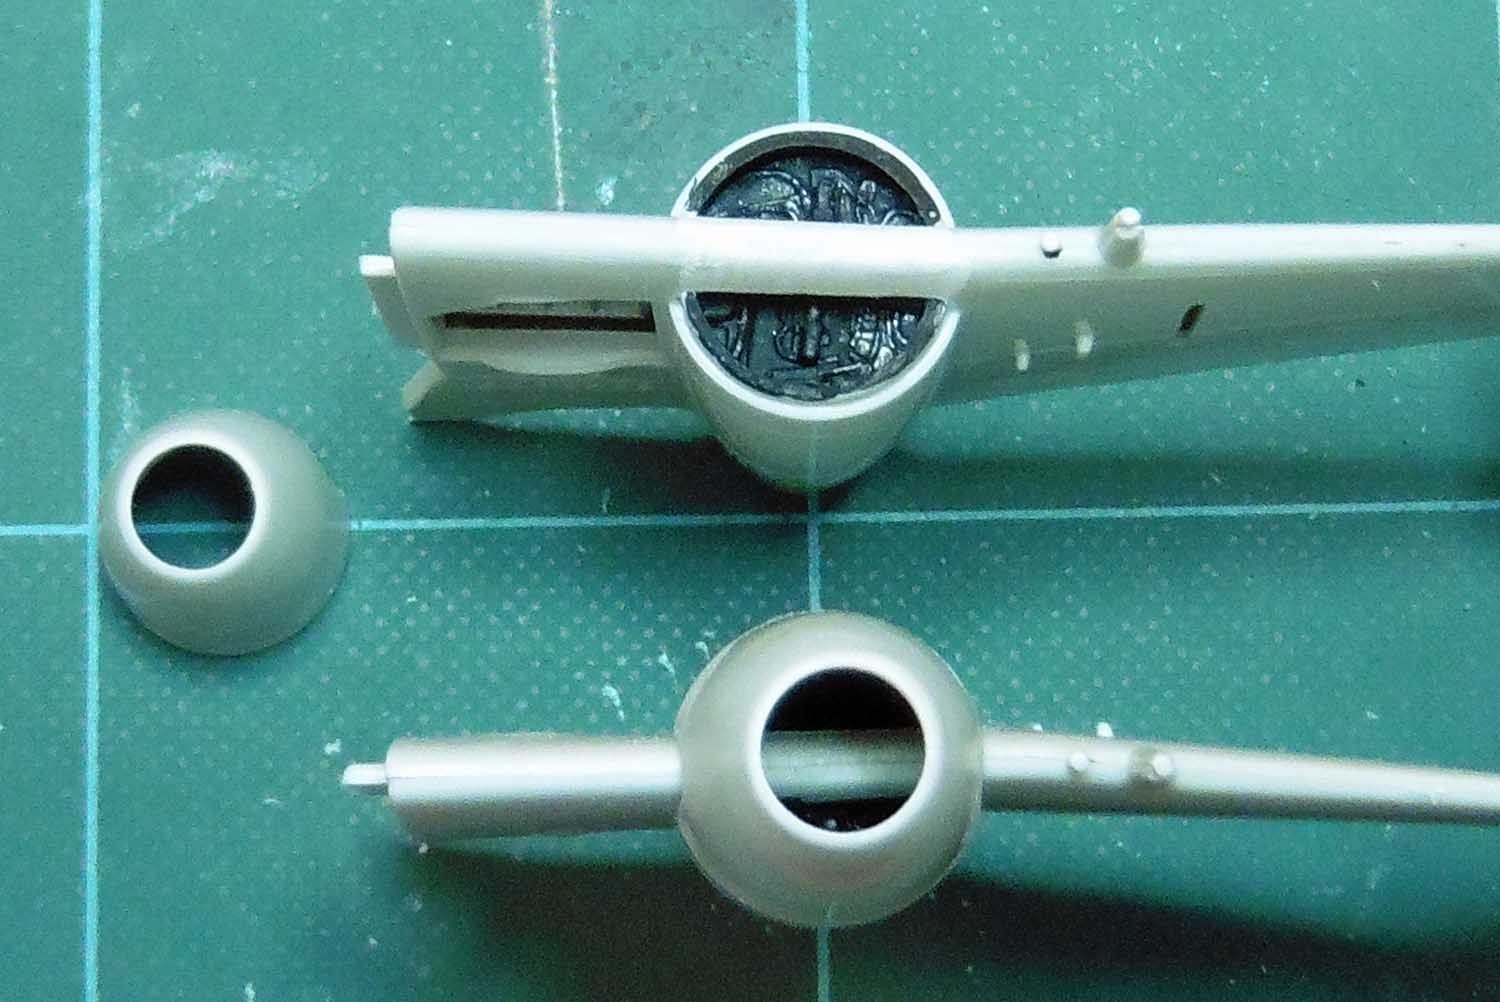
Here you can see the front face in situe and the forward engine nacelle in place, you have to peer to see anything!! I think even with the larger intakes nacelles fitted it would be a challenge to see anything meaningful!
OK, some construction tips:
The forward nacelles rear ends have a slight flare where they join the wing engine section, it is easier to remove this prior to fitting otherwise there will be excessive sanding when the filler is applied.
The rear nacelles forward ends are slightly larger in diameter than that of the rear of the engine casing on the wing, I overcame this by filing about 0.5 mm off the forward end.
Sorry, I forgot to take 'before and after' photos :-(
Here are the engine faces dry brushed 'a bit' (having done a trial fit I knew that the details were not all that important - as you will see). Note that I have removed the 'leading edge' part of the castings so that they would sit behind the kit parts. My 'Blue Light' glue fixed these in place.
There should be some copper coloured pipes in there as well!
Here you can see the front face in situe and the forward engine nacelle in place, you have to peer to see anything!! I think even with the larger intakes nacelles fitted it would be a challenge to see anything meaningful!
OK, some construction tips:
The forward nacelles rear ends have a slight flare where they join the wing engine section, it is easier to remove this prior to fitting otherwise there will be excessive sanding when the filler is applied.
The rear nacelles forward ends are slightly larger in diameter than that of the rear of the engine casing on the wing, I overcame this by filing about 0.5 mm off the forward end.
Sorry, I forgot to take 'before and after' photos :-(
Tony
The older I get the better I was!
Current build:
Airfix 1:72 Javelin FAW9
Particular modelling interests:
Cuban Airforce aircraft, 29(F) Sqn aircraft, Aircraft I’ve flown
The older I get the better I was!
Current build:
Airfix 1:72 Javelin FAW9
Particular modelling interests:
Cuban Airforce aircraft, 29(F) Sqn aircraft, Aircraft I’ve flown
-
DavidWomby

- Modelling Gent and Scholar
- Posts: 11766
- Joined: May 1st, 2011, 8:09 pm
- Location: Florida, USA
Re: TeeELLs Meteor NF 11
Thanks for the tips on the nacelle front and rear parts.
David
David
-
Stuart
- Raider of the Lost Ark Royal
- Posts: 19451
- Joined: February 25th, 2013, 4:55 pm
- Location: North Wales
- Contact:
Re: TeeELLs Meteor NF 11
Blooming 'eck - you don't see a lot with the intakes on do you.
Stuart Templeton I may not be good but I'm slow...
My Blog: https://stuartsscalemodels.blogspot.com/
My Blog: https://stuartsscalemodels.blogspot.com/
-
TeeELL
- Modelling Gent and Scholar
- Posts: 11632
- Joined: December 28th, 2015, 4:38 pm
- Location: North Wiltshire
Re: TeeELLs Meteor NF 11
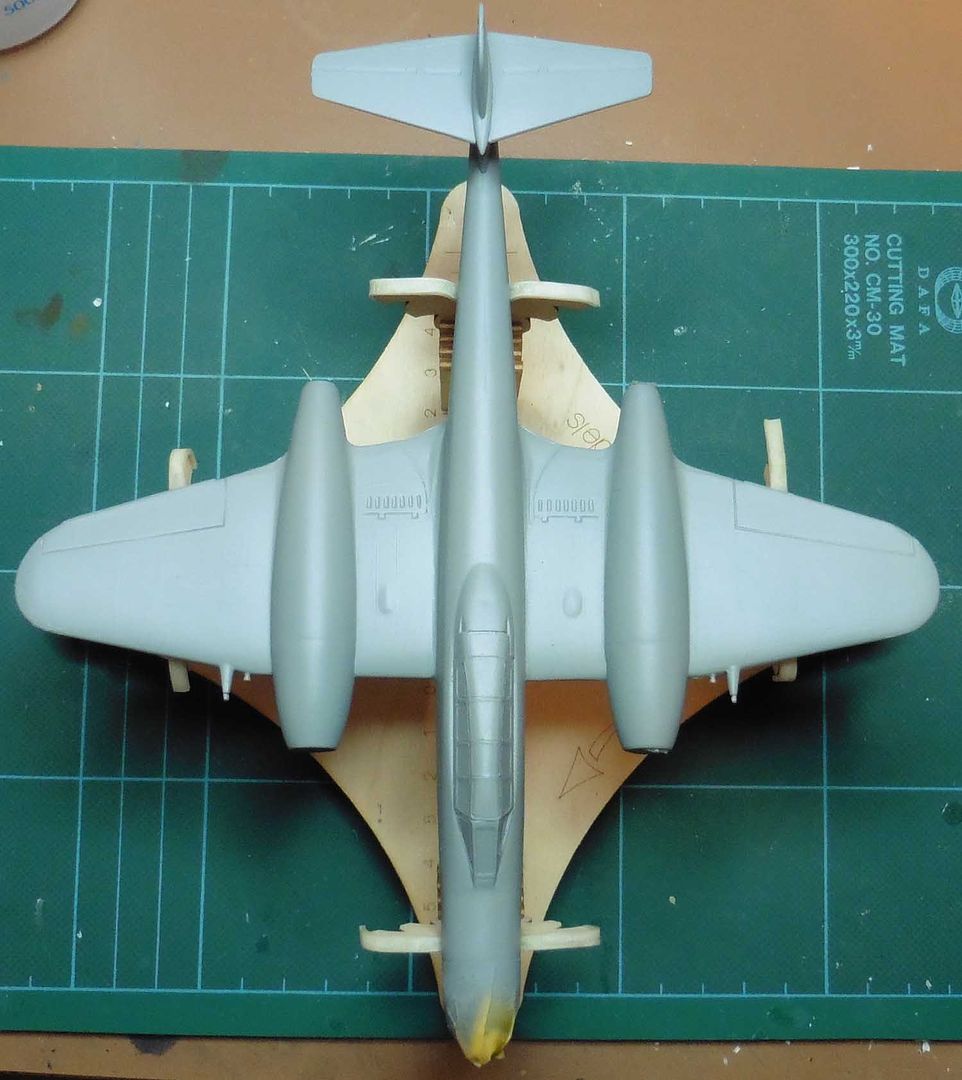
The wings and engine nacelles needed some filler and, because I prefer to minimise the amount of filler I 'slap on', I put masking tape either side of the gaps and push the filler well in.

On the right, the wing has had the masking tape applied and the filler added using a sculpting tool. On the left, the masking tape has been removed showing the small amount of sanding required.
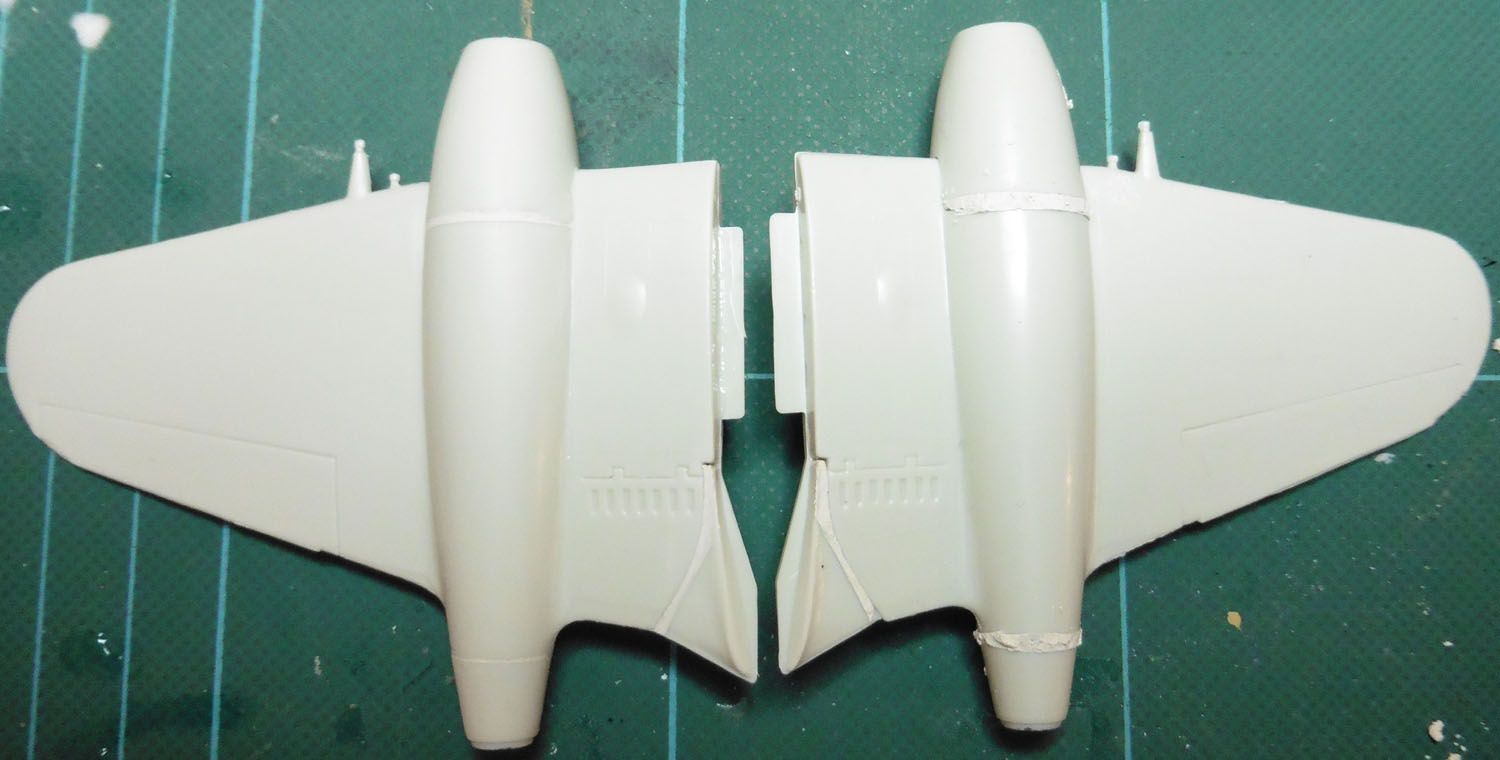
In this photo the wing on the left has been sanded using fine and very fine W&D, that on the right has been un-masked.
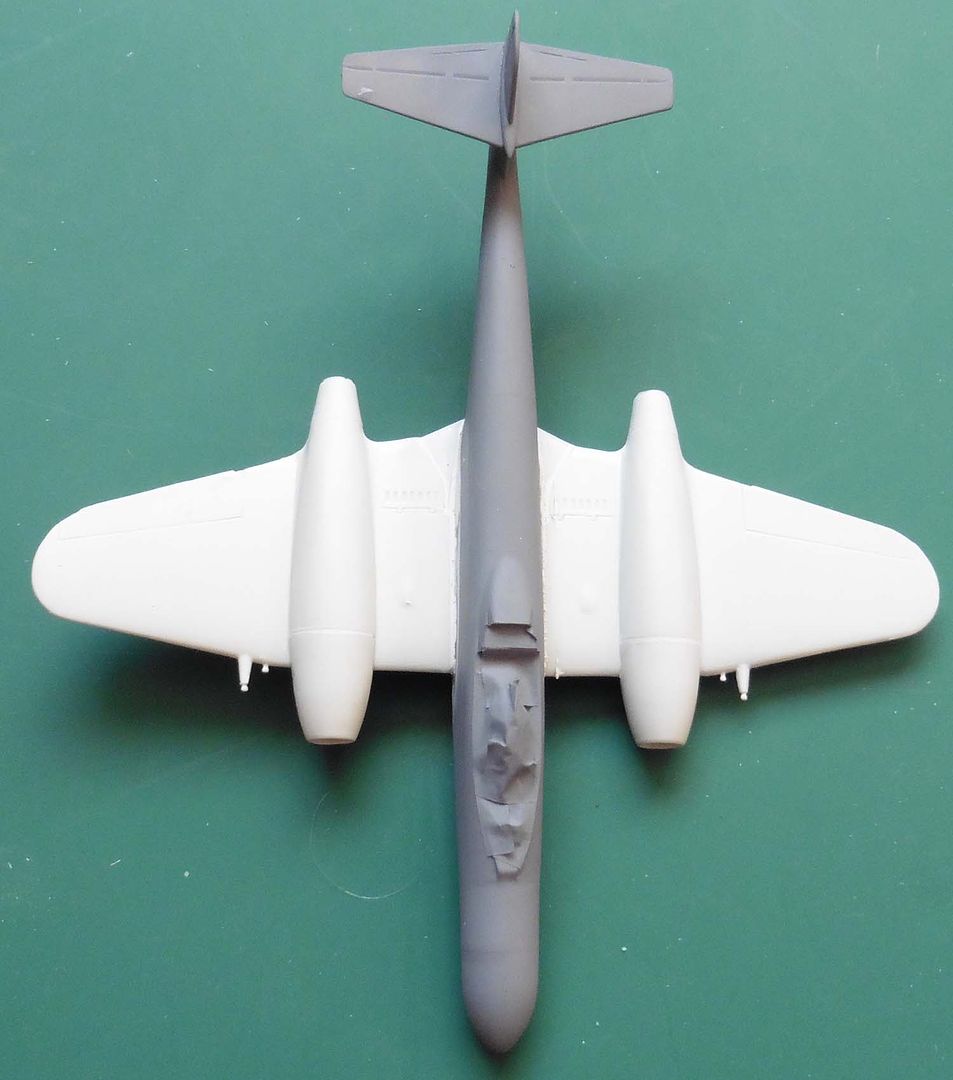
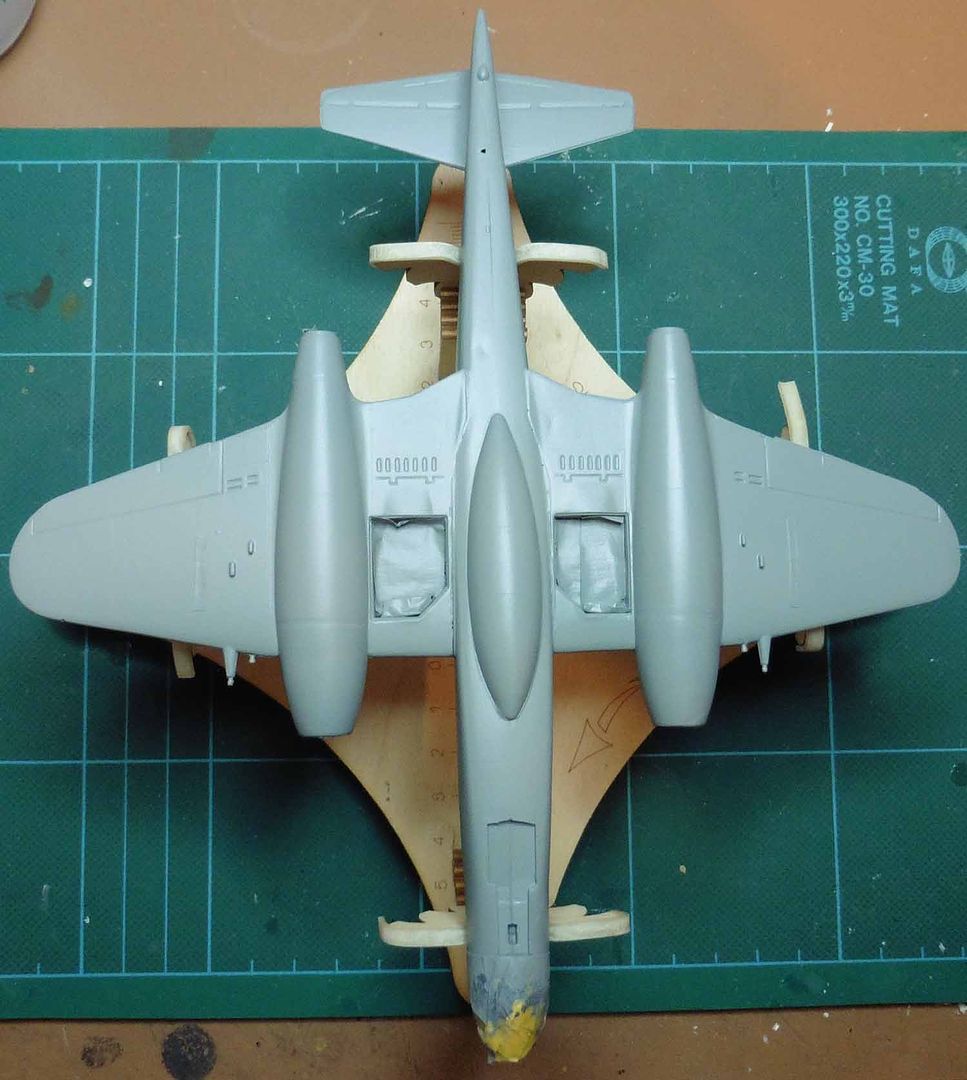
In this photo the wings have been attached and the wing fuselage has been filled using the same technique as previously mentioned.
I use Squadron White putty initially, no real reason other than it sticks well to the plastic, it does have a slightly coarse grain and so I use White 'perfect putty' subsequently (if required). With Perfect Putty a wet cotton bud does most of the cleaning up before the W&D.
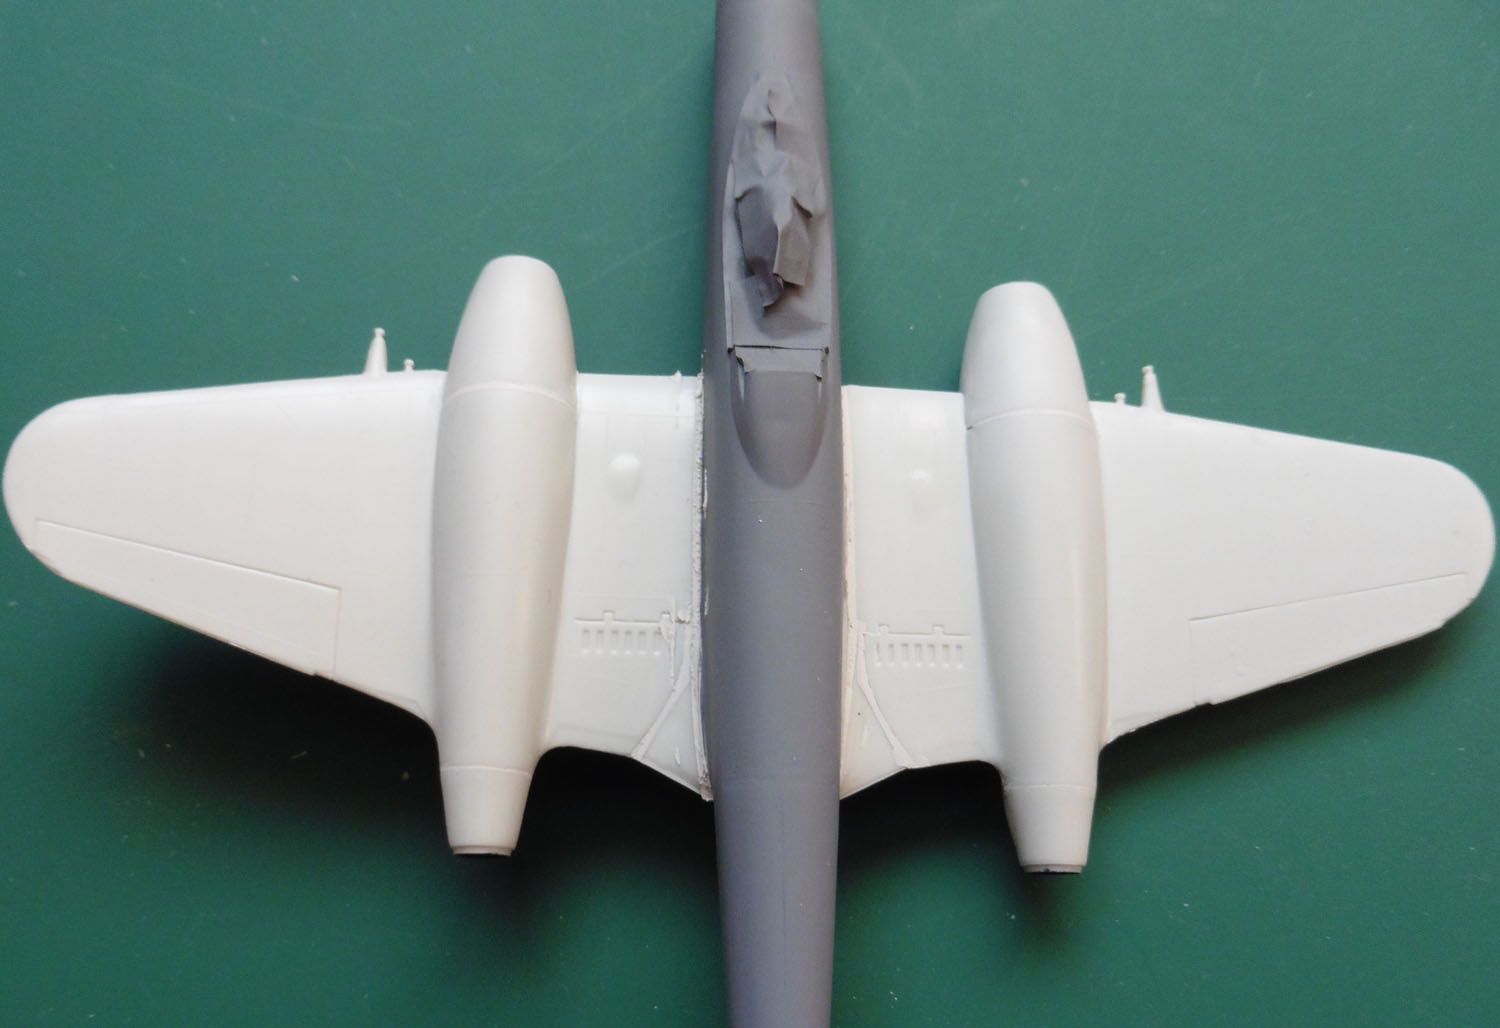
Issues to note: The wings do not have any alignment pins which makes dry fitting wing to fuselage challenging, use the engine nacelles and tape whilst working on the fit. If you spent a bit more (make that a lot more) time than I did, then you will find the wing to fuselage join will be quite good. Even I have not had to use a great deal of filler. However, check the lower rear quarter of the PORT wing (on mine anyway) as there is a slight downward distortion - easily remedied before attaching to the fuselage. I must say I've not found any serious issues with the fit on this model, certainly much fewer issues than others have commented on - certainly it is no 'shake and bake' model.
I also found some areas on the lower wing molding (Starboard wing trailing edge just outboard of the engine) where filler was required.
I am hoping to get her into 'paint shops' for priming this afternoon.
On the right, the wing has had the masking tape applied and the filler added using a sculpting tool. On the left, the masking tape has been removed showing the small amount of sanding required.
In this photo the wing on the left has been sanded using fine and very fine W&D, that on the right has been un-masked.
In this photo the wings have been attached and the wing fuselage has been filled using the same technique as previously mentioned.
I use Squadron White putty initially, no real reason other than it sticks well to the plastic, it does have a slightly coarse grain and so I use White 'perfect putty' subsequently (if required). With Perfect Putty a wet cotton bud does most of the cleaning up before the W&D.
Issues to note: The wings do not have any alignment pins which makes dry fitting wing to fuselage challenging, use the engine nacelles and tape whilst working on the fit. If you spent a bit more (make that a lot more) time than I did, then you will find the wing to fuselage join will be quite good. Even I have not had to use a great deal of filler. However, check the lower rear quarter of the PORT wing (on mine anyway) as there is a slight downward distortion - easily remedied before attaching to the fuselage. I must say I've not found any serious issues with the fit on this model, certainly much fewer issues than others have commented on - certainly it is no 'shake and bake' model.
I also found some areas on the lower wing molding (Starboard wing trailing edge just outboard of the engine) where filler was required.
I am hoping to get her into 'paint shops' for priming this afternoon.
Tony
The older I get the better I was!
Current build:
Airfix 1:72 Javelin FAW9
Particular modelling interests:
Cuban Airforce aircraft, 29(F) Sqn aircraft, Aircraft I’ve flown
The older I get the better I was!
Current build:
Airfix 1:72 Javelin FAW9
Particular modelling interests:
Cuban Airforce aircraft, 29(F) Sqn aircraft, Aircraft I’ve flown
-
TeeELL
- Modelling Gent and Scholar
- Posts: 11632
- Joined: December 28th, 2015, 4:38 pm
- Location: North Wiltshire
Re: TeeELLs Meteor NF 11
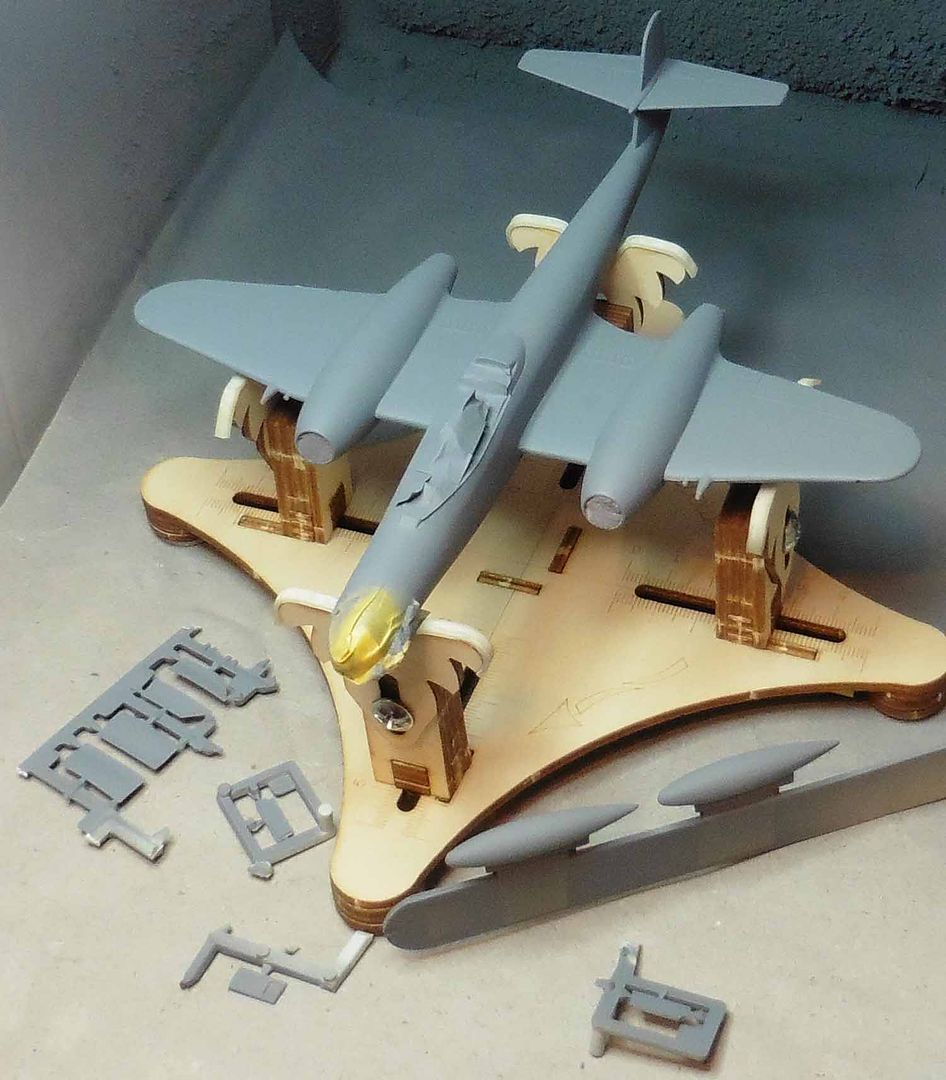
It has been busy in the spray bay, all the remaining major components are now in primer. When the primer is thoroughly dry I will go over the finish with some fine micromesh and then we are into the camouflage stage. It is looking as though I may not achieve a finish status on this before I go on holiday - but it will be close!! My 'better half' has lined-up several significant house orientated jobs that will be undertaken before we go away, so tomorrow I have to go round and take up carpet ready for the fitter on Thursday!! It would have been so much easier after we return from holiday :-(. (Doesn't she realise how important this is!!!!)
Tony
The older I get the better I was!
Current build:
Airfix 1:72 Javelin FAW9
Particular modelling interests:
Cuban Airforce aircraft, 29(F) Sqn aircraft, Aircraft I’ve flown
The older I get the better I was!
Current build:
Airfix 1:72 Javelin FAW9
Particular modelling interests:
Cuban Airforce aircraft, 29(F) Sqn aircraft, Aircraft I’ve flown
-
TeeELL
- Modelling Gent and Scholar
- Posts: 11632
- Joined: December 28th, 2015, 4:38 pm
- Location: North Wiltshire
Re: TeeELLs Meteor NF 11
I thought I had submitted my latest stage of work on the Meteor, but it seems not, I must try again. Last night, having got back from watching/dozing through 'LA, LA Land' ( a couple of hours that could have been much better spent on this build!!) I masked the green house canopy; fingers crossed it will be OK as following the frames was more difficult than first appearances had me believe. The main canopy was then stuck to the body with PVA.
This morning I did some work on the fit of the windscreen (Note: if part no 45 has been fitted out of true it will prevent the windscreen from sitting correctly - believe me) material had to be removed from the bottom rear of the windscreen to get the angle right between the 2 canopies and to get the 'sit' right. PVA was again used to attach the windscreen and, when dry, any gaps filled with more PVA to ensure the airbrush didn't turn the cockpit interior grey.
Before setting off for todays Spanish lesson I was able to apply Tamiya SGM (XF83) to the airframe, wing tanks and undercarriage doors (just have to find another 48 shades of grey!!!). It produces quite a nice finish, I am certainly warming to Tamiya acrylics despite an extensive selection of Humbrol enamels. The only down side is that there is only the radome available to hold on to and, on the NF 11, there isn't that much so assisted drying is certainly the way ahead. I am out teaching aerodynamics for a couple of hours this evening so the paint will have had 8 hours to dry, assisted by the model sitting above a warm radiator. I doubt the green will get applied tonight but I might manage masking up the camouflage - I trust Tamiya tape doesn't have a detrimental effect on their paint?????
I have realised I have slightly more time available to finish than anticipated - this GB continues to 4th March so I've a couple of days available on my return.
Tony
The older I get the better I was!
Current build:
Airfix 1:72 Javelin FAW9
Particular modelling interests:
Cuban Airforce aircraft, 29(F) Sqn aircraft, Aircraft I’ve flown
The older I get the better I was!
Current build:
Airfix 1:72 Javelin FAW9
Particular modelling interests:
Cuban Airforce aircraft, 29(F) Sqn aircraft, Aircraft I’ve flown
-
Stuart
- Raider of the Lost Ark Royal
- Posts: 19451
- Joined: February 25th, 2013, 4:55 pm
- Location: North Wales
- Contact:
Re: TeeELLs Meteor NF 11
That looks super Tony!
Stuart Templeton I may not be good but I'm slow...
My Blog: https://stuartsscalemodels.blogspot.com/
My Blog: https://stuartsscalemodels.blogspot.com/