
Hey Corricon, hello from St Neots!!.Corricon wrote:Late to the party on this one Shaun, but very nicely done, some of the shades you've used for various parts on the Lightning look spot on from how I remembered them when I used to service them!
Shaun's English Electric Lightning F.6 * COMPLETED*
Re: Shaun's English Electric Lightning F.6
Hoping to return to modelling sometime this year!! 
Owner of Marky's Model Emporium since 2013!.
Owner of Marky's Model Emporium since 2013!.
-
Softscience

- Staring out the window
- Posts: 7492
- Joined: April 5th, 2011, 4:34 pm
- Location: Maryland, near Washington DC
Re: Shaun's English Electric Lightning F.6
I love the markings and the silver finish is smooth as silk.
Really nice build.
Oh and I really like how you did up the exhausts.very convincing metallic effect there.
Really nice build.
Oh and I really like how you did up the exhausts.very convincing metallic effect there.
-
ShaunW
- NOT the sheep
- Posts: 26194
- Joined: November 26th, 2011, 6:11 pm
- Location: Pontefract West Yorkshire
Re: Shaun's English Electric Lightning F.6
Many thanks guys.
Mark - the stilts are glued in and, of course, there is some damage to the interior of wheel wells on removal - I've cleaned the damage up and painted over it but the detail is a little spoiled but, heck, I don't park them on a mirror so unless the model is inverted it's all out of sight. I generally use stilts only when I'm not able to support the model on a dowel or similar inserted up its jet pipe or prop hole!
Anyhoo, I've done a bit more.
Gear down!
I anticipated a bit of a fight with the landing gear but in fact it all went together without drama, including the gear doors. However, all is not that good as the pre-flattened wheels aren't touching down properly and I'm going to have to do a little judicious filing. I thought I'd got it all lined up OK but it seems not. Ho hum.
I've also painted up and decalled the canopy:
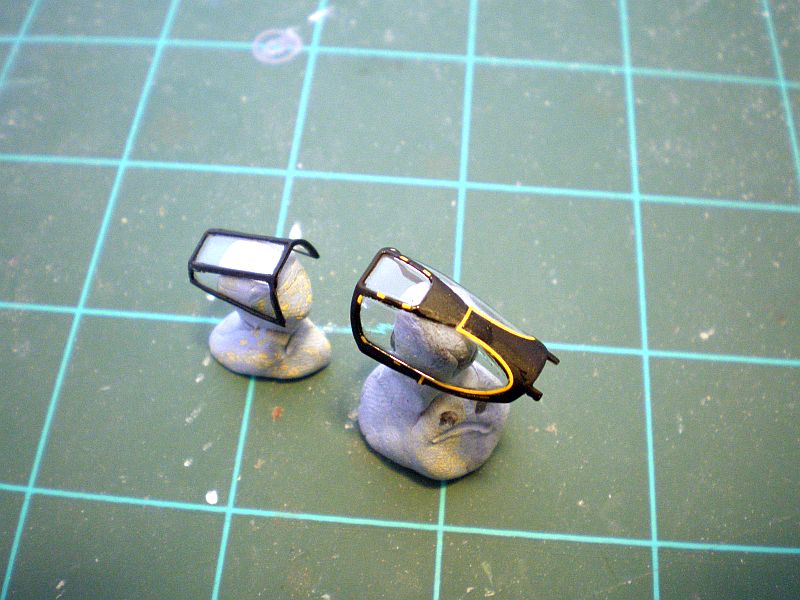
The decals on the rear opening section of the canopy were as fiddly as they look and tested my patience for ages! The rear curved stripes were quite fiddly to line up but at least they didn't break as I feared they might but the tiny yellow dashes are all individual decals and were a real PITA to deal with. The decals were sealed on with a coat of Humbrol matt coat carefully applied by paint brush.
I'm now building up the Firestreak missiles - I don't usually fit weapons but somehow a Lightning looks too naked without its missiles either side of the nose so I'll make an exception for this build.
Mark - the stilts are glued in and, of course, there is some damage to the interior of wheel wells on removal - I've cleaned the damage up and painted over it but the detail is a little spoiled but, heck, I don't park them on a mirror so unless the model is inverted it's all out of sight. I generally use stilts only when I'm not able to support the model on a dowel or similar inserted up its jet pipe or prop hole!
Anyhoo, I've done a bit more.
Gear down!
I anticipated a bit of a fight with the landing gear but in fact it all went together without drama, including the gear doors. However, all is not that good as the pre-flattened wheels aren't touching down properly and I'm going to have to do a little judicious filing. I thought I'd got it all lined up OK but it seems not. Ho hum.
I've also painted up and decalled the canopy:
The decals on the rear opening section of the canopy were as fiddly as they look and tested my patience for ages! The rear curved stripes were quite fiddly to line up but at least they didn't break as I feared they might but the tiny yellow dashes are all individual decals and were a real PITA to deal with. The decals were sealed on with a coat of Humbrol matt coat carefully applied by paint brush.
I'm now building up the Firestreak missiles - I don't usually fit weapons but somehow a Lightning looks too naked without its missiles either side of the nose so I'll make an exception for this build.
Doing - Tamiya 1/35th Universal Carrier.
Work is the curse of the modelling classes!
IPMS#12300
Work is the curse of the modelling classes!
IPMS#12300

Re: Shaun's English Electric Lightning F.6
Looks good Shaun 
All models are equal. Some models are more equal than others.
Airfix Tribute Forum
Airfix Tribute Forum
-
Stuart

- Raider of the Lost Ark Royal
- Posts: 19458
- Joined: February 25th, 2013, 4:55 pm
- Location: North Wales
- Contact:
Re: Shaun's English Electric Lightning F.6
That is looking superb Shaun - I love those markings!
Stuart Templeton I may not be good but I'm slow...
My Blog: https://stuartsscalemodels.blogspot.com/
My Blog: https://stuartsscalemodels.blogspot.com/
Re: Shaun's English Electric Lightning F.6
Just catching up on this one, and it is coming together and looking very good.
Trying to Build kits and not Buy kits
-
RayS

- Modelling Gent and Scholar
- Posts: 2047
- Joined: May 25th, 2013, 8:50 am
- Location: Adelaide, South Australia
- Contact:
Re: Shaun's English Electric Lightning F.6
Me too, the silver finish and canopy look great.chrism wrote:Just catching up on this one, and it is coming together and looking very good.
Just a question on the stilts, how do you secure them tot he wheel wells? could you not use white glue/wood glue to limit the damage?
Ray
-----------------------
-----------------------
-
Chuck Finley

- Modelling Gent and Scholar
- Posts: 2194
- Joined: December 20th, 2012, 1:02 am
- Location: A Middle School in Gwinnett County, Georgia
Re: Shaun's English Electric Lightning F.6
Looking Good!
On second thoughts, let's not go to Camelot. It is a silly place!
-
ShaunW
- NOT the sheep
- Posts: 26194
- Joined: November 26th, 2011, 6:11 pm
- Location: Pontefract West Yorkshire
Re: Shaun's English Electric Lightning F.6
Many thanks, guys.
I've tried using PVA in the past to attach temporary stilts, Ray and it didn't hold strongly enough. I'm prepared to accept the damage that poly cement can cause in the wheel wells as I find it much easier to deal with painting and decalling the model when it is on the stilts as opposed to its undercarriage, which can be easily damaged when constantly picking up and putting down the model. If the model has quite large wheel bays, the stilt attachment damage can be fixed relatively easily. I will only use the stilts if there is no other way of supporting the model, such as a rod or wooden dowel inserted in the jet exhaust orifice or hole for the prop with a piston engined type.
I've tried using PVA in the past to attach temporary stilts, Ray and it didn't hold strongly enough. I'm prepared to accept the damage that poly cement can cause in the wheel wells as I find it much easier to deal with painting and decalling the model when it is on the stilts as opposed to its undercarriage, which can be easily damaged when constantly picking up and putting down the model. If the model has quite large wheel bays, the stilt attachment damage can be fixed relatively easily. I will only use the stilts if there is no other way of supporting the model, such as a rod or wooden dowel inserted in the jet exhaust orifice or hole for the prop with a piston engined type.
Doing - Tamiya 1/35th Universal Carrier.
Work is the curse of the modelling classes!
IPMS#12300
Work is the curse of the modelling classes!
IPMS#12300
-
Corricon

- Modelling Gent and Scholar
- Posts: 1035
- Joined: September 3rd, 2017, 2:32 pm
- Location: Huntingdon, Cambs
Re: Shaun's English Electric Lightning F.6
That’s looking the business Shaun
Steve
Now a full time modeller!
Now a full time modeller!
-
RayS
- Modelling Gent and Scholar
- Posts: 2047
- Joined: May 25th, 2013, 8:50 am
- Location: Adelaide, South Australia
- Contact:
Re: Shaun's English Electric Lightning F.6
Thanks Shaun, I thought that might be the case with PVA.ShaunW wrote:Many thanks, guys.
I've tried using PVA in the past to attach temporary stilts, Ray and it didn't hold strongly enough. I'm prepared to accept the damage that poly cement can cause in the wheel wells as I find it much easier to deal with painting and decalling the model when it is on the stilts as opposed to its undercarriage, which can be easily damaged when constantly picking up and putting down the model. If the model has quite large wheel bays, the stilt attachment damage can be fixed relatively easily. I will only use the stilts if there is no other way of supporting the model, such as a rod or wooden dowel inserted in the jet exhaust orifice or hole for the prop with a piston engined type.
I might steal that trick next time I am in the same boat.
Ray
-----------------------
-----------------------
-
ShaunW
- NOT the sheep
- Posts: 26194
- Joined: November 26th, 2011, 6:11 pm
- Location: Pontefract West Yorkshire
Re: Shaun's English Electric Lightning F.6
Steal away, Ray, it's a useful technique for those awkward to handle models during painting and decalling.
I've been basking in the lovely weather over in Scarborough on the east coast, walking and drinking (and I'm not referring just to water!) over the long weekend so nothing has happened here. I'm now back in harness and, all being well, will finish her up over the next few days.
I've been basking in the lovely weather over in Scarborough on the east coast, walking and drinking (and I'm not referring just to water!) over the long weekend so nothing has happened here. I'm now back in harness and, all being well, will finish her up over the next few days.
Doing - Tamiya 1/35th Universal Carrier.
Work is the curse of the modelling classes!
IPMS#12300
Work is the curse of the modelling classes!
IPMS#12300
-
JamesPerrin

- Looks like his avatar
- Posts: 13699
- Joined: April 5th, 2011, 8:09 pm
- Location: W. Yorkshire
- Contact:
Re: Shaun's English Electric Lightning F.6
Use CA. It's brittle and the silts can be snapped off. I use it to mount figures and tiny parts for painting
Classic British Kits SIG Leader Better to fettle than to fill
(2024 A:B 5:2) (2023 13:8:7) (2022 21:11) (2021 15:8) (2020 8:4:4)
(2024 A:B 5:2) (2023 13:8:7) (2022 21:11) (2021 15:8) (2020 8:4:4)
-
ShaunW
- NOT the sheep
- Posts: 26194
- Joined: November 26th, 2011, 6:11 pm
- Location: Pontefract West Yorkshire
Re: Shaun's English Electric Lightning F.6
I hadn't considered CA, James, as I don't really like the stuff and only use it now and again but certainly I will bear it in mind next time I stilt up a model. Ta for the tip.JamesPerrin wrote:Use CA. It's brittle and the silts can be snapped off. I use it to mount figures and tiny parts for painting
Doing - Tamiya 1/35th Universal Carrier.
Work is the curse of the modelling classes!
IPMS#12300
Work is the curse of the modelling classes!
IPMS#12300
-
ShaunW
- NOT the sheep
- Posts: 26194
- Joined: November 26th, 2011, 6:11 pm
- Location: Pontefract West Yorkshire
Re: Shaun's English Electric Lightning F.6
Oh my, it's been a while!
OK here's the latest, progress has been slow due to holidays and gardening requirements. Just before we went away a couple of weeks ago I managed to finish off the Firestreak AAM's:
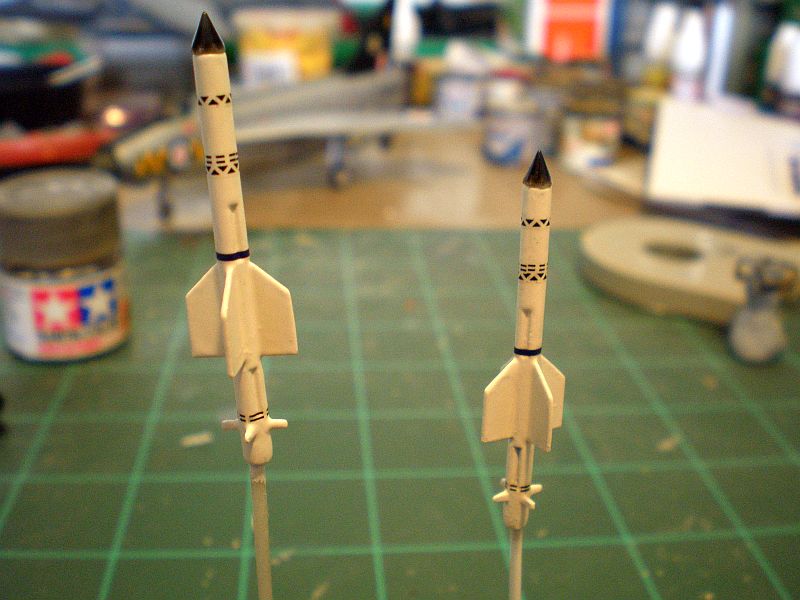
The missiles were brush painted in Hu-130 with the noses (provided as clear parts by Airfix) being coloured with Tamiya Smoke. The decals behaved impeccably, even meeting up perfectly when wrapped around the missile bodies instead of there being a gap due to the decal being too short as is often the case in my experience.
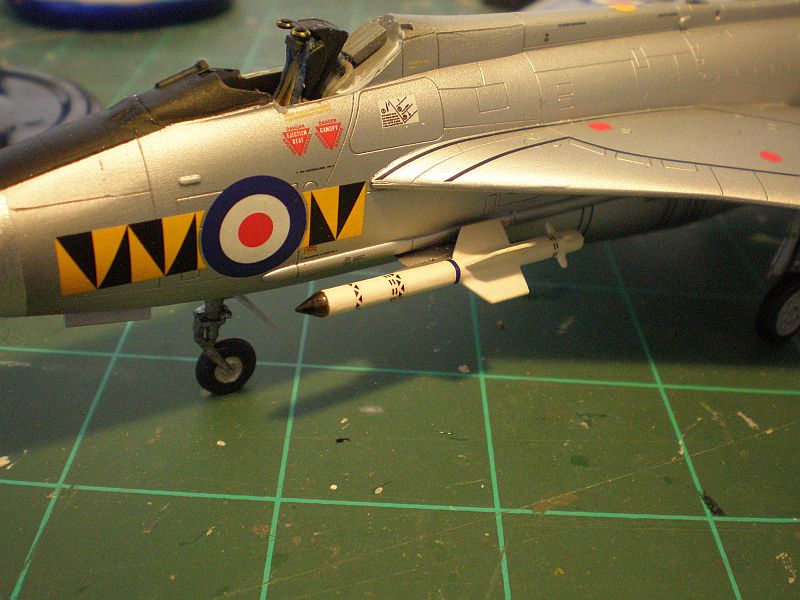
Here's the missiles in place:
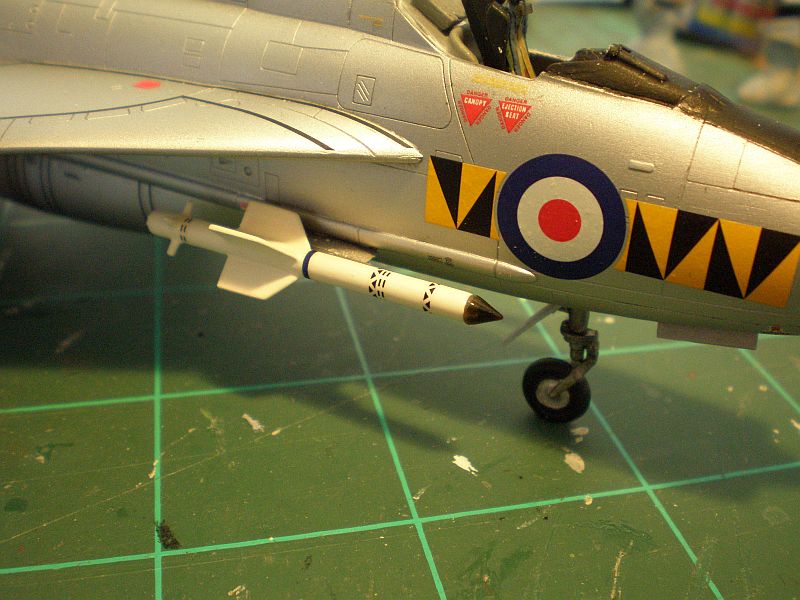
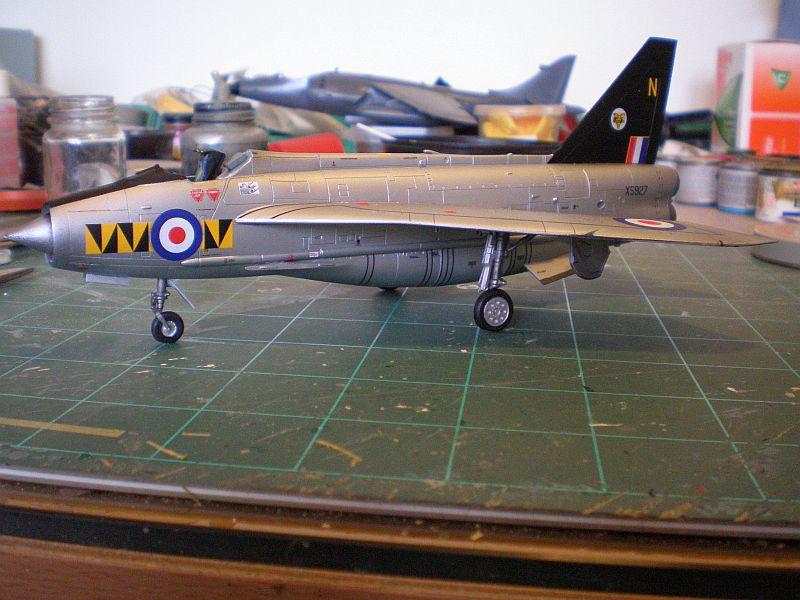
As far as the airframe is concerned, I've now painted the nose ring with Tamiya Chrome Silver and the nose randome with Hu-155. There's a bit of tidying up to do on the paintwork around the nose anti-dazzle panel and then I'll get on with fitting the canopy and the under nose pitot in order to complete the build.
Thanks for looking.
OK here's the latest, progress has been slow due to holidays and gardening requirements. Just before we went away a couple of weeks ago I managed to finish off the Firestreak AAM's:
The missiles were brush painted in Hu-130 with the noses (provided as clear parts by Airfix) being coloured with Tamiya Smoke. The decals behaved impeccably, even meeting up perfectly when wrapped around the missile bodies instead of there being a gap due to the decal being too short as is often the case in my experience.
Here's the missiles in place:
As far as the airframe is concerned, I've now painted the nose ring with Tamiya Chrome Silver and the nose randome with Hu-155. There's a bit of tidying up to do on the paintwork around the nose anti-dazzle panel and then I'll get on with fitting the canopy and the under nose pitot in order to complete the build.
Thanks for looking.
Doing - Tamiya 1/35th Universal Carrier.
Work is the curse of the modelling classes!
IPMS#12300
Work is the curse of the modelling classes!
IPMS#12300