Ernie's Comfy Corner
-
Lone Modeller
- Modelling Gent and Scholar
- Posts: 5345
- Joined: April 1st, 2013, 6:45 pm
Re: Ernie's Comfy Corner
One of our club members is a maritime modeller and has built many submarines. Yours looks every bit as good as his with the subtle but not overdone weathering. It must be difficult to get that right in such a small scale but you seem to have doen so very well indeed.
-
Ernie

- The Bug Has Well And Truly Bitten
- Posts: 354
- Joined: May 1st, 2011, 3:09 am
- Location: A small town in New Hampshire
Re: Ernie's Comfy Corner
Thank you so much for that, I really appreciate it! It was a bit of a challenge to get the weathering subtle but still visible and yet not overdone. I am happy with the balance I achieved, and the finished result.Lone Modeller wrote:One of our club members is a maritime modeller and has built many submarines. Yours looks every bit as good as his with the subtle but not overdone weathering. It must be difficult to get that right in such a small scale but you seem to have doen so very well indeed.
-
Ernie
- The Bug Has Well And Truly Bitten
- Posts: 354
- Joined: May 1st, 2011, 3:09 am
- Location: A small town in New Hampshire
Re: Ernie's Comfy Corner
After a brief interruption the beat goes on. Friday, June 21st I had my colostomy reversal surgery which went really well. Leading up to that and the period after I needed to focus on that procedure and the recovery. My mother has Alzheimer's and my wife and I are her care givers so my biggest fear was if there were complications with me, my wife would have to try to take care of me as well as my mother. Fortunately that was not the case; I hit all the benchmarks I had to and 72 hours after walking into the surgery ward I walked out with everything hooked back up as intended and functioning as normal. So, anyway, now back to modeling! 
I managed to do a bit to the Daphne, there really isn't a lot to the kit,

It built up pretty quickly, though I did make a few additions such as filling the door outline on the port side of the sail, as there is not one on that side. I also scribed in some hatch detail on the deck as there was no detail at all present, and scratch built new masts for the sail from Albion Alloys telescoping tubing. Small bits of stretched sprue were also used for the bits and bollards on the deck just to add a bit more detail.
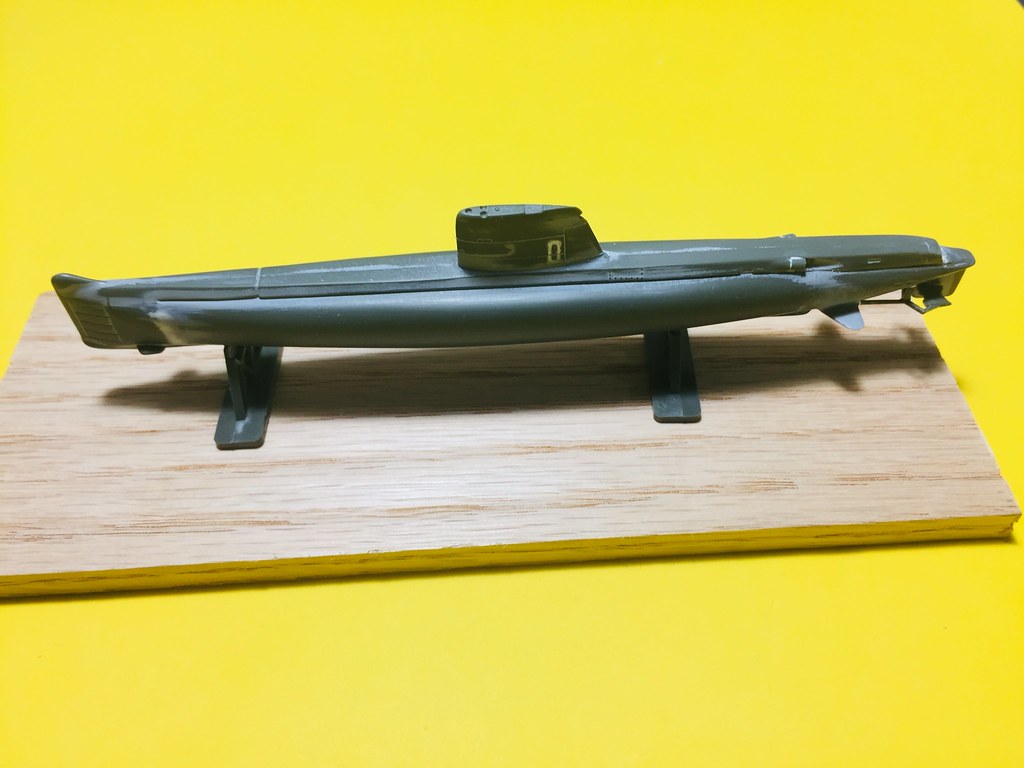
One last overall coat of primer brought everything together and smoothed out the areas that had been filled and sanded ready for the final paint job.

The painting is quite simple as well, overall blueish black. I used some Tamiya XF-85 rubber black with several drops of X-4 blue mixed in until I got a bluish tint to the black.

As the Tu-143's were DNF's in the Soviet GB, I will move then here for the last little bit of work to finish those up as well.
I managed to do a bit to the Daphne, there really isn't a lot to the kit,
It built up pretty quickly, though I did make a few additions such as filling the door outline on the port side of the sail, as there is not one on that side. I also scribed in some hatch detail on the deck as there was no detail at all present, and scratch built new masts for the sail from Albion Alloys telescoping tubing. Small bits of stretched sprue were also used for the bits and bollards on the deck just to add a bit more detail.
One last overall coat of primer brought everything together and smoothed out the areas that had been filled and sanded ready for the final paint job.
The painting is quite simple as well, overall blueish black. I used some Tamiya XF-85 rubber black with several drops of X-4 blue mixed in until I got a bluish tint to the black.
As the Tu-143's were DNF's in the Soviet GB, I will move then here for the last little bit of work to finish those up as well.
-
Clashcityrocker

- Modelling Gent and Scholar
- Posts: 10823
- Joined: May 1st, 2011, 12:31 am
- Location: Adelaide. South Australia
Re: Ernie's Comfy Corner
Good to have you back and everything functioning as it should Ernie. Nice Submarine.
Nigel
Nigel
-
ShaunW
- NOT the sheep
- Posts: 26188
- Joined: November 26th, 2011, 6:11 pm
- Location: Pontefract West Yorkshire
Re: Ernie's Comfy Corner
Indeed that is really excellent news, Ernie and it's good to see you back. Your Heller Daphne is coming along very nicely.
Doing - Tamiya 1/35th Universal Carrier.
Work is the curse of the modelling classes!
IPMS#12300
Work is the curse of the modelling classes!
IPMS#12300
-
Lone Modeller
- Modelling Gent and Scholar
- Posts: 5345
- Joined: April 1st, 2013, 6:45 pm
Re: Ernie's Comfy Corner
Glad to read your good news: I hope that your health continues to be very good. The sub looks good too - especially the small scratch built details.
-
Ernie
- The Bug Has Well And Truly Bitten
- Posts: 354
- Joined: May 1st, 2011, 3:09 am
- Location: A small town in New Hampshire
Re: Ernie's Comfy Corner
Thank you all so much, I am really glad to be past the surgery and back here. I enjoy my hobby especially now and it means a lot to me to be able to share it with such a great and supportive group of people who are the UAMF, I truly appreciate it more than you might realize.
Re: Ernie's Comfy Corner
Its nice to hear good news and I look forward to reading more of your posts in future.
Regards
celt
Regards
celt
-
Ernie
- The Bug Has Well And Truly Bitten
- Posts: 354
- Joined: May 1st, 2011, 3:09 am
- Location: A small town in New Hampshire
Re: Ernie's Comfy Corner
Lots of stuff happening on the workbench  Before going into the hospital for my surgery I cleaned up my workbench and excavated a couple of projects that needed to be worked on. I had also resolved to add no more queens to the shelf, and in fact am making an effort to clear out my started kits. I also have a lot of bagged kits stored that are somewhat inconvenient to organize neatly, and as a consequence of my unexpected illness last fall I have been cataloging all my model related materials for my wife. As a result I have also resolved to try to work my way through the bagged kits to get those out of the way. So, a couple of these are the first of those kits.
Pushed to the side of my table was R2-D2 who was part of the set that included BB-8 that I finished a month or two back. I had all the parts ready for paint, so I picked up from there. I must admit this kit has been the bane of my modeling existence for the past few days. The blue went down well, as did the natural metal (black under coat, Model Master non buffing aluminum metalizer over the black). The white body however was an issue. The first coat of paint came out with a really rough finish, so I stripped it and sprayed it again, and still was not happy, and also I had to rescribe around one of the doors on the front, and wasn't happy with that. So I replaced the frame around the door with Evergreen strip and resprayed again, this time everything looked good. So, it was put aside. I went on to put the blue inserts into R2's head, when I noticed a hairline crack appear So, I removed the inserts and reinforced the seams from the inside with superglue, and then stripped the head and repaired the crack with superglue, it took a couple tries, and one more paint, strip paint, and try again before the seam was mostly gone. I went back to assemble the body and apparently had not cleaned out all the chemicals as I noticed the paint around one of the panels was softening up.
  So, that was cleaned up, masked around and sprayed again..... hopefully that is the last of the repairs on this guy
  He is sitting to the side to let all the pant harden up good and proper before going on.

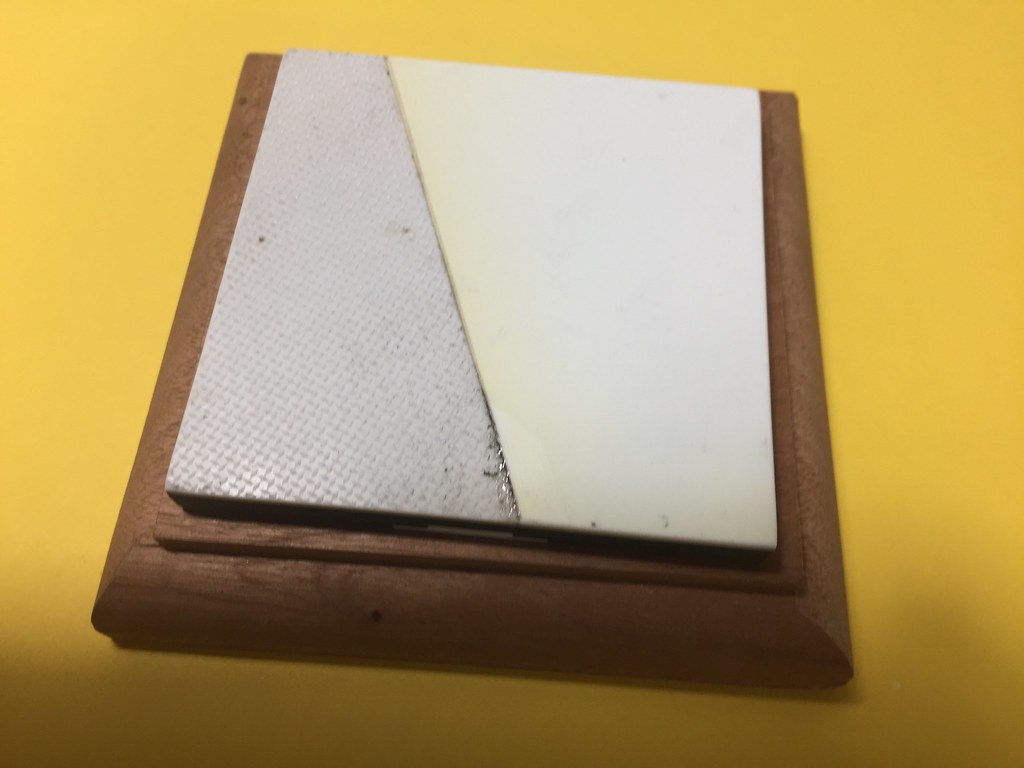
Since it seems that this might make it across the finish line, I decided to start working on the base, I used the basic plastic base from the kit, and added a piece of plastic tread plate that I have had since about forever, and a piece of sheet plastic to form a base with an "industrial" type feel to it.
Pushed to the side of my table was R2-D2 who was part of the set that included BB-8 that I finished a month or two back. I had all the parts ready for paint, so I picked up from there. I must admit this kit has been the bane of my modeling existence for the past few days. The blue went down well, as did the natural metal (black under coat, Model Master non buffing aluminum metalizer over the black). The white body however was an issue. The first coat of paint came out with a really rough finish, so I stripped it and sprayed it again, and still was not happy, and also I had to rescribe around one of the doors on the front, and wasn't happy with that. So I replaced the frame around the door with Evergreen strip and resprayed again, this time everything looked good. So, it was put aside. I went on to put the blue inserts into R2's head, when I noticed a hairline crack appear
Since it seems that this might make it across the finish line, I decided to start working on the base, I used the basic plastic base from the kit, and added a piece of plastic tread plate that I have had since about forever, and a piece of sheet plastic to form a base with an "industrial" type feel to it.
-
Ernie
- The Bug Has Well And Truly Bitten
- Posts: 354
- Joined: May 1st, 2011, 3:09 am
- Location: A small town in New Hampshire
Re: Ernie's Comfy Corner
Next up is a kit I have wanted to build for a while. This one is a pure nostalgia build as the kit itself is not a very accurate representation of the real vessel, but it is an interesting snapshot in time at what it was though the Soviet's latest doomsday missile submarine looked like back in the early 1960's.

Ironically, the historical notes on the kits instruction sheet offer a fairly accurate assessment of the Golf III submarine, though the kit would need a new bow and the deepened keel midship that allowed for the missile tubes, for a start at making an accurate replica. There are now decent 1/350 scale Golf III kits available, so the best thing to do with this kit is to build it the way Aurora intended it to be built. Plus, it has been years since I have built an Aurora kit, so it is nice to take the time again to build a kit produced by one of the icons of our hobby.
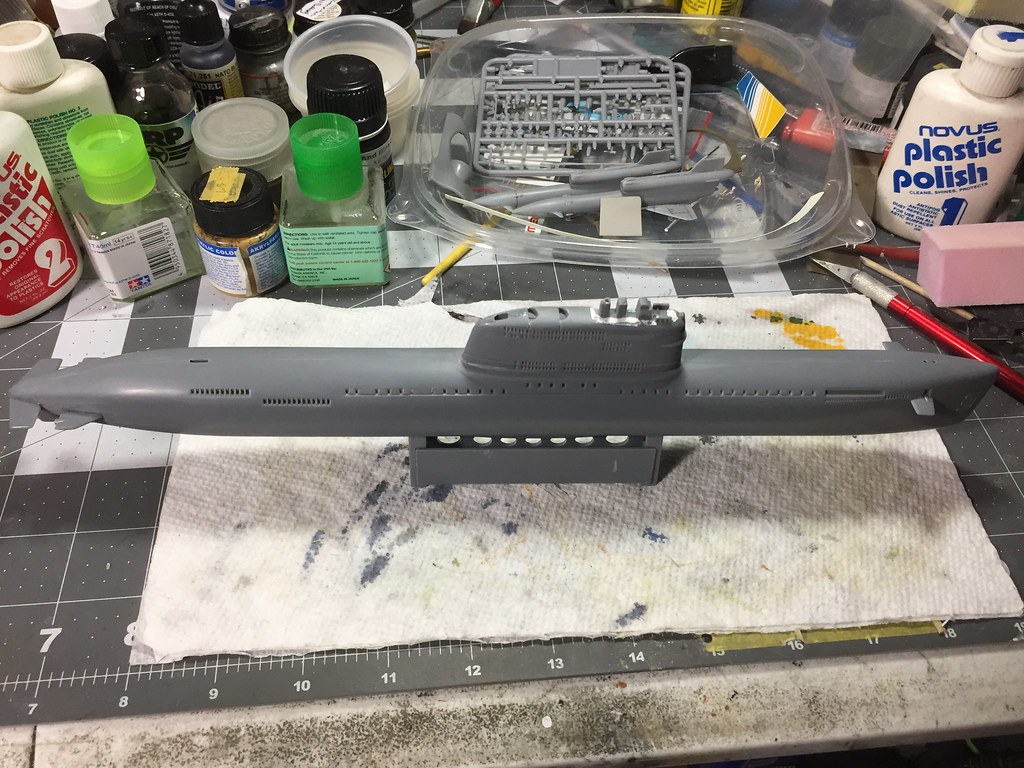
I got most of the model assembled this afternoon, and a lot of the seam work done. It is sitting on the stand that came in the kit, I will probably use it to display the finished model. I know I am old, but I am still amazed at how old many kits are when I get around to building them. This is the 1973 issue of the kit, 46 years old.....I remember seeing it in h the local department store when I was kid. In an odd sort of way, it is kind of comforting to be building a kit now that I remember from my childhood.
The Tu-143's are all assembled, once again, I am very impressed with these kits.
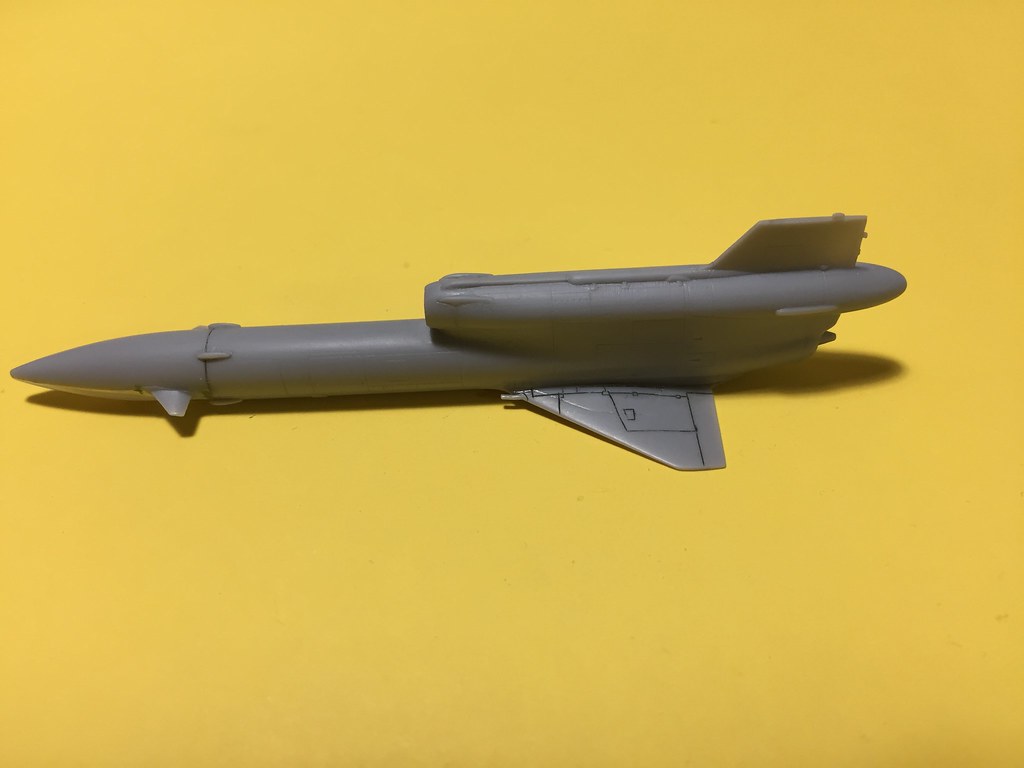
One will have it's landing gear retracted, the kit supplies plastic gear doors with the landing pads molded on. These needed considerable sanding down to fit correctly, flush with the surface of the wing. It was at this point I got one of those rare (for me) "ah ha" moments; I cut out the photo etched landing gear doors meant to be used on the extended landing gear and tried to fit those to the gear well openings in the closed position, they fit like a charm!

It was now just a matter of using the separate pads for the extended gear option and gluing them in place at the end of the gear doors, quick, easy, and looks just right! These have been checked over and are about ready for the paint barn.
The Daphne has been decaled and attached to its base. It just needs the rigging added and a name plate designed, printed, and added to the base. That kit is an original issue from 1979, so it is 40 years old! The decals worked perfectly much to my surprise and delight. It has also been a very long time since I have built a Heller kit, so I have enjoyed this one very much as well. I can remember when I was a kid going to larger cities with bigger malls and in turn larger hobby shops where I would hang out while my parent shopped around the mall. Anyway, I can still remember my excitement when I would find a couple stacks of Heller, KP, or LS kits just like I had seen in Scale Modeler Magazine. I remember being able to get a couple and when I got home putting them together with all the care and patience I could muster and then displaying them proudly on my bookshelf.
Ironically, the historical notes on the kits instruction sheet offer a fairly accurate assessment of the Golf III submarine, though the kit would need a new bow and the deepened keel midship that allowed for the missile tubes, for a start at making an accurate replica. There are now decent 1/350 scale Golf III kits available, so the best thing to do with this kit is to build it the way Aurora intended it to be built. Plus, it has been years since I have built an Aurora kit, so it is nice to take the time again to build a kit produced by one of the icons of our hobby.
I got most of the model assembled this afternoon, and a lot of the seam work done. It is sitting on the stand that came in the kit, I will probably use it to display the finished model. I know I am old, but I am still amazed at how old many kits are when I get around to building them. This is the 1973 issue of the kit, 46 years old.....I remember seeing it in h the local department store when I was kid. In an odd sort of way, it is kind of comforting to be building a kit now that I remember from my childhood.
The Tu-143's are all assembled, once again, I am very impressed with these kits.
One will have it's landing gear retracted, the kit supplies plastic gear doors with the landing pads molded on. These needed considerable sanding down to fit correctly, flush with the surface of the wing. It was at this point I got one of those rare (for me) "ah ha" moments; I cut out the photo etched landing gear doors meant to be used on the extended landing gear and tried to fit those to the gear well openings in the closed position, they fit like a charm!
It was now just a matter of using the separate pads for the extended gear option and gluing them in place at the end of the gear doors, quick, easy, and looks just right! These have been checked over and are about ready for the paint barn.
The Daphne has been decaled and attached to its base. It just needs the rigging added and a name plate designed, printed, and added to the base. That kit is an original issue from 1979, so it is 40 years old! The decals worked perfectly much to my surprise and delight. It has also been a very long time since I have built a Heller kit, so I have enjoyed this one very much as well. I can remember when I was a kid going to larger cities with bigger malls and in turn larger hobby shops where I would hang out while my parent shopped around the mall. Anyway, I can still remember my excitement when I would find a couple stacks of Heller, KP, or LS kits just like I had seen in Scale Modeler Magazine. I remember being able to get a couple and when I got home putting them together with all the care and patience I could muster and then displaying them proudly on my bookshelf.
-
Lone Modeller
- Modelling Gent and Scholar
- Posts: 5345
- Joined: April 1st, 2013, 6:45 pm
Re: Ernie's Comfy Corner
Some nostalgic moments for you Ernie. I am sure that for the rest of us over a certain age(?!) some kits can also bring back memories (happy or otherwise). They certainly do for me even though I no longer build them. Just seeing the efforts of others is enough to bring memories flooding back for me.
The Aurora sub looks good to me - and apart from afficionardos, whoowould know that the shape of the hull is incorrect?
The Aurora sub looks good to me - and apart from afficionardos, whoowould know that the shape of the hull is incorrect?
-
Ernie
- The Bug Has Well And Truly Bitten
- Posts: 354
- Joined: May 1st, 2011, 3:09 am
- Location: A small town in New Hampshire
Re: Ernie's Comfy Corner
So, after another brief interruption brought on by real life, I will again pick up where I left off. Both the Daphne and the Aurora sub have been finished. Apparently, this has become the year of the sub for me, and three more are under construction, with two hopefully being completed before the new year.
First up are these two little guys, a pair of Iranian Ghadir class subs. I never really though of Iran as having a submarine fleet, but it seems they do! These are produced by OKB Grigorov.

These things are really tiny, and while there are two in the box, I figure if I can get one complete out of the two I will be doing good. It has been along time since I have built a 1/700 scale ship so this will be a fun (hopefully) challenge.

Fits my pinky quite well!
And, also is this one, a Pit Road 1/350 scale JMSDF Yushio sub. This is a shelf queen that needs to get finished up, so I figured I would take care of that but will hopefully be the first completion of the new year.

Basically I just got the hull together and that was it before it was put away in favor of something else. I have since gotten it together and begun painting it. Those photos will come tomorrow.
So, anyway, very happy to be back building and sharing again!
First up are these two little guys, a pair of Iranian Ghadir class subs. I never really though of Iran as having a submarine fleet, but it seems they do! These are produced by OKB Grigorov.
These things are really tiny, and while there are two in the box, I figure if I can get one complete out of the two I will be doing good. It has been along time since I have built a 1/700 scale ship so this will be a fun (hopefully) challenge.
Fits my pinky quite well!
And, also is this one, a Pit Road 1/350 scale JMSDF Yushio sub. This is a shelf queen that needs to get finished up, so I figured I would take care of that but will hopefully be the first completion of the new year.
Basically I just got the hull together and that was it before it was put away in favor of something else. I have since gotten it together and begun painting it. Those photos will come tomorrow.
So, anyway, very happy to be back building and sharing again!
-
ShaunW
- NOT the sheep
- Posts: 26188
- Joined: November 26th, 2011, 6:11 pm
- Location: Pontefract West Yorkshire
Re: Ernie's Comfy Corner
Great sub building, Earnie and certainly that Iranian vessel is very diminutive (looking at the photo on the box as well as the kit) and I would think almost classes as a mini-sub!
Doing - Tamiya 1/35th Universal Carrier.
Work is the curse of the modelling classes!
IPMS#12300
Work is the curse of the modelling classes!
IPMS#12300
-
Ernie
- The Bug Has Well And Truly Bitten
- Posts: 354
- Joined: May 1st, 2011, 3:09 am
- Location: A small town in New Hampshire
Re: Ernie's Comfy Corner
Thank you Shaun, I believe you are correct and the Iranian subs are indeed classed as mini subs. Even still though they are cool and will make a unique addition to the other subs I have built.
-
Clashcityrocker
- Modelling Gent and Scholar
- Posts: 10823
- Joined: May 1st, 2011, 12:31 am
- Location: Adelaide. South Australia
Re: Ernie's Comfy Corner
I've thrown out larger pieces of plastic than that Iranian sub 
Nigel
Nigel