Aeroclub 1/72 English Electric P.1A conv
-
Eric Mc

- Modelling Gent and Scholar
- Posts: 4813
- Joined: May 3rd, 2011, 8:27 am
- Location: Farnborough, Hants
Re: Aeroclub 1/72 English Electric P.1A conv
Impressive stuff so far.
-
ShaunW
- NOT the sheep
- Posts: 26188
- Joined: November 26th, 2011, 6:11 pm
- Location: Pontefract West Yorkshire
Re: Aeroclub 1/72 English Electric P.1A conv
That is a great piece of modelling in making those wheel wells more accurate, James.
Doing - Tamiya 1/35th Universal Carrier.
Work is the curse of the modelling classes!
IPMS#12300
Work is the curse of the modelling classes!
IPMS#12300
-
iggie

- Modelling Gent and Scholar
- Posts: 23438
- Joined: July 31st, 2013, 11:04 am
- Location: North Somercotes, Lincolnshire
- Contact:
Re: Aeroclub 1/72 English Electric P.1A conv
A superb bit of proper modelling James 

Best wishes
Jim
If you can walk away from a landing, it's a good landing. If you use the airplane the next day, it's an outstanding landing
"Never put off till tomorrow, what you can do the day after tomorrow"
Jim
If you can walk away from a landing, it's a good landing. If you use the airplane the next day, it's an outstanding landing
"Never put off till tomorrow, what you can do the day after tomorrow"
-
Barry
- Modelling Gent and Scholar
- Posts: 2612
- Joined: May 1st, 2011, 1:23 am
- Location: Eastvale, California, USA
Re: Aeroclub 1/72 English Electric P.1A conv
Great stuff there James. I had thought Maintrack did this one in their 'Project X' series but, apparently not.
2012 A:12 B:13 C:0
Re: Aeroclub 1/72 English Electric P.1A conv
Impressive job so far
-
JohnRatzenberger

- Why is he so confused ?
- Posts: 15734
- Joined: April 5th, 2011, 3:42 pm
- Location: Living on a sandbar - Nags Head, NC.
Re: Aeroclub 1/72 English Electric P.1A conv
Good modelling, education, and entertainment !!
John Ratzenberger 
It's my model and I'll do what I want with it.
It's my model and I'll do what I want with it.
-
JamesPerrin

- Looks like his avatar
- Posts: 13695
- Joined: April 5th, 2011, 8:09 pm
- Location: W. Yorkshire
- Contact:
Re: Aeroclub 1/72 English Electric P.1A conv
Re-scribing time!
So in the past I've used the existing panel-lines as guides for rescribing. However, it soon became clear the existing ones on the wings weren't going to helpful, so the first job was to sand them off. This left me with a satin finish which serendipitously made it a lot easier to mark out the correct panel lines in pencil.
To transfer to panel-lines from the plans a mixture of methods were employed. Those at the edge of the wings could be marked off from the plans. The square is used to draw perpendicular lines from these marks. Compass and dividers are used to transfer distances from known points. The metal strip is SAM magazine's scale ruler which is thin PE and an excellent tool that I've used since its first release (30yrs ago?). I worked on both wings simultaneously so that the divider settings were consistent. The circle template was used for the distinct arc in the main spar. Some more complex inner wing panel lines were done by cutting out the shape from the plans and using it as a guide. Radiating lines were extended onto the template so that the correct angles could be transferred.
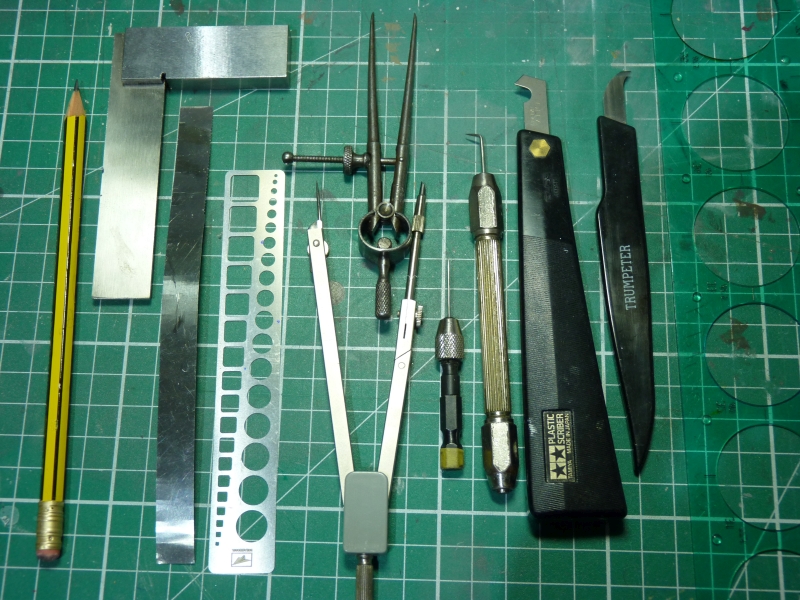
With all the main panels marked out, rescribing could begin. Now there are more than enough scribing tools out there and frankly, you can do everything with a sewing needle in a pin-vice (eg my Wessex build) however they all have their pros and cons.
* sewing/airbrush needle, I have both the latter from a defunct airbrush and bent at an angle these can do everything but they are necessary for when you want to do curves or follow scribing small templates. They tend to plow the plastic rather than remove it, so you need to sand away the raised burr, clean out the furrow and then a good idea is to run a bit of Tamiya extra thin to soften any roughness.
* the Olfa cutter (designed to score and snap plastic sheet), rebadged by Tamiya is a fantastic tool as it removes a tiny Vee of plastic however it's only good on flat surfaces - the shape of the blade stops it from getting into any tight corners. It can be used to make quite deep grooves which are excellent for control surface hinges.
* the Trumpeter tool is a cheaper version; it will cut the same if held at a high enough angle but generally is more a scraper than a cutter, but can get into corners
* razor/PE saw - I have several but one is built into the ruler, this can be used to extend the panel line around tight curves such as the leading edge of the wing.
Bottom wing with just the pencil lines and the top wing rescribed.
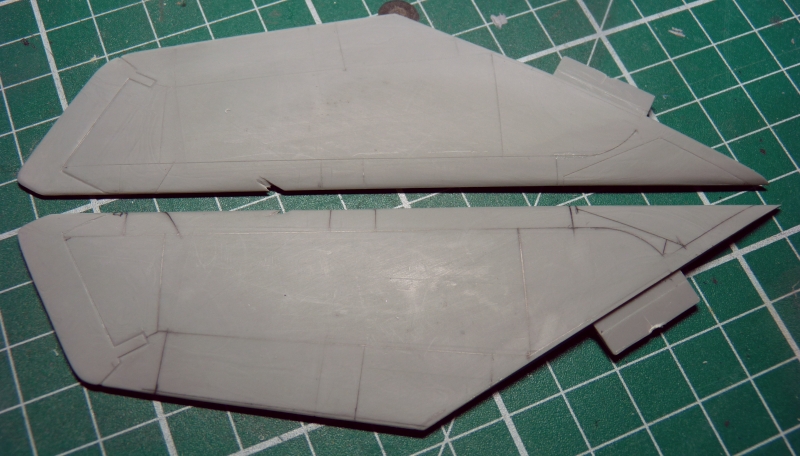
Maintenance and access ports and panels can then be added, a good set of scribing templates are a boon - mine say "Dream works" and I bought them off eBay some time ago. There are two others ( rectangles and ovals ) plus a rivetting guide in the set.
So in the past I've used the existing panel-lines as guides for rescribing. However, it soon became clear the existing ones on the wings weren't going to helpful, so the first job was to sand them off. This left me with a satin finish which serendipitously made it a lot easier to mark out the correct panel lines in pencil.
To transfer to panel-lines from the plans a mixture of methods were employed. Those at the edge of the wings could be marked off from the plans. The square is used to draw perpendicular lines from these marks. Compass and dividers are used to transfer distances from known points. The metal strip is SAM magazine's scale ruler which is thin PE and an excellent tool that I've used since its first release (30yrs ago?). I worked on both wings simultaneously so that the divider settings were consistent. The circle template was used for the distinct arc in the main spar. Some more complex inner wing panel lines were done by cutting out the shape from the plans and using it as a guide. Radiating lines were extended onto the template so that the correct angles could be transferred.
With all the main panels marked out, rescribing could begin. Now there are more than enough scribing tools out there and frankly, you can do everything with a sewing needle in a pin-vice (eg my Wessex build) however they all have their pros and cons.
* sewing/airbrush needle, I have both the latter from a defunct airbrush and bent at an angle these can do everything but they are necessary for when you want to do curves or follow scribing small templates. They tend to plow the plastic rather than remove it, so you need to sand away the raised burr, clean out the furrow and then a good idea is to run a bit of Tamiya extra thin to soften any roughness.
* the Olfa cutter (designed to score and snap plastic sheet), rebadged by Tamiya is a fantastic tool as it removes a tiny Vee of plastic however it's only good on flat surfaces - the shape of the blade stops it from getting into any tight corners. It can be used to make quite deep grooves which are excellent for control surface hinges.
* the Trumpeter tool is a cheaper version; it will cut the same if held at a high enough angle but generally is more a scraper than a cutter, but can get into corners
* razor/PE saw - I have several but one is built into the ruler, this can be used to extend the panel line around tight curves such as the leading edge of the wing.
Bottom wing with just the pencil lines and the top wing rescribed.
Maintenance and access ports and panels can then be added, a good set of scribing templates are a boon - mine say "Dream works" and I bought them off eBay some time ago. There are two others ( rectangles and ovals ) plus a rivetting guide in the set.
Classic British Kits SIG Leader Better to fettle than to fill
(2024 A:B 5:2) (2023 13:8:7) (2022 21:11) (2021 15:8) (2020 8:4:4)
(2024 A:B 5:2) (2023 13:8:7) (2022 21:11) (2021 15:8) (2020 8:4:4)
-
DavidWomby

- Modelling Gent and Scholar
- Posts: 11765
- Joined: May 1st, 2011, 8:09 pm
- Location: Florida, USA
Re: Aeroclub 1/72 English Electric P.1A conv
My goodness, James. That's a tour de force, man!
David
David
-
B4en

- Modelling Gent and Scholar
- Posts: 1145
- Joined: February 8th, 2014, 9:58 am
- Location: South Yorkshire
Re: Aeroclub 1/72 English Electric P.1A conv
This is some stunning work James, and thanks for all the tips. You are actually making me consider buying a vacform again for the first time in nearly 50 years! 
The past, present, and future walked into a bar. It was tense.
-
iggie
- Modelling Gent and Scholar
- Posts: 23438
- Joined: July 31st, 2013, 11:04 am
- Location: North Somercotes, Lincolnshire
- Contact:
Re: Aeroclub 1/72 English Electric P.1A conv
Fantastic work
Best wishes
Jim
If you can walk away from a landing, it's a good landing. If you use the airplane the next day, it's an outstanding landing
"Never put off till tomorrow, what you can do the day after tomorrow"
Jim
If you can walk away from a landing, it's a good landing. If you use the airplane the next day, it's an outstanding landing
"Never put off till tomorrow, what you can do the day after tomorrow"
-
RayS

- Modelling Gent and Scholar
- Posts: 2042
- Joined: May 25th, 2013, 8:50 am
- Location: Adelaide, South Australia
- Contact:
Re: Aeroclub 1/72 English Electric P.1A conv
Now this is some modelling, vacform work and scratch building!
I like!
I like!
Ray
-----------------------
-----------------------
-
X12A

- Modelling Gent and Scholar
- Posts: 1327
- Joined: October 5th, 2020, 6:30 pm
- Location: The New Forest, UK
Re: Aeroclub 1/72 English Electric P.1A conv
This is why I don't call myself a modeller (just someone who can cement plastic together) - great work James, looking forward to seeing the finished product.
-
Stuart

- Raider of the Lost Ark Royal
- Posts: 19451
- Joined: February 25th, 2013, 4:55 pm
- Location: North Wales
- Contact:
Re: Aeroclub 1/72 English Electric P.1A conv
Just catching up with this James. An excellent bit of work thus far, and some very useful descriptions of what/how you're doing. Looking forward to seeing how this goes together.
Stuart Templeton I may not be good but I'm slow...
My Blog: https://stuartsscalemodels.blogspot.com/
My Blog: https://stuartsscalemodels.blogspot.com/
-
JamesPerrin
- Looks like his avatar
- Posts: 13695
- Joined: April 5th, 2011, 8:09 pm
- Location: W. Yorkshire
- Contact:
Re: Aeroclub 1/72 English Electric P.1A conv
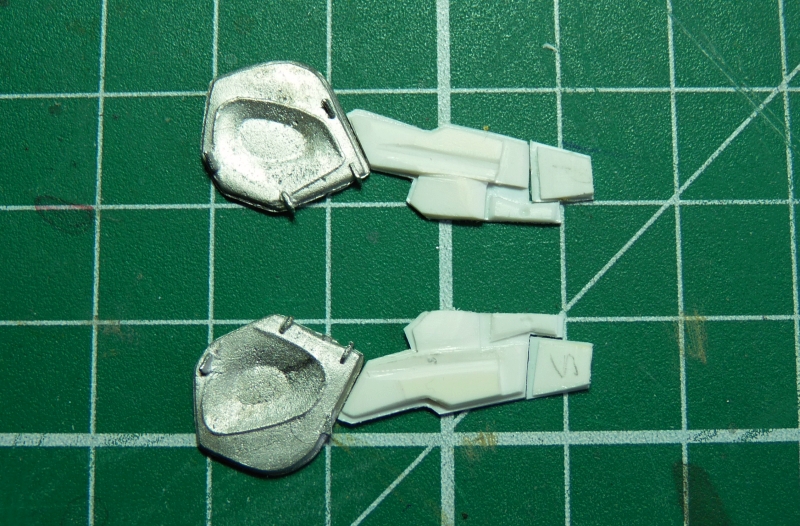
After the wing the main undercarriage doors. Aeroclub provides some nice doors for the wheels, but you are left to fend for yourself for the leg doors. These are complex affairs with numerous surfaces and angles making up the inside of the doors. I did a rough test version to help work things out after making a few sketches from the references I had. Getting these anything like consistent wasn't easy and I've even more appreciation for those who made masters for resin kits before the days of 3D design. The last thing to do was to file the recess for the main legs. Sorry that the photo doesn't show the detail very clearly.
Classic British Kits SIG Leader Better to fettle than to fill
(2024 A:B 5:2) (2023 13:8:7) (2022 21:11) (2021 15:8) (2020 8:4:4)
(2024 A:B 5:2) (2023 13:8:7) (2022 21:11) (2021 15:8) (2020 8:4:4)
-
iggie
- Modelling Gent and Scholar
- Posts: 23438
- Joined: July 31st, 2013, 11:04 am
- Location: North Somercotes, Lincolnshire
- Contact:
Re: Aeroclub 1/72 English Electric P.1A conv
That looks to be very good work James
Best wishes
Jim
If you can walk away from a landing, it's a good landing. If you use the airplane the next day, it's an outstanding landing
"Never put off till tomorrow, what you can do the day after tomorrow"
Jim
If you can walk away from a landing, it's a good landing. If you use the airplane the next day, it's an outstanding landing
"Never put off till tomorrow, what you can do the day after tomorrow"