Tales from the Basement Lab by AndrewR

Show us a view of your workbench / work in progress and build reports too.
User avatar
AndrewR
In the basement lab
Posts: 24121
Joined: April 5th, 2011, 4:13 pm
Location: Ottawa, Ontario, The Great White North
Contact:

Re: Tales from the Basement Lab by AndrewR

Post by AndrewR »

First the Auster:

The rear ski is now glued on, so we are nearly there. A few details on the struts and undercarriage should do it.

Image

Some people in cold weather gear are needed for the display, so I added miliput to some of those terrible cheap railway figures you can buy on ebay at $1 for a hundred!

The originals are the white, skinny figures. The yellow ones will be our intrepid Antarctic explorers. And there will be penguins. :-D
Image

I was not happy with the metallic finish on the port wing of the Vampire T.11 (although it is a work of art compared to that on the Frog Vampire!). I gently sanded it down and respected, with paint from a new bottle.

Image

Much better, but there is a patch on the nose which needs fixing too. :roll:
Up in the Great White North
ShaunW
NOT the sheep
Posts: 26188
Joined: November 26th, 2011, 6:11 pm
Location: Pontefract West Yorkshire

Re: Tales from the Basement Lab by AndrewR

Post by ShaunW »

The Auster is looking great Andrew and the penguins will certainly add to the scene! There's more Vampires in this thread than a Hammer House of Horrors film set :grin: The aircraft is one of those famous types that I haven't got around to building yet.
Doing - Tamiya 1/35th Universal Carrier.

Work is the curse of the modelling classes!
IPMS#12300
User avatar
AndrewR
In the basement lab
Posts: 24121
Joined: April 5th, 2011, 4:13 pm
Location: Ottawa, Ontario, The Great White North
Contact:

Re: Tales from the Basement Lab by AndrewR

Post by AndrewR »

ShaunW wrote:The Auster is looking great Andrew and the penguins will certainly add to the scene! There's more Vampires in this thread than a Hammer House of Horrors film set :grin: The aircraft is one of those famous types that I haven't got around to building yet.
The new Airfix kit is nice, but not perfect. Fit the jet intakes after the wings, not before. Even then you will probably find a few things need filling. That said, it's lightyears ahead of the rest on price/features.

I hope to have the metallic bits finished today, and start on those stripes!

Here's the Vindicator:

Image
Up in the Great White North
User avatar
AndrewR
In the basement lab
Posts: 24121
Joined: April 5th, 2011, 4:13 pm
Location: Ottawa, Ontario, The Great White North
Contact:

Re: Tales from the Basement Lab by AndrewR

Post by AndrewR »

Penguins in production.

Image

I'm trying out these new oil based Sharpies for the first time.

Image

I have to manufacture some beaks now. :grin:
Up in the Great White North
User avatar
AndrewR
In the basement lab
Posts: 24121
Joined: April 5th, 2011, 4:13 pm
Location: Ottawa, Ontario, The Great White North
Contact:

Re: Tales from the Basement Lab by AndrewR

Post by AndrewR »

Beaks from slivers of orange foam. Feet/stands from plastic card.

Image
Up in the Great White North
User avatar
AndrewR
In the basement lab
Posts: 24121
Joined: April 5th, 2011, 4:13 pm
Location: Ottawa, Ontario, The Great White North
Contact:

Re: Tales from the Basement Lab by AndrewR

Post by AndrewR »

All penguins complete.

Image
Up in the Great White North
User avatar
AndrewR
In the basement lab
Posts: 24121
Joined: April 5th, 2011, 4:13 pm
Location: Ottawa, Ontario, The Great White North
Contact:

Re: Tales from the Basement Lab by AndrewR

Post by AndrewR »

The new tool Airfix Vampire is in the paint shop and will be getting orange stripes soon.

Meanwhile, I decided to start another Airfix new tool, the fabric winged Hurricane Mk 1.

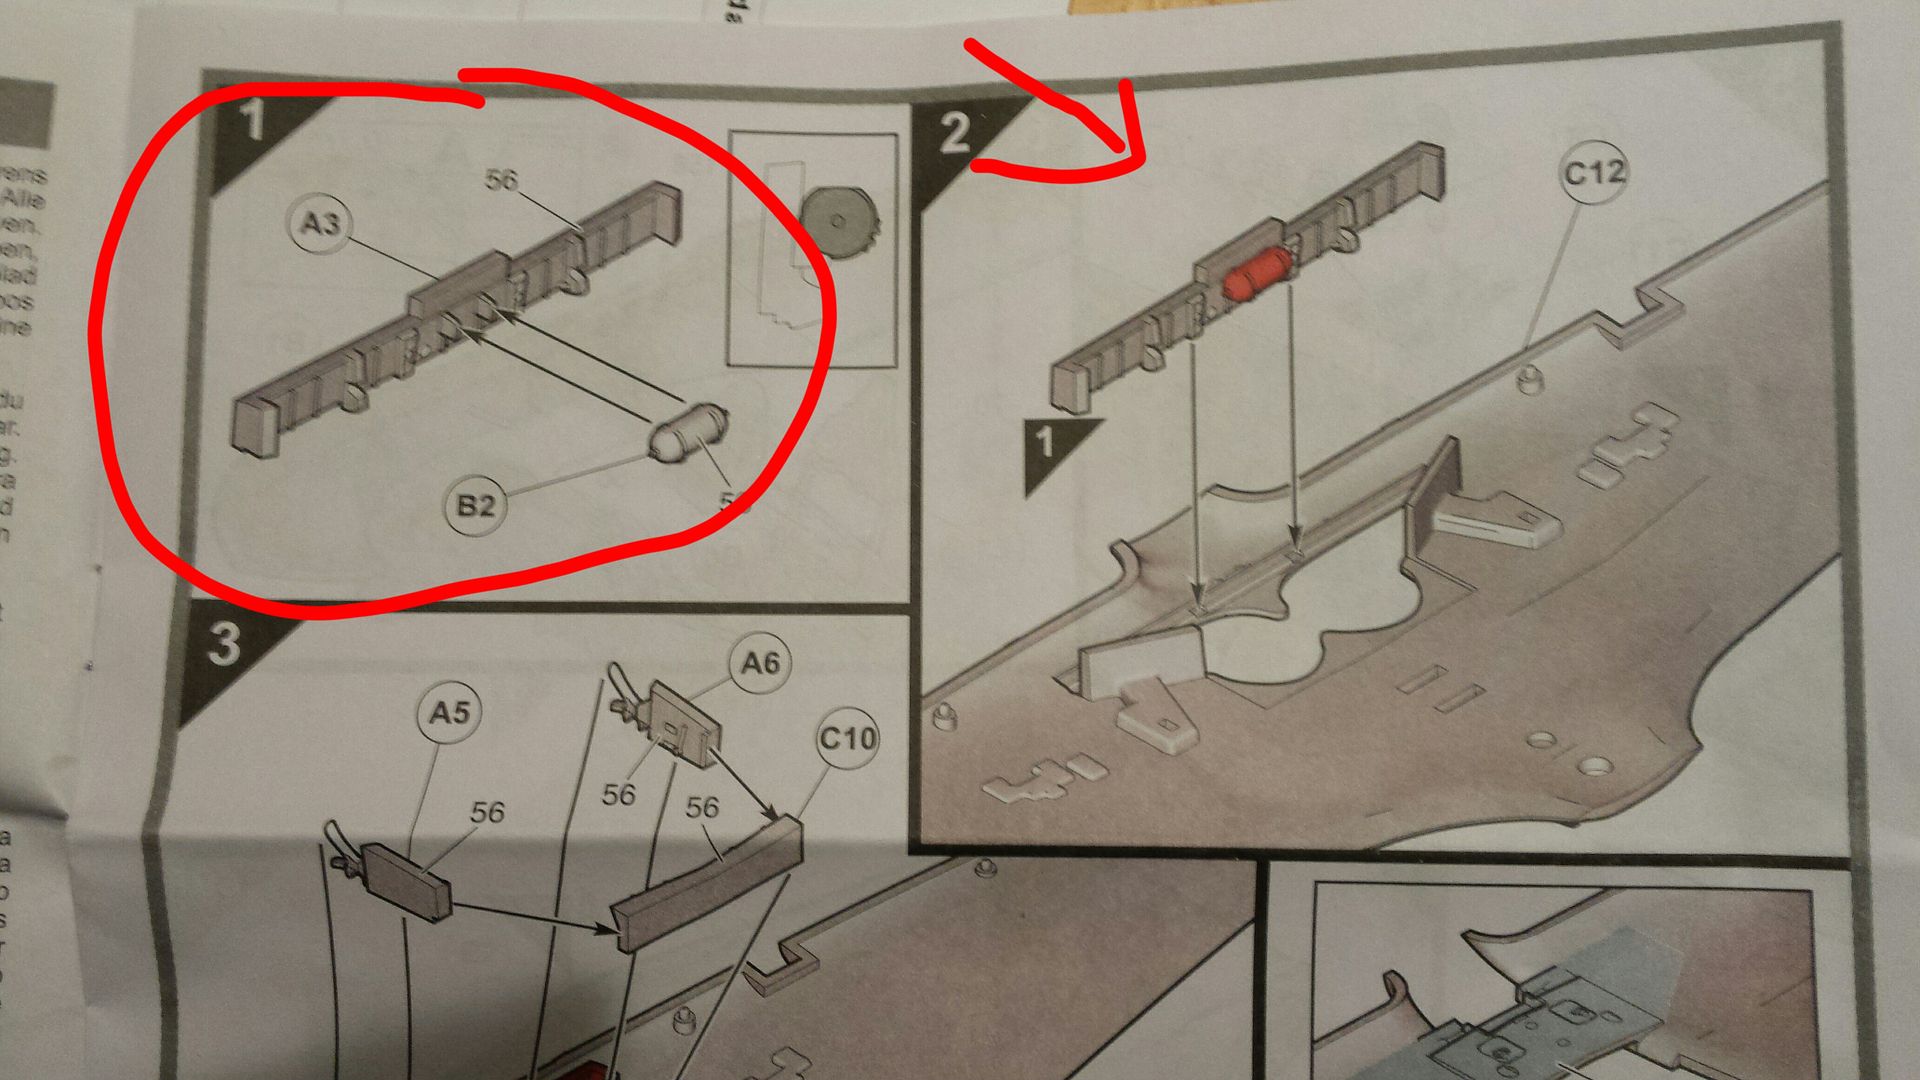
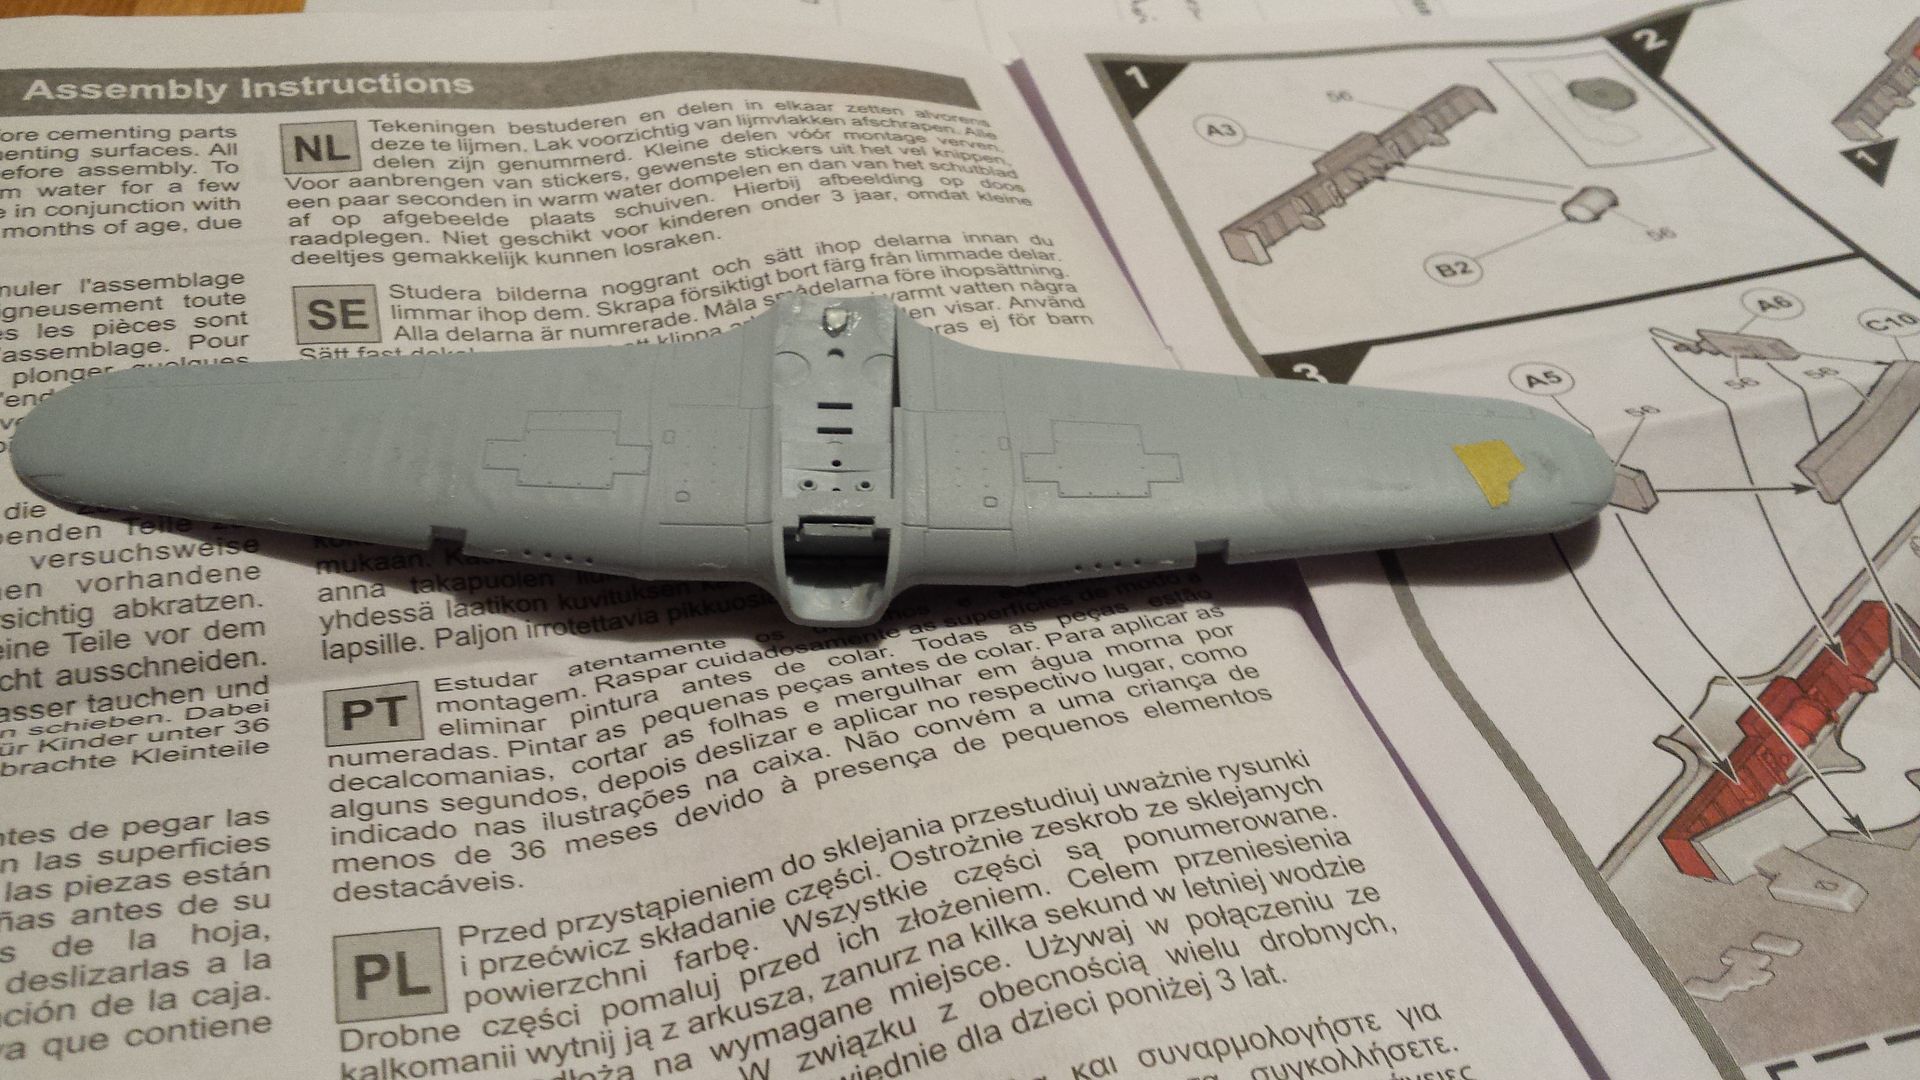
Now this one has been causing consternation because of the poor fit of the wings and the poor fit of the wings to fuselage.

So I did a bit of dry fitting to see what the problem is.

The first problem seems to be the front of the wheelbay . If this is not mounted exactly right, it prevents the upper and lower wings meeting properly in the Centre section.

Image

To try and deal with this problem, I cut the end pieces off this part, and made the tab on top a bit smaller, so that it fits in the slot in the upper wing better. I found it difficult to get the piece to sit vertically, and ended up trimming the protruding pieces on parts A5 and A6 too.

Image

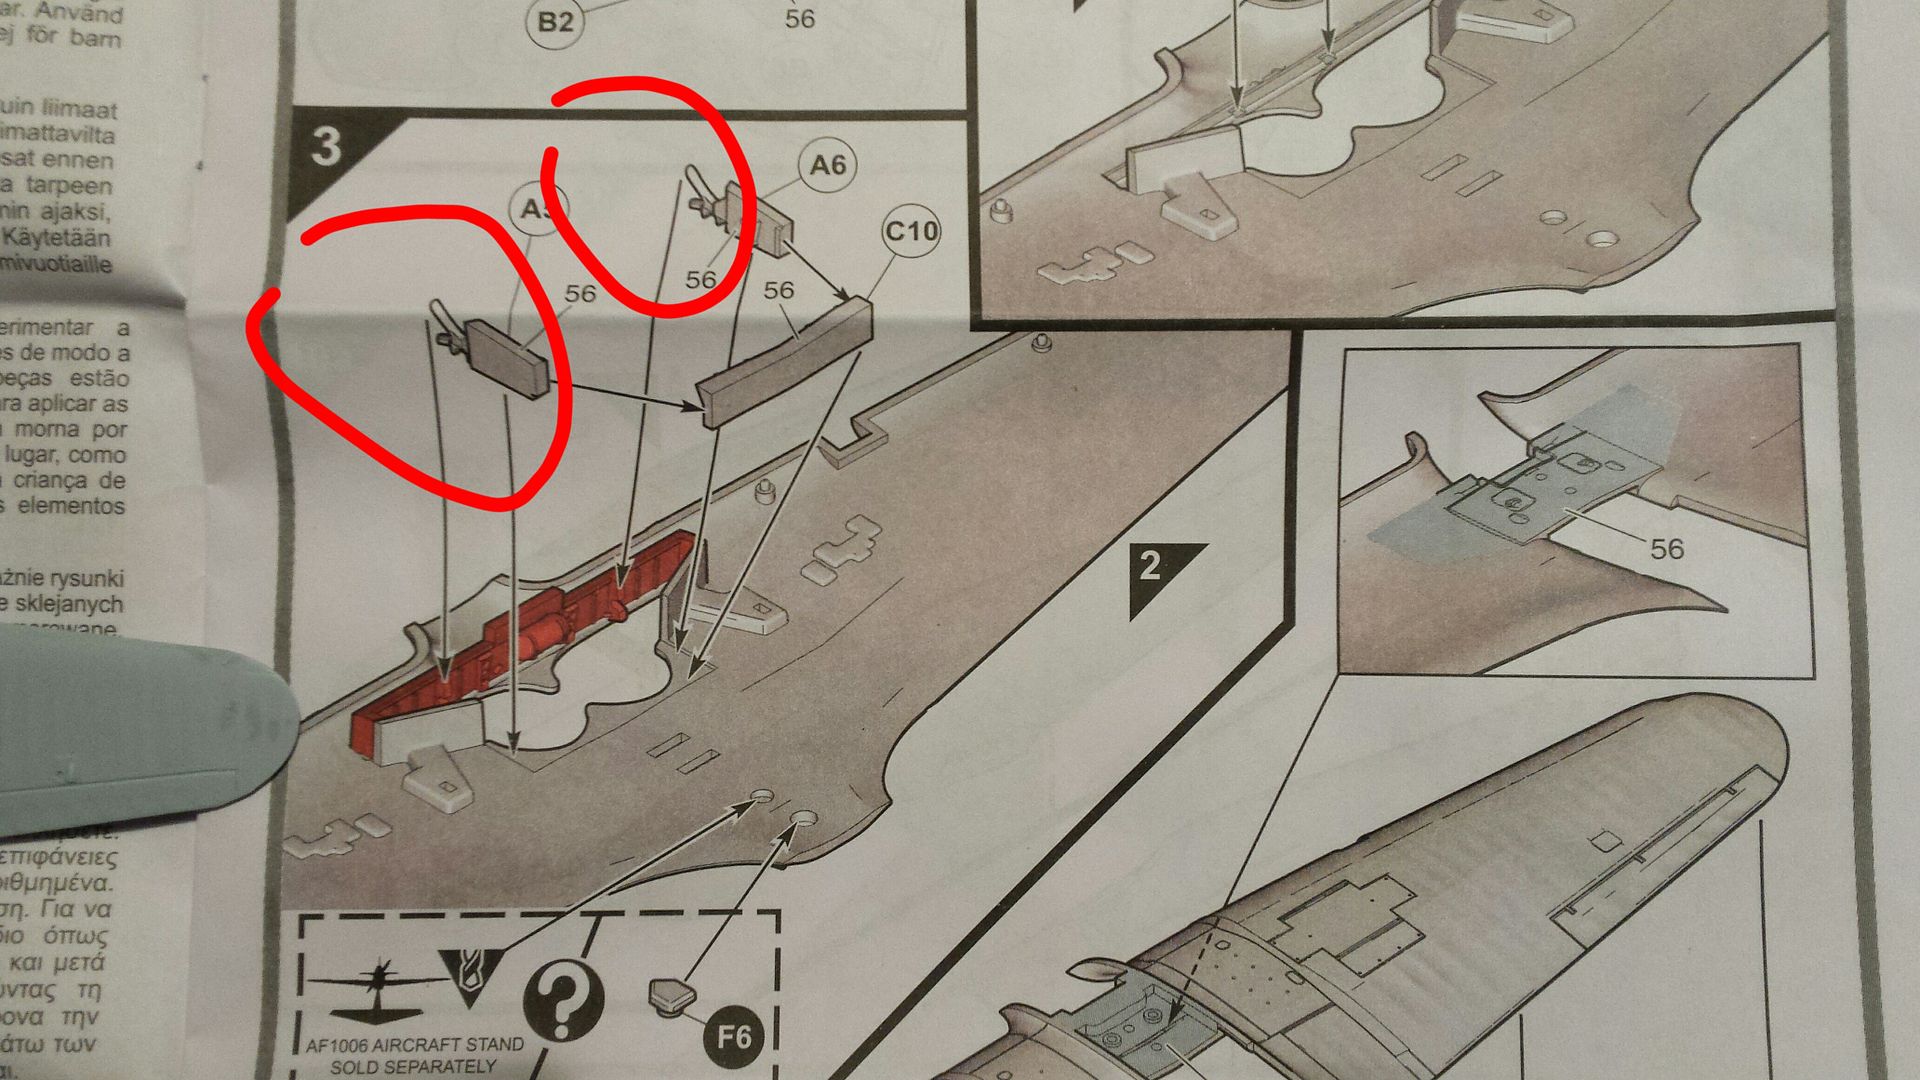
After all this, the centre sections of the upper and lower wings would sit with no gap between them. This turns out to be essential. The wheelbay front is hardly visible, so it can be hacked about with little consequence. :-D

Image

Now,glue the centre sections (only) of the wing together carefully. Align the trailing edges carefully, and you should find a reasonable fit at the front. You may need to clamp it fairly tight to get the leading edge and the trailing edge to be aligned between top and bottom. Do not glue the outer parts of the wing.


Image

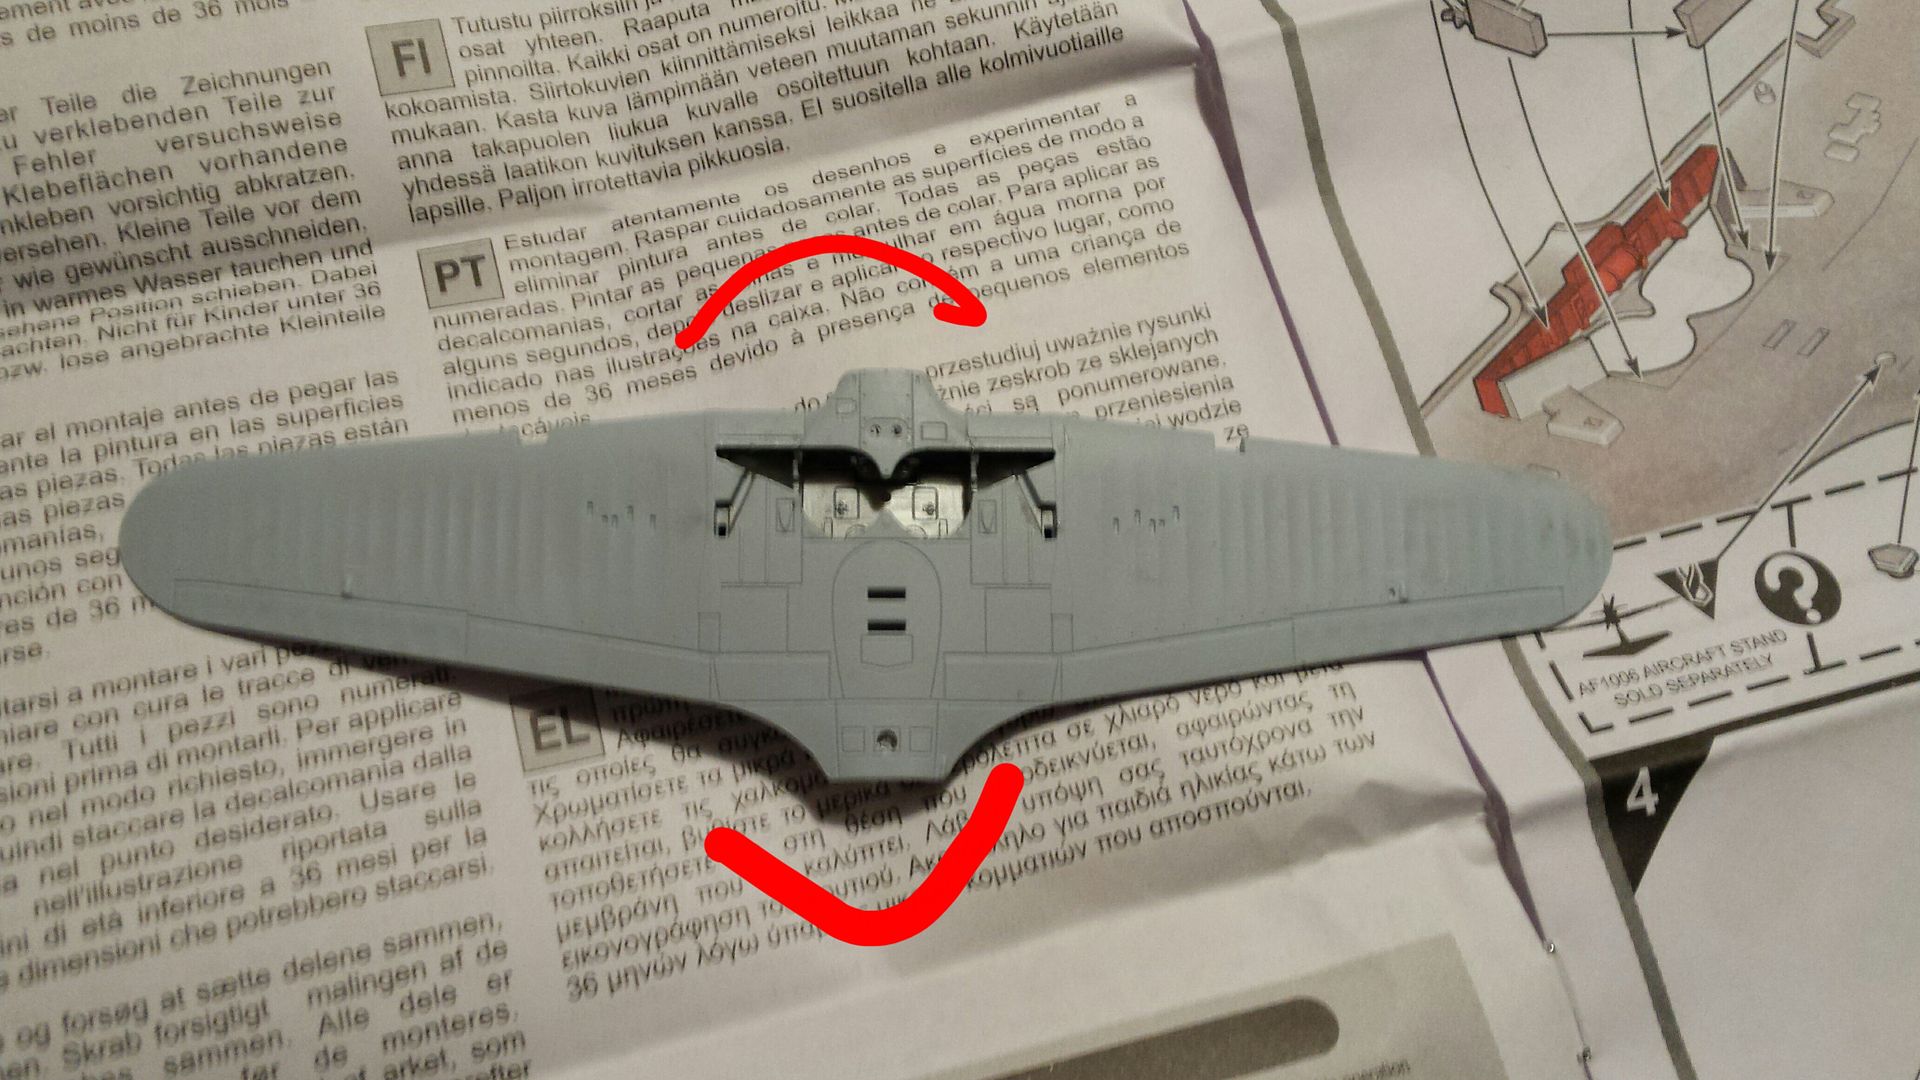
Now bend one side of the lower wing up until the wingtips are aligned top and bottom. This sets the dihedral. Glue into place. Make sure there is glue at the wing root on the trailing edge and clamp it until dry. Now do the other side. Everything should now be aligned, with the correct dihedral set.
Image

This is much too finicky for my liking, but it can be done. The designers have used a tolerance which is too small.

Cheers


Andrew
Up in the Great White North
User avatar
AndrewR
In the basement lab
Posts: 24121
Joined: April 5th, 2011, 4:13 pm
Location: Ottawa, Ontario, The Great White North
Contact:

Re: Tales from the Basement Lab by AndrewR

Post by AndrewR »

Auster on its ski undercarriage. I added the missing struts and a few bits sticking out from the undercarriage.

Image

Paint and a few rigging lines to go!
Up in the Great White North
ShaunW
NOT the sheep
Posts: 26188
Joined: November 26th, 2011, 6:11 pm
Location: Pontefract West Yorkshire

Re: Tales from the Basement Lab by AndrewR

Post by ShaunW »

Those penguins are great - is the one with the longest beak the gaffer then?

The new tool Hurri looks to be a decent enough kit but has the same team been at it that designed the Lancaster - a little too much over engineering in places where it can't been seen perhaps?
Doing - Tamiya 1/35th Universal Carrier.

Work is the curse of the modelling classes!
IPMS#12300
User avatar
AndrewR
In the basement lab
Posts: 24121
Joined: April 5th, 2011, 4:13 pm
Location: Ottawa, Ontario, The Great White North
Contact:

Re: Tales from the Basement Lab by AndrewR

Post by AndrewR »

ShaunW wrote:Those penguins are great - is the one with the longest beak the gaffer then?

The new tool Hurri looks to be a decent enough kit but has the same team been at it that designed the Lancaster - a little too much over engineering in places where it can't been seen perhaps?
That penguin is the Judge - you are up before the beak. :)

Yes, the wheelbay detail is nice, but the offending pieces are completely invisible unless you are one of those people who puts aircraft on mirror shelves. So it tends to throw construction out of whack for very little gain.
The next trick is to get the wings and fuselage together; this had also caused consternation. I think I know how to do it, I have a cunning plan :-D

I think the engineering is too stringent for the variable ability of the builders - and this is a kit aimed at the younger end of the market. You should not really have to do tricks like glue the middle of the wing first, then the tips - it should slot together intuitively.
Up in the Great White North
User avatar
Clashcityrocker
Modelling Gent and Scholar
Posts: 10827
Joined: May 1st, 2011, 12:31 am
Location: Adelaide. South Australia

Re: Tales from the Basement Lab by AndrewR

Post by Clashcityrocker »

Nice tips re the Hurricane. Perhaps I should start mine while they're fresh in my mind :grin:

Nigel
User avatar
AndrewR
In the basement lab
Posts: 24121
Joined: April 5th, 2011, 4:13 pm
Location: Ottawa, Ontario, The Great White North
Contact:

Re: Tales from the Basement Lab by AndrewR

Post by AndrewR »

More Hurricane building today. I had a visit to the dentist this morning :omg so I needed cheering up!

Image

The interior was quite straightforward and fitted together nicely. The rear fuselage piece is just push fitted into the poet fuselage at the moment. I then glued the seat on, so I could get the alignment right.

Image
Image
Image
Image
Up in the Great White North
User avatar
AndrewR
In the basement lab
Posts: 24121
Joined: April 5th, 2011, 4:13 pm
Location: Ottawa, Ontario, The Great White North
Contact:

Re: Tales from the Basement Lab by AndrewR

Post by AndrewR »

A very rough dry fit with nothing stuck together seems to be okay.

Image

BUT the fit is only okay if the rear part of the fuselage is not glued together. Looks like gluing the front half, up to the rear cockpit bulkhead is the way to go. Then fit the wings on and clamp down on the rear fuselage to spread it to to the wing roots. Once again, a bit too clever.
Up in the Great White North
ShaunW
NOT the sheep
Posts: 26188
Joined: November 26th, 2011, 6:11 pm
Location: Pontefract West Yorkshire

Re: Tales from the Basement Lab by AndrewR

Post by ShaunW »

Although there are some fit issues, this does look to be a very nice kit and certainly the interior is a massive improvement on the oldies (not that difficult to achieve I suppose, a decent IP, seat and stick would equate to that alone!) and the external detailing looks great. I've become used to the latest new tool panel lines now and they do reduce a little under primer and paint.
Doing - Tamiya 1/35th Universal Carrier.

Work is the curse of the modelling classes!
IPMS#12300
User avatar
AndrewR
In the basement lab
Posts: 24121
Joined: April 5th, 2011, 4:13 pm
Location: Ottawa, Ontario, The Great White North
Contact:

Re: Tales from the Basement Lab by AndrewR

Post by AndrewR »

ShaunW wrote:Although there are some fit issues, this does look to be a very nice kit and certainly the interior is a massive improvement on the oldies (not that difficult to achieve I suppose, a decent IP, seat and stick would equate to that alone!) and the external detailing looks great. I've become used to the latest new tool panel lines now and they do reduce a little under primer and paint.
The cockpit is nicely done, although I think the IP decal is a bit too black and white. The instrument bevels would not be pure white on that scale. Grey would look better.
The panel lines I can live with. :-D

But the older kit would be a more straightforward build for a beginner.
Up in the Great White North
Post Reply

Return to “Workbench Window”